Finding just the right gift can sometimes seem an impossible task. If you like to work with wood or would like to try, making your holiday gifts can be a way to solve your most difficult gift-giving problems. Creating interesting, useful pieces for your family and friends will be a rewarding experience for you, and the recipients will be pleased with a one-of-a-kind present that will be appreciated well after the holidays pass into memory.
You need not be a master cabinetmaker to build any of the projects in this bulletin. While some are more complicated than others, just follow the step-by-step instructions and illustrations. Its easy.
Materials for these projects may be purchased at hardware stores, lumberyards, and building-supply stores. If a particular type of wood is unavailable, a suitable substitute can be found.
Hand tools will suffice for most of the projects. You dont need a basement full of power tools, but they are useful for some of the operations. The tools for all the projects are listed below.
With a little foresight, any of these projects can be finished in time for the holidays. You can avoid pre-holiday panic by setting aside enough time and organizing your work space. Before you begin, here are some pointers that will yield a stress-free, pleasurable woodworking experience.
Helpful Hints for Woodworking Projects
1. Start with a large, clean work area with adequate ventilation. A clear surface for all your tools and materials will set a positive tone for a successful project and help prevent accidents.
2. Gather all the materials and tools in advance or youll spend more time scrambling for missing items than working!
3. Choose good-quality tools for your work. Worn-out or defective tools can be dangerous and will produce poor results.
4. Be sure you understand all the instructions and order of assembly before commencing. Try to anticipate any problems you will face and come up with solutions.
5. Always check the fit prior to any nailing or gluing operation by clamping the pieces together. A poor fit will lead to an imperfect result or possibly a complete failure with the piece falling apart.
6. Remove all excess glue with a damp cloth from surfaces that will show. Dried glue will mar surfaces to be finished.
7. Do not rush the finish! Sand surfaces and edges smooth and remove dust before finishing with varnish, stain, or paint. Follow the manufacturers directions and allow the proper amount of time between coats. A good finish will reward your care and patience and will enhance the project.
Gifts for Bird Lovers
Who doesnt like to see birds around the property at all times of the year? One of these projects is sure to please anyone who enjoys the entertainment of backyard wildlife. Choose the one that suits your fancy and woodworking skills. The recipient will be pleased, and the birds will sing your praises.
EASY BIRDHOUSE
adapted from HomeMade
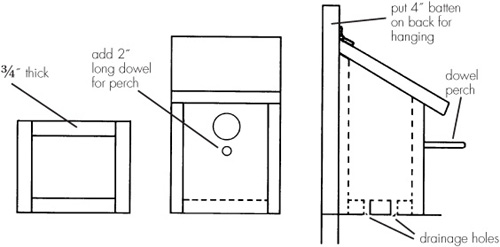
Heres a birdhouse that can be built by children, so its a good project if you have a budding carpenter in your flock. The size is just right for a bluebird, chickadee, titmouse, or wren. If made of cedar, it will provide a fine home for generations of birds. Each year in early spring, be sure to clean out the old nest, because new arrivals like to start from scratch.

Materials and Hardware
western white cedar for:
Front, Back, Sides, and Bottom: 6 40, cut as shown in Roof: 8 8
Batten (for hanging birdhouse): 6 12
Perch: 1 dowel, 2 long
Nails: 6d, galvanized
Hinges: 2, galvanized
.

2. Bore entrance hole so that center of hole is 2 from top of front: 1 in diameter for bluebird, 1 for chickadee, titmouse, or wren. Bore hole deep below entrance hole for dowel perch. Bore 4 drainage holes in bottom (see Figure 2).

3. Nail together sides, front, back, and bottom with 6d galvanized nails. Insert and glue dowel perch in place.
4. Nail batten to back of birdhouse for hanging as shown in Figure 2. Attach hinges to roof and batten.
5. Hang birdhouse six to ten feet above ground in the spring and watch the birds move in.
BIRDFEEDER
adapted from Woodworking Projects for the Great Outdoors
A birdfeeder in the yard will attract wild birds during the winter. Wild birds often find it difficult to find food during this time and will flock to a well-stocked feeder all season. Once you feed wild birds, they become dependent on you for food and you must keep the feeder full at all times.
The food you put out will depend on the birds in your area. A wild bird seed mixture is best for many birds. It is widely available in supermarkets, home-improvement centers, and feed stores. In all probability, the mixture you buy will be right for the birds in your area.
Commercially made birdfeeders can be quite expensive. A do-it-yourselfer with minimum woodworking skills can quickly make an attractive and functional feeder for a modest cost.
While a birdfeeder can be as simple as a board nailed to a windowsill, this project is much more versatile and should last for many seasons with no care other than filling it with seeds.
Materials and Hardware
1 redwood or cedar for:
Top: 11 24
Top: 10 24
Ends: 2 each, 8 13
Base:CDX plywood, 15 23
Parting strips: 2 each, pine, 15
Dividers: 2 each, Plexiglas, 10 15
Hinges: 2 each, galvanized, 2 long
L-Brackets: 2 each, galvanized, 2 long
Waterproof adhesive
Nails: 4d finishing, galvanized
Paint if desired
Post for mounting: 4 4, 7 long


