1997 by Peter Partch
All rights reserved.
Published in the United States by Ten Speed Press, an imprint of the Crown Publishing Group, a division of Random House, Inc., New York.
www.crownpublishing.com
www.tenspeed.com
Ten Speed Press and the Ten Speed Press colophon are registered trademarks of Random House, Inc.
Library of Congress Cataloging in Publication Data available from the publisher.
eISBN: 978-1-60774-375-0
Cover design by Catherine Jacobes
Illustrations by Alexander G. Weygers
The Making of Tools originally published by Van Nostrand Reinhold in 1973.
The Modern Blacksmith originally published by Van Nostrand Reinhold in 1974.
The Recycling, Use, and Repair of Tools originally published by Van Nostrand Reinhold in 1978.
v3.1
CONTENTS
NOTE ON SAFETY
Before attempting any of the procedures described in this book, please be sure to familiarize yourself thoroughly with the . When working with tools, always observe shop safety practices: the safe toolmaker and blacksmith is always careful, systematic, and in control of his tools and materials, avoiding injury to himself, other people, and his tools.
The publisher, copyright holder, and estate of Alexander G. Weygers are not liable for accidents or injury caused by unsafe use of the tools and techniques described in The Complete Modern Blacksmith.
THE
MAKING
OF TOOLS
CONTENTS
Introduction
This book teaches the artist and craftsman how to make his own tools: how to design, sharpen, and temper them.
Having made tools (for myself and for others) for most of my life, I have also enjoyed teaching this very rewarding craft, finding that anyone who is naturally handy can readily succeed in toolmaking. The student can begin with a minimum of equipment, at little expense. Using scrap steel (often available at no cost), he can start by making the simplest tools and gradually progress to more and more difficult ones. Once a student has learned to make his own tools, he will be forever independent of having to buy those not specifically designed for his purpose.
Many students, after three weeks of intensive training under my guidance, have produced sets of wood- and stonecarving tools as fine as my own. And, over the years, the students invariably observe that the value of the fine tools they have made during the short course exceeds the cost of their tuition. One might say they were taught for free, emerging as full-fledged toolmakers, each one carrying home a beautiful set of tools to boot.
The guidelines to toolmaking in this book are identical to the information and explanations I give in class. The drawings are picture translations of my personal demonstrations to students, showing the step-by-step progression from the raw material to the finished product the handmade tool.
1. A Beginners Workshop
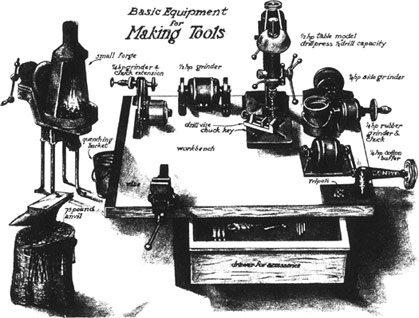
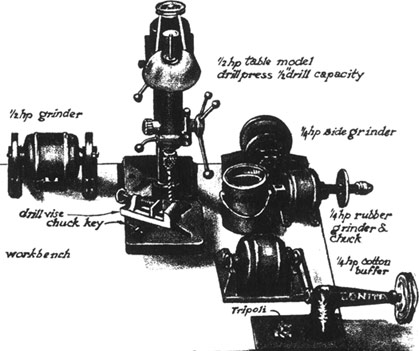
A beginners workshop ought to include the following basic equipment:
A sturdy workbench, onto which are bolted:
Grinder ( hp) and chuck extension
Dry grinding wheel assembly, based on a hp motor grinder
Table-model drill press ( hp; -inch-diameter drill capacity)
Side grinder ( hp)
Rubber abrasive wheel ( hp; can of water adjacent, to cool workpieces)
Buffer ( hp)
Vise (35-pound, or heavier)
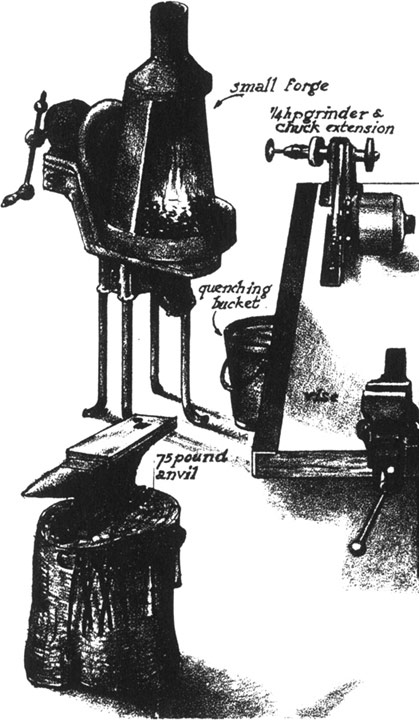
Anvil (25-pound, or heavier; preferably mounted separately, on a freestanding wood stump)
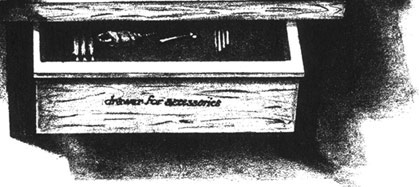
A large drawer under bench, in which to store a cumulative collection of accessory tools: wrenches, files, drills, hammers, center punch, cold chisels, hacksaw, assorted grinding wheels, sanding discs, drill vise, and chuck key, etc.
A small forge, in which to shape and temper your tools (a forge is preferred, though a charcoal brazier will do). To draw temper color, use either a gas flame (as in a kitchen stove), a Bunsen burner, or the blue flame of a plumbers blowtorch fueled with gasoline.
A quenching bucket
A coal bin
This minimum workshop can be equipped very satisfactorily with secondhand articles, provided they are in good working order. Therefore, look for discarded washing-machine motors, surplus-store grinding wheels, hammers, files, etc. Flea markets and garage sales frequently will provide surprisingly useful items with which to complete your shop.
INSTALLATION OF EQUIPMENT
The Workbench
In nine out often hobby shops, workbenches are too flimsy. Instead, they should be as sturdy as possible, to support equipment which is put under great strain. Everything fastened to a heavy workbench benefits from its supporting mass and rigidity. Obviously, for instance, much energy will be wasted if hammer blows are delivered onto workpieces held in an insecure vise on a wobbly or lightweight bench.
The equipment arrangement here is mainly to guide those who have limited space in their workshop. A long, roomy bench built against a strong wall is the ideal arrangement: it allows the various machine units to be spaced out in the most workable and orderly way, while utilizing the wall as additional reinforcement. (Make sure though, that noise will not carry through the wall and disturb neighbors.)
The Bench Vise
The vise shown is not adjustable at its base, but those that are ones that can be turned around and clamped at any angle ought to be bolted at the exact corner of the bench.
Bench vises should not weigh less than twenty-five pounds and the heavier, the better; with luck, you may even find a good secondhand seventy-five-pound monster. Large vises, with wider jaws, can hold bigger workpieces, a great advantage when woodcarvings are to be clamped in them.
The Drill Press
As the most important piece of equipment in your shop, the drill press should not be smaller than that shown here. Bolted onto the bench, its swivel table should be adjustable in every position, and high enough in its lowest position to clear all permanent bench machinery when a long workpiece is clamped on it.
). Once you become familiar with the drill press, your own inventiveness will find many uses for it.
Accessories to the Drill Press
In addition to assorted metal- and wood-cutting drills stored in the bench drawer, one major accessory is the drill-press vise (as shown). Placed on the drill presss swivel base, it is used to hold a workpiece that has previously been marked by a center punch. Firmly held in the vise, it prevents the drill from wandering off these marks.




![Shanks - Essential bicycle maintenance & repair: [step-by-step instructions to maintain and repair your road bike]](/uploads/posts/book/235248/thumbs/shanks-essential-bicycle-maintenance-repair.jpg)
