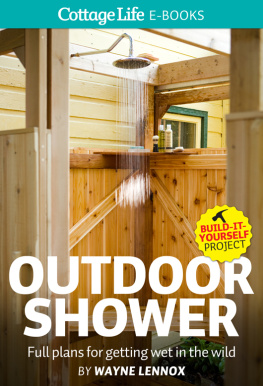
Wayne Lennox - Outdoor Shower: Full plans for getting wet in the wild
Here you can read online Wayne Lennox - Outdoor Shower: Full plans for getting wet in the wild full text of the book (entire story) in english for free. Download pdf and epub, get meaning, cover and reviews about this ebook. year: 2013, publisher: Cottage Life, genre: Home and family. Description of the work, (preface) as well as reviews are available. Best literature library LitArk.com created for fans of good reading and offers a wide selection of genres:
Romance novel
Science fiction
Adventure
Detective
Science
History
Home and family
Prose
Art
Politics
Computer
Non-fiction
Religion
Business
Children
Humor
Choose a favorite category and find really read worthwhile books. Enjoy immersion in the world of imagination, feel the emotions of the characters or learn something new for yourself, make an fascinating discovery.

- Book:Outdoor Shower: Full plans for getting wet in the wild
- Author:
- Publisher:Cottage Life
- Genre:
- Year:2013
- Rating:5 / 5
- Favourites:Add to favourites
- Your mark:
Outdoor Shower: Full plans for getting wet in the wild: summary, description and annotation
We offer to read an annotation, description, summary or preface (depends on what the author of the book "Outdoor Shower: Full plans for getting wet in the wild" wrote himself). If you haven't found the necessary information about the book — write in the comments, we will try to find it.
An outdoor shower is a practical, affordable cottage upgrademuch less expensive than adding a second bathroom, easier to keep clean, and a lot more fun too. Project designer Wayne Lennox provides the detailed instructions, easy-to-follow plans, and complete a materials list that make Cottage Life projects unique. Youll find useful tips on customizing the shower to your site, with options for storage and seating, and easy modifications if you need more privacy (or less). Plus, Cottage Life provides clear plumbing instructions to drain grey water safely and legally.
Wayne Lennox: author's other books
Who wrote Outdoor Shower: Full plans for getting wet in the wild? Find out the surname, the name of the author of the book and a list of all author's works by series.


Outdoor Shower: Full plans for getting wet in the wild — read online for free the complete book (whole text) full work
Below is the text of the book, divided by pages. System saving the place of the last page read, allows you to conveniently read the book "Outdoor Shower: Full plans for getting wet in the wild" online for free, without having to search again every time where you left off. Put a bookmark, and you can go to the page where you finished reading at any time.
Font size:
Interval:
Bookmark:


OUTDOOR SHOWER
A Cottage Life magazine E-Book
Distributed by HarperCollinsCanadaLtd
Copyright 2013 Cottage Life Media, a division of Blue Ant Media Partnership
All rights reserved
ISBN 978-0-9880666-9-4
www.cottagelife.com
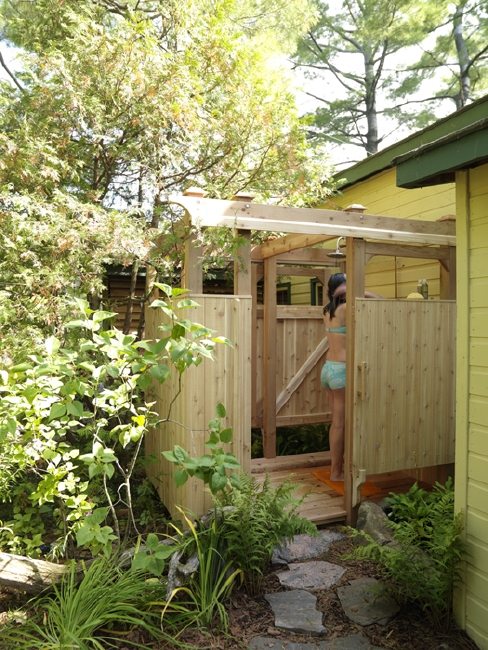
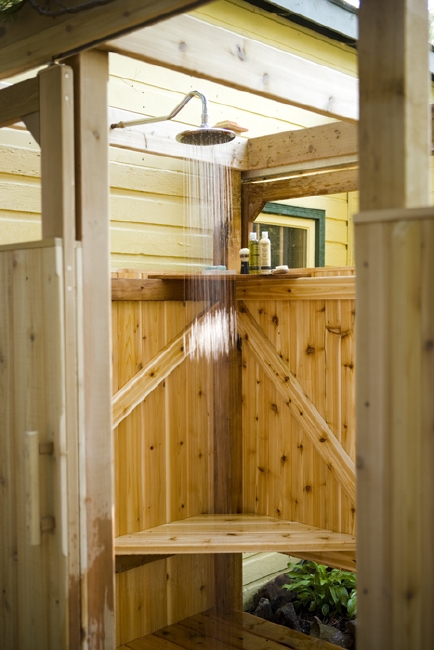
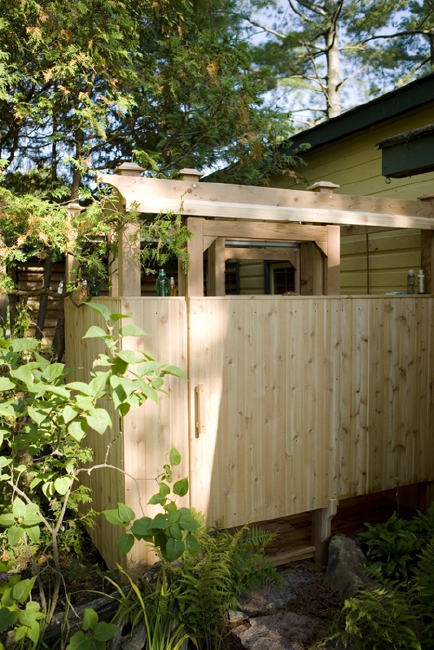
Is there an ideal place for an outdoor shower? In most cases, you want a sheltered spot, because a windy location will shorten the Im-comfortable-standing-outside-while-wet-and-naked season considerably. Heavy winds will also require setting the corner posts in concrete footings instead of simply placing them on 1'-square concrete patio stones, as I did. If you have neighbours, give some advance thought to their sightlines: Lay out a few boards on the ground to mark the walls and bang a few stakes into the ground where the corners and the edges of the doors will be. Then, stand inside the shower area. Youll be able to see what your view of the lake will be and what your neighbours view of you will beif you can see them, they can see you. Moving the shower slightly, or even just repositioning a door, can make a big difference. Consider the plumbing, toohow near is the water supply, and how easy is it to install a legal drainage system?
Start by levelling four patio stones for the corner posts. (You may have to stack a couple to help achieve that level base.) This structure is small and rigid enough that a little winter heaving wont do any harm, so full below-the-frost-line footings arent necessary unless its in a very windy spot.
If theres any digging needed for your drainage system (see ), do it now, before you start building overtop.
Cut and assemble the main elements of the end walls4x4 corner posts, 2x4 frames, and tongue-and-groove sidingon the ground (see ). I toenailed the 2x4 frame pieces to the posts with #10 x 3 1/2" deck screws and attached the siding with #8 x 2" deck screws. Note that the siding is longer (60") at both ends of the structure and on the sides of the storage compartment; its shorter (48") elsewhere. As well, position the siding 1" above the top rails, because it just looks better that way. Once the end walls are built, stand them up and brace them.
Cut to length and scallop the ends of the two 8' headers, then clamp in place on the posts. Cut two 2x6 pressure-treated rim joists for the floor structure and clamp in position on the posts too. Once the structure is plumb and square, and headers and rim joists are positioned correctly, drill 3/8" holes and bolt the clamped parts together (two bolts per intersection). The lower set of bolts on the headers must be flush with the surface, or the outer valance wont sit flat. You can either countersink the bolts or overtighten them a bit to pull the heads down.
Position four more patio stones for the other posts. Bolt posts to headers and rim joists. Trim posts to length, 1" above headers. Screw post caps on top of posts.
Cut three cross headers and screw to the tops of the posts, as shown in
Cut 2x6 pressure-treated spruce joists to length and attach between the rim joists with #10 x 3 1/2" screws. Remember to install plumbing for the drain.
Cut nine deck boards for the floor from 5/4x6. (Two boards have 2"-deep notches to fit around the posts.) Fasten the boards in place with #8 x 3" screws, making sure to leave even gaps (roughly 3/16"). To create access to the drain for winterizing, heres what I suggest: Locate the deck board thats overtop the drain. Cut out a section, lining up your cuts over the centres of two adjacent joists. Predrill holes near these cuts in order to avoid splitting the ends of the boards when you screw them in place. In fall, unscrew this short piece to fill the drain with non-toxic antifreeze and plug it. As well, add an overhang support for the edge of the deck board at each door: Sister a 30" length of 2x6 to the rim joist, between the posts framing the door.
Cut and install the 2x4 frame and the tongue-and-groove for the side walls.
Construct doors as in , taking care to build them square. I used outdoor-rated glue and two #10 x 3 1/2" screws at each corner. Note that the two screws should be offset from the centre line: one screw 1/8" to the left, the other 1/8" to the right. (This keeps them clear of the screws for the pocket-door hardware.) Youll have to countersink them about 1 1/2". I filled the holes with pine plugs because I like the contrast of pine and cedar. The corner bracket is optional.
Rip lengths of tongue-and-groove to 5/8" x 3/4" to make the cap trim for the walls and the tops of the door panels. Nail in place, flush to the inside surface.
Although the pocket-door hardware I chose is meant for interior doors, its sturdy enough to use outside. I did replace the screws in the package with #8 x 3" deck screws to mount the supplied brackets to the doors more securely.
From an 8' length of deck board, rip two inner valance pieces as in . Trim to 7' and mount with 2" screws and glue, flush with the bottom of the headers. Rip the outer valance pieces from 8' lengths of the 5/8" tongue-and-groove. Use finishing nails and glue to attach them.
Attach the pocket-door track with the screws provided. It should extend 1" beyond the post thats at the front of the bench. With help, hang the door in the track. You may have to make adjustments so the door is square in its opening, the cap trim pieces on the door and wall align, and the door slides freely. First, you can move the door away from or closer to the structure: The bracket holes are slotted for this tweak, but youll have to take the door off the track first. As well, you can adjust either end of the door up or down by turning the hanger bolts. Theres a small wrench for this purpose included with the hardware (try not to lose it).
Rip 1 1/2"-wide doorstops out of 5/4x6. Cut to length (4') and mitre the ends. Close each door (the 2x4 frame should be parallel to the 4x4 posts) and place the closed-position stop. A couple of 2" finishing nails or clamps will hold the stop while you screw it from the inside (for strength) with #8 x 1 1/4" screws. In the same way, open the door and mount the open-position stop.
Add a bracket to prevent the bottom of each door from swinging out as its pulled open or closed, as well as to stop the door from rattling in the wind. Cut these brackets from leftover 2x6. See . Mount to the posts with 3 1/2" screws. Its okay if the doors rub a bit against the brackets, but they shouldnt bind.
Use corrosion-resistant handles for the doors or, as I did, fashion some from 1" by 1" lengths of scrap wood. Or make some out of other materials, such as driftwood or small cedar branches.
After the winter, its possible frost heaving will shift the shower; if the track isnt level, the door may not stay open or closed. Fortunately, the whole structure is small and light enough that it can be lifted slightly while you shim under the posts to re-level it.
Font size:
Interval:
Bookmark:
Similar books «Outdoor Shower: Full plans for getting wet in the wild»
Look at similar books to Outdoor Shower: Full plans for getting wet in the wild. We have selected literature similar in name and meaning in the hope of providing readers with more options to find new, interesting, not yet read works.
Discussion, reviews of the book Outdoor Shower: Full plans for getting wet in the wild and just readers' own opinions. Leave your comments, write what you think about the work, its meaning or the main characters. Specify what exactly you liked and what you didn't like, and why you think so.