SINGER
UPHOLSTERY
Basics Plus
COMPLETE STEP-BY-STEP PHOTO GUIDE
STEVE CONE

CONTENTS

INTRODUCTION
Upholstery is often a self-taught craft, learned by experimenting. With this approach, the only instructions for reupholstering a piece of furniture are developed while taking it apart. The obvious dilemma is that you must rely on the cleverness of the person who upholstered before you and risk repeating poor decisions. Singer Upholstery Basics Plus is designed to take the guesswork out of the upholstery process. Used as a guide, this book will help you recognize and repeat quality techniques, while avoiding unprofessional, and sometimes costly, errors.
Upholstery, when done well, can be very rewarding. Consider the creative satisfaction of returning a tattered cast-off to its like-new state, as well as the money saved because you didnt have to buy new. The comfort of a favorite chair need not be sacrificed simply because it no longer suits the color scheme of the room. Family heirlooms become more than cherished souvenirs when they are upholstered to blend with the dcor of the home.
In the Getting Started section, acquaint yourself with the supplies, tools, and terms used for upholstery. Throughout this section, you will find detailed instructions for some of the most frequently required elements in the upholstery process. Use this section as a reference for completing tasks such as stripping, webbing, tying springs, making cushions, and sewing skirts.
Whether your intent is to tackle one project or begin an ongoing hobby, set up a work space away from the general living area of your home. Depending on the amount of time you have available, projects can take several work sessions to complete. You will want to leave your project, supplies, and tools undisturbed between sessions.
The various furniture pieces in the Upholstery Projects section incorporate a full range of basic upholstery techniques for beginner to intermediate skill levels. This new, revised edition of Upholstery Basics includes five additional projects featuring popular furniture pieces. Acknowledging endless furniture design differences, it is likely that you may have to combine techniques from several projects to complete your particular piece. The process for upholstering an easy chair, for example, might include some methods used in both the overstuffed chair and the wing chair. Compare the design features of your furniture item with those shown, and use the upholstery methods that suit your particular project.

Getting
STARTED

Tools
Quality upholstery cannot be achieved without the use of a few specially designed tools. If you make the initial investment in these tools and learn the proper way to use them, upholstery projects will be easier to complete and produce more satisfactory results. Tools can be purchased at upholstery supply stores or through catalogs or websites. Check the Yellow Pages or the Internet for the nearest supplier.
STRIPPING & UPHOLSTERING TOOLS
Claw-shaped tack and staple removers (1) are designed for removing old tacks and staples when stripping furniture to be reupholstered. A small screwdriver (2) can also be used to remove old tacks or staples. An upholsterers tack hammer (3) has one magnetized tip, so that the hammer holds the tack, leaving your other hand free to hold the fabric. The style shown has a nylon tip, used for inserting decorative tacks. An electric staple gun (4) is a fast, efficient way to secure new fabric. Purchase a style that will accommodate both 3/8 (1 cm) and (1.3 cm) staples. Replacing worn or loose webbing is a chore made infinitely easier by using a webbing stretcher (5). It works as a lever, allowing you to pull the webbing taut with one hand while tacking or stapling it with the other hand. Mallets (6), made of rubber or rawhide, are used to close flexible metal tack strips and to adjust padded surfaces. Stretching pliers (7), made for webbing and leather, can also be used to grasp and stretch fabric for stapling to the frame. Upholstery regulators (8), available in 8 (20.3 cm) and 10 (25.4 cm) lengths, are long metal skewers with multiple uses. The flattened end of the regulator is used for pleating or forcing padding into tight corners. The sharp end of the regulator is used to make a hole in the fabric by gently separating yarns in the weave. Once the padding has been moved, the hole can be closed by gently coaxing the yarns back into position.
MEASURING, MARKING & CUTTING TOOLS
Frequently, during the upholstery process, a yardstick (meterstick) (9) is necessary. Since most upholstery is not flat, you will also need a good-quality cloth tape measure (10). Dustless white chalk sticks (11) are used for marking out cutting lines on the fabric, for tailoring cushion patterns, and for various other marking tasks. A cutting mat and rotary cutter (12) make short work of cutting fabric strips for welting. Also be sure to have heavy-duty shears (13) for cutting the upholstery fabrics, battings, and other supplies.

PINS & NEEDLES
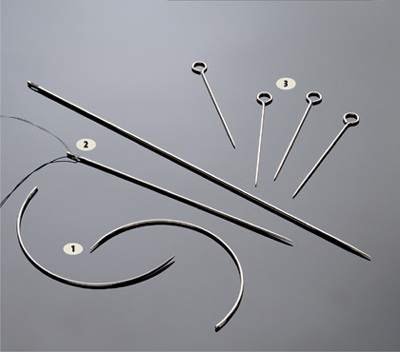
There are several hand-sewing needles designed for upholstery work. Curved needles (1) are used for blind-stitching fabric in places where stapling or tacking are not possible. They are also used to secure springs to webbing and burlap. Round-point curved needles are used for fabrics, while wedge-point needles are used for leather or vinyl. Button needles (2), available in a variety of lengths from 6 to 18 (15.2 to 45.7 cm), are used to secure buttons to upholstered furniture and to stitch through padding to secure it to a foundation. Upholstery pins (3) are used to hold fabric in place temporarily before tacking or sewing.
SEWING MACHINE EQUIPMENT
Though professional upholsterers use industrial sewing machines, most home sewing machines can successfully handle lightweight to medium-weight upholstery fabrics. Some specially designed accessories can help to make the job easier.
Insert heavy-duty needles into the sewing machine. For lightweight to medium-weight upholstery fabrics, use size 16/1oo (1); for heavyweight fabrics, use size 18/110 (2). Specially designed needles for sewing on leathers and vinyls (3) have a wedge-shaped point that cuts a tiny slit, rather than a round hole.
A welting foot is very helpful for sewing continuous welting without puckers. A deep groove cut in the bottom of the foot rides over the fabric-covered cord, feeding the layers of fabric evenly for a smooth, tight fit. If a welting foot is not available for your sewing machine brand, you may be able to use a generic foot, such as the Pearls N Piping Foot (4) made by Creative Feet, which is designed to accommodate welting and trim up to (6 mm) thick. A zipper foot (5) is essential for inserting zippers into cushions and can also be used for making welting, if a welting foot is not available. A general-purpose foot (6) or a straight-stitch foot (7) can be used for sewing any seam that does not have welting. A walking foot (8) can be used to keep layers from shifting when sewing unwelted seams in difficult fabrics, such as upholstery velvet.


