Table of Contents
One-Day Crochet: Afghans: Easy Afghan Projects You Can Complete in One Day Barb AsselinBarb Asselin (2014)
Complete a beautiful crocheted afghan in just one day!
Have you always wanted to learn to crochet but thought it was too difficult?
Have you considered crocheting an afghan but thought it would take too long?
Would you like to create a special and meaningful gift for someone?
Are you looking for fun, easy and quick afghan projects to complete in just a day?
If any of these questions resound with you, then this book is for you! Inside you will find a review of the main crochet stitches and materials often used in crochet projects, in case you are new to the craft, or are looking for a refresher. Finally, you will find 10 beautiful afghan patterns that can be completed in just one day. Note that these patterns will help you complete a lap-sized blanket or a baby blanket. For larger projects, you can expect that you will need more than one day to complete.
Are you ready to be creative? Just scroll up and download now so that we can get started
C OPYRIGHT I NFORMATION
Copyright 2016 by Barb Asselin and 927922 Ontario Inc., o/a Asselin Group Online Publisher
All rights Reserved. No part of this publication or the information in it may be quoted from or reproduced in any form by means such as printing, scanning, photocopying or otherwise without prior written permission of the copyright holder.
Disclaimer and Terms of Use: Effort has been made to ensure that the information in this book is accurate and complete, however, the author and the publisher do not warrant the accuracy of the information, text and graphics contained within the book due to the rapidly changing nature of science, research, known and unknown facts and internet. The Author and the publisher do not hold any responsibility for errors, omissions or contrary interpretation of the subject matter herein. This book is presented solely for motivational and informational purposes only.
T ABLE OF C ONTENTS
I NTRODUCTION
I have a special announcement I would love to share with you, including a fantastic gift to say thank you to my readers.


C HRISTMAS C RAFTS:
E ASY C HRISTMAS C RAFTS A NYONE C AN M AKE!
I NTRODUCTION
Thank you for downloading this book and supporting an independent author. I really appreciate it.
I have always loved making crafts. As a kid, I learned how to crochet from my Nanny Short when I was just young. Now that I have two daughters of my own, we spend lots of time making crafts, researching how to do a certain craft, or even making our own greeting cards, and gifts.
Not only do I love making crafts, but Christmas is one of my favorite times of the year. I love the whole season leading up to Christmas. I usually start in mid-October with baking all of my familys favorite Christmas treats. I load up the freezer full of yummy desserts and then take a tray of mixed cookies, chocolates, and squares to everyones house that we visit during the holidays.
Every Christmas, my daughters and I plan what we will give each person as a Christmas present and think of gifts that we can make ourselves. We spend our fall weekends making gifts for others or making Christmas ornaments for our tree. We have so much fun!
I hope you will enjoy some fun crafting days either on your own, with some friends, or with the children in your life this year. Note that, if you are planning to make some of these crafts with children, some of these projects will require some assistance or supervision by an adult or an older child. Note also that four of these projects require some basic wood working skills, such as cutting wood with an axe, or a table saw, or using a drill to drill some holes into some wood pieces.
My goal was to create a book that would appeal to all types of crafters and future crafters:
- people with cooking or baking experience
- people with woodworking experience
- people with sewing experience
- even people with no crafting experience!
I hope you enjoy and try something new and maybe even try a craft that is outside of your comfort level. Happy crafting!
C OOKIE G ARLAND

Materials:
- Star cookie cutter
- Drinking straw
- White fabric paint
- 1 recipe salt dough
- 2 cups flour
- 1 cup salt
- 1/2 cup allspice or cinnamon
- 2 teaspoons wallpaper paste
- 1/2 cup water
- Polyurethane varnish
- Approximately 10-15 of seasonal rope ribbon
Instructions:
- Preheat oven to 250F
- Combine all salt dough ingredients and knead until smooth
- Roll out dough to 1/4" to 1/2" thick
- Cut out 14 star shapes using the cookie cutter
- Use a straw to cut a hole out of the top of each star shape for hanging
- Place on ungreased baking tray and bake for one hour
- Turn and bake for another hour
- Turn oven off and let shapes cool in oven
- Varnish with polyurethane
- Write MERRY CHRISTMAS by putting 1 letter on each cookie with white fabric paint
- Thread a length of ribbon through the hole at the top of each cookie and create a garland to hang in a doorway or on a Christmas tree
Makes 1 Merry Christmas garland
G INGERBREAD H OUSE

Materials:
- Gingerbread Dough recipe (see below)
- Icing recipe (see below)
- Tree cookie cutter
- Rolling pin
- Sharp knife
- Large platter or foil covered piece of cardboard
- Candies for decorating
Instructions:
- Make 1 batch of gingerbread dough
- Make 1 batch of royal icing
- Follow instructions below for cutting out gingerbread house and trees
- Decorate with icing and candies
- Display on tray or foil wrapped piece of cardboard
Gingerbread Dough Ingredients:
- 1c brown sugar
- 1/3 c butter or margarine
- 1 c dark molasses
- 2/3 c cold water
- 7c flour
- 2t baking soda
- 2t ground ginger
- 1t salt
- 1t ground allspice
- 1t ground cloves
- 1t ground cinnamon
Instructions:
Preheat oven to 350 degrees. Cream the brown sugar and butter together in a large bowl. Add molasses and water and combine. Mix dry ingredients together and add slowly, combining as you go, until it is all mixed together. Form into a ball and refrigerate for at least 2 hours. Roll dough on floured surface to1/2 thick and cut according to the following diagram using a sharp knife:
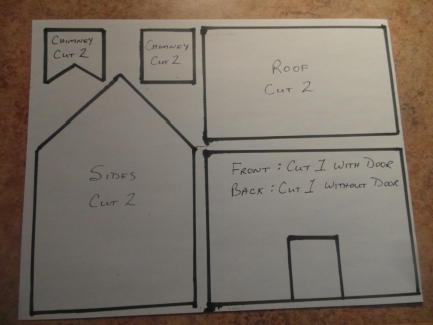
Cut remaining dough into gingerbread trees with cookie cutter. Place on ungreased baking sheet about 2 inches apart. Bake for 10-12 minutes until no indentation remains when touched. Cool on cookie racks. Decorate with frosting and candies as desired using icing as glue to hold your gingerbread house together.
Royal Icing:
- 2 egg whites
- 3 cups of icing or powdered sugar
- 1/2 teaspoon of cream of tartar
Next page
