2014 Glory Albin
Photography 2014 Gene Chutka
All rights reserved.
No part of this book may be reproduced in any form whatsoever, whether by graphic, visual, electronic, film, microfilm, tape recording, or any other means, without prior written permission of the publisher, except in the case of brief passages embodied in critical reviews and articles.
The opinions and views expressed herein belong solely to the author and do not necessarily represent the opinions or views of Cedar Fort, Inc. Permission for the use of sources, graphics, and photos is also solely the responsibility of the author.
ISBN 13: 978-1-4621-0741-4
Published by Front Table Books, an imprint of Cedar Fort, Inc.
2373 W. 700 S., Springville, UT 84663
Distributed by Cedar Fort, Inc., www.cedarfort.com
Cover and page design by Erica Dixon
Cover design 2014 by Lyle Mortimer
Edited by Casey J. Winters
C ONTENTS
INTRODUCTION
Want to know the secret to creating beautiful,
delicious desserts your friends and family will love? Its all about layers!
Glorious Layered Desserts gives you a recipe collection of delicious dessert components and then shows you how to creatively layer different flavors and textures to create unforgettable desserts!
Whether you need a treat you can make ahead, something quick and easy, or an impressive dessert for a special occasion, Glorious Layered Desserts has the perfect treat for you!
In the first half of the book youll find dozens of beautiful, creative, and mouthwatering layered desserts.
These recipes are made using two or more delicious dessert components, layered in a variety of beautiful ways.
With many of these recipes, youll find tips on how to save time, how to adjust the recipe to your tastes, and even more creative recipe ideas.
The second half of the book contains all the essential recipes needed to create each incredible layered dessert. These are recipes youll be able to rely on again and again to create delicious desserts.
EQUIPMENT & TECHNIQUES
Having the right tools for the job will make any kitchen task more enjoyableand more successful.
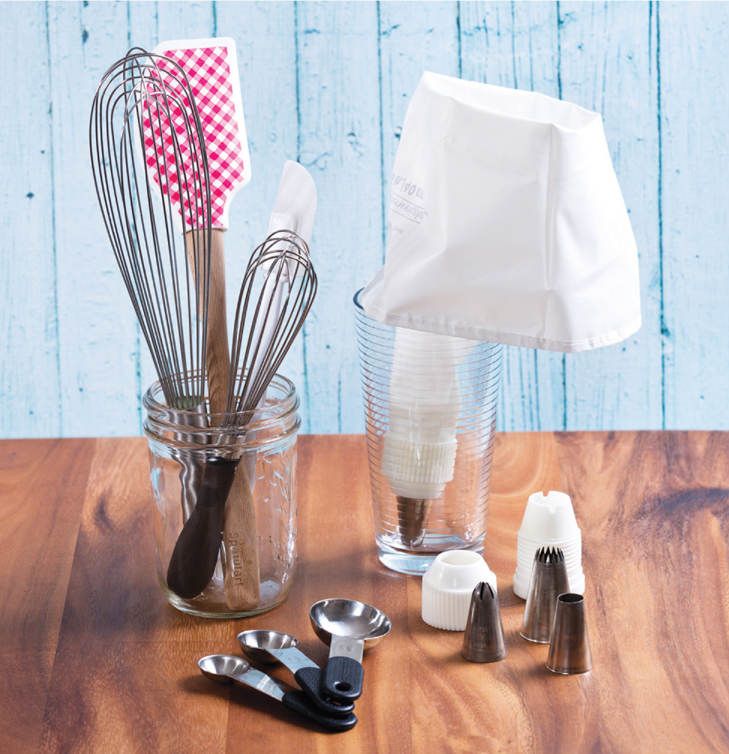
Electric mixer: Many of the recipes in this book will require the use of either a large stand mixer (preferred) or a handheld electric mixer. I have used a large (KitchenAid) stand mixer in any recipes where whipping is listed. Using a handheld mixer will take longer but will produce almost identical results.
Handheld whisk: Use a whisk in any recipe that requires stirring but does not require an electric mixer (such as pudding, chocolate sauce, and caramel sauce).
Spatula: Rubber spatulas are the perfect tool to fold together ingredients. When the directions say fold together, that means to incorporate two mixtures gently without deflating the air (that was added during whipping). Run the spatula down one side of the bowl and then up through the center, repeating until the two mixtures are combined.
Piping bag and tips: For many of the layered desserts, you will get the most perfect layers by piping the ingredients into the glass or dish. I like using a large (sixteen-inch) reusable piping bag, fitted with a coupler and large tips. To easily fill the piping bag, place the bag in a large glass (after you have added the coupler and tip), fold down the top of the bag, and then use a large spoon or spatula to fill the bag two-thirds to three-fourths full. Once filled, pull up the edges of the bag and twist the bag just above where the ingredients are. Hold the twist closed with your thumb against your hand and then use your fingers to press on the bag, and squeeze out the contents. (See for piping bags and tips.)
Piping bag alternative: If you do not have a large piping bag, you can use a gallon-size ziplock-type plastic bag to pipe the various layers into your dishes. Put the plastic bag in a large glass (just as you would the piping bag), fold down the top, and fill the bag two-thirds full. Pull up the bag and seal it closed. Snip off one corner of the bag and squeeze contents into your dishes, as desired.
ADDITIONAL TIPS FOR SUCCESS
A standard dessert serving is - cup (4-6 oz.). Keep this in mind as you plan how many desserts you want to make. If you are using large glasses (8-10 oz.), you will be able to make fewer desserts than the listed range. If you are using mini, taster-sized glasses (2-3 oz.), you will be able to make more than the listed range.
Read the whole recipe. Depending on the recipe, you may need to consider the chilling or baking time before you start the recipe. Make sure you have all the necessary ingredients on hand as well.
TIME-SAVING OPTIONS
As much as I love the process of making elaborate desserts, I know the importance of having recipes I can turn to when Im short on time. The desserts below are quick and easy but will still produce a beautiful and delicious treat.
Made and served within:
30 minutes:
(using a store-bought angel food cake or pound cake)
(using a store-bought angel food cake or pound cake)
(using a store-bought angel food cake or pound cake)
1 hour:
Many of the individual dessert components (Essential Recipes) can be made in advance to save time on the day of serving.
Make in advance
1 full day:
Up to 2 days:
1 week or more:
INGREDIENTS
Using quality ingredients is essential to creating delicious food. Choosing the correct ingredients will have a huge impact on the final results of your dish.
Butter: Chose high-quality full-fat butter. Margarine or reduced-fat butters have added water or other ingredients that will affect the results of your dish. The general standard in baking is to use unsalted butter. For the recipes in this book, using salted butter will also work, but be sure to reduce or eliminate any additional salt listed in the recipe.
Chocolate: The overall flavor of your finished product will be greatly affected by the quality of chocolate you use, so choose the best-quality chocolate available (in most cases, price and quality are directly related).
Cocoa powder: Use unsweetened cocoa powder, not a sweet cocoa or chocolate mix, in the recipes in this book. As with any chocolate, using the best-quality cocoa you can find will greatly affect the end results of your recipe. Choose rich, dark, flavorful cocoa powders.
Cream: When heavy cream is listed in a recipe, make sure you are using heavy cream, not half-and-half. Heavy cream is sometimes labeled heavy whipping cream, and it is usually 36 percent milk fat.
Cream cheese: Choose high-quality full-fat cream cheese. Reduced-fat cream cheese contains extra water and will affect the results of the recipe. In any recipe that calls for cream cheese, you should beat the cream cheese until smooth before adding any other ingredients. If there are lumps in the cream cheese when you add other ingredients to the mixer, creating a smooth dessert will be nearly impossible.
Lemon and lime (zest and juice) : In recipes that call for citrus juice or zest, use fresh juice (not bottled juice) and fresh zest (not dried). Fresh juice and zest have much more flavor and will produce tastier results.
Milk: In recipes that call for milk, use whole or 2 percent milk. If you only have non-fat or 1 percent milk, add a little cream or half-and-half. A few recipes in this book that require milk will say any fat content; in these cases, feel free to use any milk you have on hand.

