Alojzije Jankovic - The Grandmaster Mindset: A First Course to Chess Improvement
Here you can read online Alojzije Jankovic - The Grandmaster Mindset: A First Course to Chess Improvement full text of the book (entire story) in english for free. Download pdf and epub, get meaning, cover and reviews about this ebook. year: 2020, publisher: Thinkers Publishing, genre: Politics. Description of the work, (preface) as well as reviews are available. Best literature library LitArk.com created for fans of good reading and offers a wide selection of genres:
Romance novel
Science fiction
Adventure
Detective
Science
History
Home and family
Prose
Art
Politics
Computer
Non-fiction
Religion
Business
Children
Humor
Choose a favorite category and find really read worthwhile books. Enjoy immersion in the world of imagination, feel the emotions of the characters or learn something new for yourself, make an fascinating discovery.
- Book:The Grandmaster Mindset: A First Course to Chess Improvement
- Author:
- Publisher:Thinkers Publishing
- Genre:
- Year:2020
- Rating:3 / 5
- Favourites:Add to favourites
- Your mark:
The Grandmaster Mindset: A First Course to Chess Improvement: summary, description and annotation
We offer to read an annotation, description, summary or preface (depends on what the author of the book "The Grandmaster Mindset: A First Course to Chess Improvement" wrote himself). If you haven't found the necessary information about the book — write in the comments, we will try to find it.
Alojzije Jankovic: author's other books
Who wrote The Grandmaster Mindset: A First Course to Chess Improvement? Find out the surname, the name of the author of the book and a list of all author's works by series.


The Grandmaster Mindset: A First Course to Chess Improvement — read online for free the complete book (whole text) full work
Below is the text of the book, divided by pages. System saving the place of the last page read, allows you to conveniently read the book "The Grandmaster Mindset: A First Course to Chess Improvement" online for free, without having to search again every time where you left off. Put a bookmark, and you can go to the page where you finished reading at any time.
Font size:
Interval:
Bookmark:
Chapter 6
Lure the king
Example 1
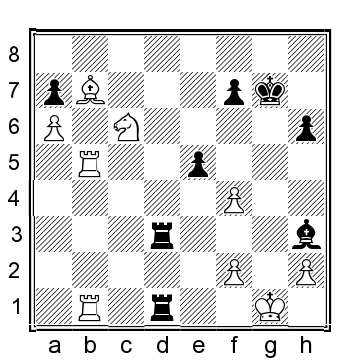
From Indjic Cruz
Baku 2016
Checkmate is the goal of the chess fight, with gaining material a secondary ojective. Therefore one has to be very skilled in attacking the king, which usually hides behind its pawns while the queens are on the board. Finding cunning ways to lure the opponents king into danger is an important skill to acquire. Usually, this involves sacrificing a piece for one of the pawns that protect the king, as is the case in this example. White is threatening 1. Q f7+ so Black is trying to prevent that and plays
30... Q f8
But now follows a petite combinaison, to borrow Capablancas term.
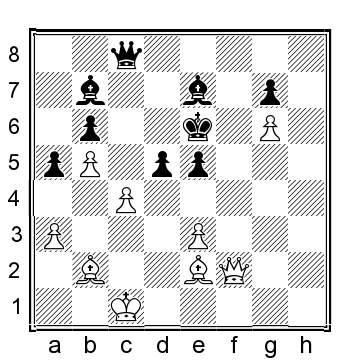
31. B g4+! K d6 32. B xe5+!!
Forcing the king into the open!
Position after: 32. B xe5+!!
32... K xe5
Mate comes also after 32... K c5 33. B d4+
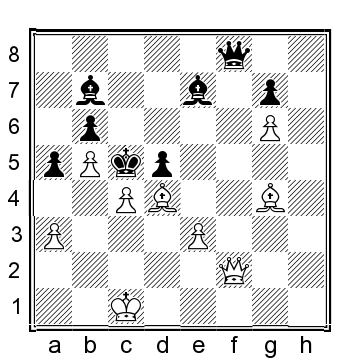
Position after: 33. B d4+
33... K xc4 [ 33... K d6 34. Q g3+ ] 34. Q c2+ K xb5 35. B e2# .
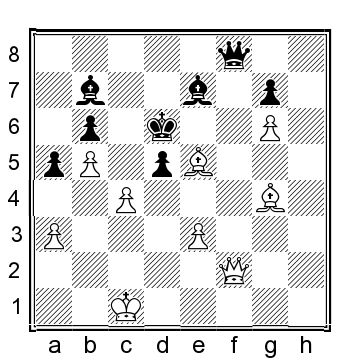
33. Q b2+!
It is easy to overlook such long moves with the queen.
One book about Bobby Fischer says in analysis of his playing style He tends to overlook long moves with the queen, which shows that even World Champions can suffer from this drawback!
Position after: 33. Q b2+!
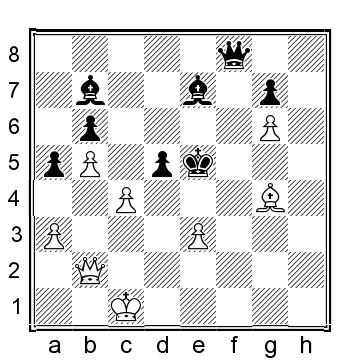
33... K d6
The king must return as advancing further ends with mate: 33... K e4 34. Q d4#
Now follows yet another long move with the queen!
34. Q h2+!
Position after: 34. Q h2+!
Again the black king is caught in the mating net.
34... K c5 35. Q c7+
1-0
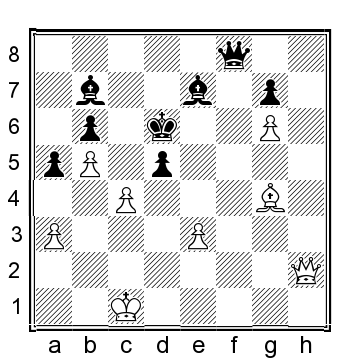
Example 2
From Ornstein Schneider
Uppsala 1985
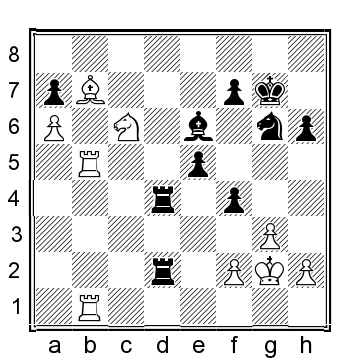
With a lot of active pieces aiming at the opponents king, even in the endgame it is possible to attack by forcing the king into the open. But, as always, it is necessary to be precise. How to do it in this position? White has prepared everything to win the a-pawn, after which his own a-pawn would be promoted very quickly. But in order to do so, White had to drag all his pieces to the queenside when his king is defended only by pawns. Black did the opposite; he abandoned the defense of the queenside and threw all the cards into the attack on the white king. He doesnt have much time and must play energetically!
29...f3+!!
29... B d5+? gives time for White to reduce the pressure by exchanging one of the black pieces. 30. R xd5! R xd5 31. N xa7
29...f3+!!
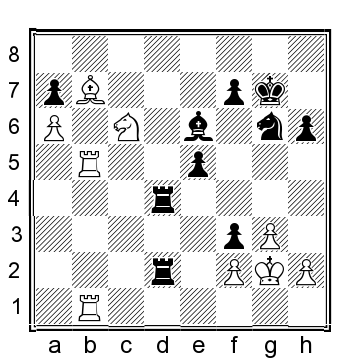
Position after: 29...f3+!!
The pawn sacrifice must be accepted, because otherwise Black mates quickly... The white king must leave its shelter!
30. K xf3
30. K f1 R d1+ 31. R xd1 R xd1#
30... R 4d3+! 31. K g2
31. K e4 f5#
It seems that the worst is over for White, but now Black reveals the point of his combination.
31... N f4+!!
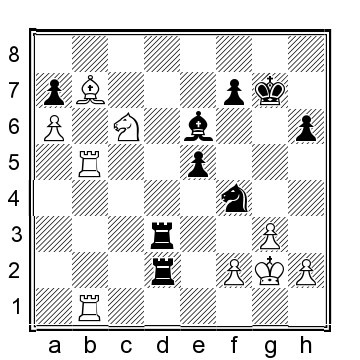
Position after: 31... N f4+!!
32.gxf4
32. K f1 R d1+ 33. R xd1 R xd1#
32... B h3+! 33. K g1 R d1+
Position after: 33... R d1+
White is getting mated!
0-1
Example 3
From Mainka Koch
Germany 2016
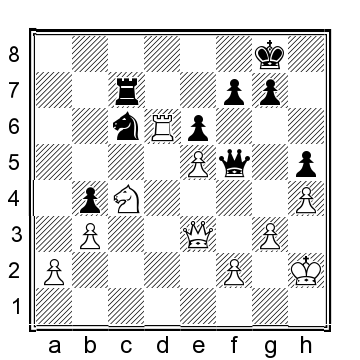
This example is a bit more complicated. White is a pawn up, but the realization of this advantage is quite complicated. You will see that from this seemingly peaceful position the black king will come under heavy fire.
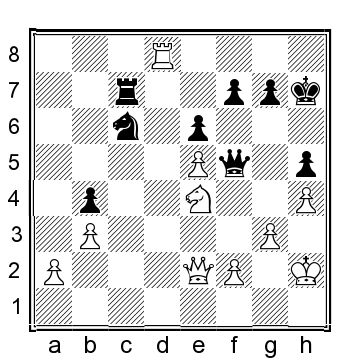
47... N e7
White threatened the double attack Q b6, so Black switches the knight to the great d5 stronghold, where it can also defend the rook. However, this move allows checks on the eighth rank, which gives rise to problems for the black king.
48. R d8+
48. Q b6 N d5
48... K h7 49. N d6
Position after: 49. N d6
The knight gets into the action and, as you will see, it becomes a very important piece.
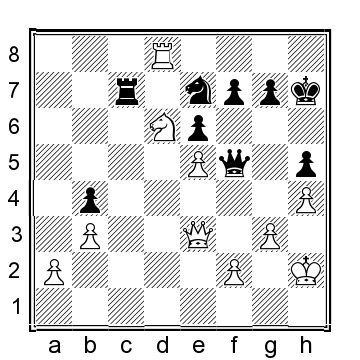
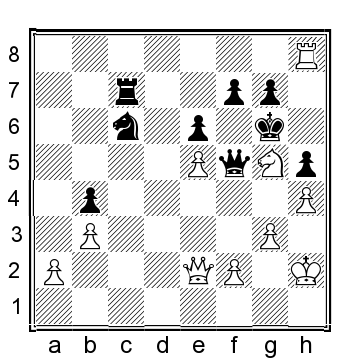
49... Q g6
The queen has to stay in touch with the f7-pawn, but it suffocates its own king.
50. N e4!
Position after: 50. N e4!
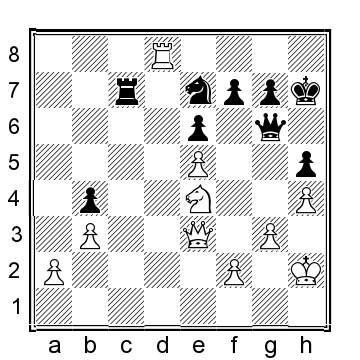
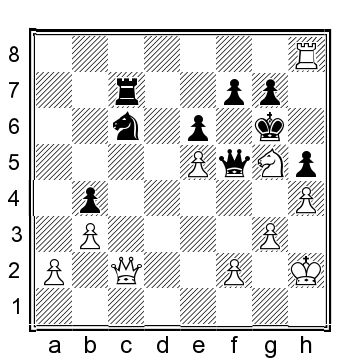
50... Q f5
The unpleasant check 51. N g5 was threatened, so Black needed to open an escape route for his king.
51. Q e2 N c6?
Position after: 51... N c6?
The decisive mistake, but Black was already in trouble.
The only defense against quick defeat was 51... N d5! 52. N g5+ K g6 53. R h8 Q g4! .
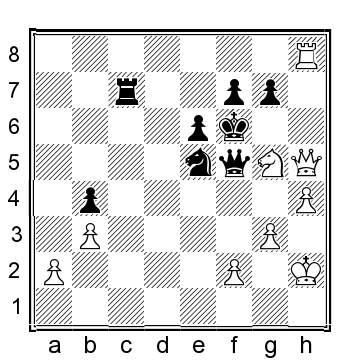
52. N g5+ K g6 53. R h8!
Position after: 53. R h8!
53... N xe5
Clearing the f6 square for the black king to escape.
Black no longer saves himself after 53... Q g4 due to
A) 54.f3 N d4 55.fxg4 N xe2 56.gxh5+
B) But there is a wonderful winning combination, albeit a more complicated one, after 54. Q c2+! Q f5 .
Position after: 54... Q f5
55. Q d1!! Q g4 [ 55... Q xf2+ 56. K h1! and now there is no more defense for the h5-pawn] 56.f3! Black is no longer able to jump ... N d4 with attack on the queen. 56... Q f5 57.f4! Again the h5 pawn is under attack. 57... Q g4 58. Q d3+ Q f5 And now comes the point of all the maneuvering. 59.g4!!

Position after: 59.g4!!
59... Q xd3 [ 59...hxg4 60.h5# ] 60.f5+! Burying the black king! 60...exf5 61.gxh5# Mate!
54. Q xh5+ K f6
Font size:
Interval:
Bookmark:
Similar books «The Grandmaster Mindset: A First Course to Chess Improvement»
Look at similar books to The Grandmaster Mindset: A First Course to Chess Improvement. We have selected literature similar in name and meaning in the hope of providing readers with more options to find new, interesting, not yet read works.
Discussion, reviews of the book The Grandmaster Mindset: A First Course to Chess Improvement and just readers' own opinions. Leave your comments, write what you think about the work, its meaning or the main characters. Specify what exactly you liked and what you didn't like, and why you think so.