Chapter 1
Familiarize yourself with the keyboard
An acoustic piano is a complex piece of machinery; lift up the lid and look inside and youll see a complicated set of strings, hammers and dampers. Compare this to the relatively simple design of other musical instruments like the violin or the recorder and you could be forgiven for assuming that the piano was a complicated instrument to learn to play.
Nothing could be further from the truth; the purpose of all that machinery is to make life easier for the player. In fact, its easier to produce a sound on the piano than on almost any other instrument. Try it yourselfpress down any key and listen to the sound. Essentially, theres no difference between what you just did and what a concert pianist does during a professional recital. Try the same thing with a violin and you might not get such good results!
Lets take a moment to look closely at the keyboard:
The keyboard consists of black and white keys (these are actually levers that work the machinery inside the piano, propelling the hammer toward the string to create a sound). The most crucial thing to note at this stage is that there are repeating patterns of notes, which appear in exactly the same form across the keyboard. For example, the pattern of two black keys, followed by three black keys is repeated across the entire keyboard.
These patterns repeat at a fixed interval, called an octave. So, for example, the note marked 2 on the diagram above is said to be one octave above the note marked 1 (and, conversely, note 1 is one octave below note 2).
Within each octave every note is given a name. All notes in the same place in the repeating pattern of black and white notes have the same name. For example, in the diagram above, notes 1 and 2 have the same name. This is very good news, because instead of having to remember hundreds of different note names, you only need to remember twelve.
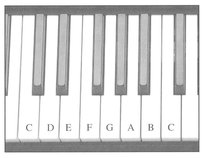
Lets start with the white keys:
Each note is given a letter name, based on the first seven letters of the alphabet. Because there are only seven white keys before the pattern of notes repeats itself, we only need seven names. Once we reach G, we start again at A. So, for example, theres no such thing as the notes J, L and W! This means that every eighth note has the same name, hence the oct in octave.
This repeating pattern of notes can be extended to cover the whole keyboard, as shown below:
Practice finding notes in all octaves, across the whole keyboard. For example, find all the As or all the Cs and play them. Listen to the sound of each note as you play it and try to hear how notes with the same letter name sound similar.
A good way to help memorize the position of each note is to look out for the note C (which appears just to the left of the group of two black notes) and F (which can be found just to the left of the group of three black notes). These marker notes are easy to spot and you can then count up or down to find the note youre after:
Now cover the top half of this page and then write in the note names where indicated on the diagram below:
The black notes
At this stage, we dont need to worry about naming the black notes. as all the exercises in the first part of this book use only the white keys. However, its worth knowing that the black keys are often referred to as sharps and flats.
Chapter 2
Playing your first notes
So, weve established that lots of different keys on the keyboard share the same names; for example, there might be six Cs across the whole range of your keyboard. In order to start playing we need to choose one note on the keyboard as a reference point, so that you know youre starting in the right place.
Traditionally, this reference note is known as Middle C. Its given this name because (youve guessed it) its the C note nearest to the middle of the keyboard. On our keyboard, Middle C is shown below:
Try to find Middle C on your keyboard. (If you have an acoustic piano, Middle C is often found just above the lock.)
Now place the thumb of your right hand on Middle C and press down the key. Congratulations! Youve just played your first note as a pianist. Experiment with pressing the key down really softly and notice that this makes the sound of the note quieter; then try hitting the key really hard and listen out for the loud noise that it will create. This ability to make sounds of different volumes was revolutionary when the piano was invented, and it was immortalized in the name given to the instrument pianoforte or quiet-loud in Italian.
Keep the thumb of your right hand on Middle C and let the other fingers of your hand fall naturally over the next four white notes to the right of Middle C.
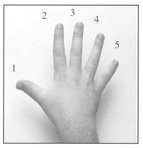
The diagram below shows exactly where your fingers should go, according to the numbering system shown on the right:
1 = thumb
2 = index finger
3 = middle finger
4 = ring finger
5 = little finger
Once youve got your right hand in the correct position, experiment with playing different combinations of the live notes and listen to the sounds that you create. Try pressing down each key individually, without moving any of your other fingersthis will feel difficult to start with, but dont give up!
The five notes that you are playing are called C, D, E, F and G:
A great way to practice these five notes is to get a friend or family member to call out one of the five letter names; with your hand in position over the five notes, you can then try to play the right note. Remember to only use your thumb to play C, index finger to play D, middle finger to play E, and so on.

