The Upholsterers Step-by-Step Handbook


Introduction
The techniques and materials of upholstery have evolved over the centuries to take on ever-more complicated nuances, but in its pure form, upholstery is a set of basic rules and similar methods that can be applied to many different chairs. I am not sure how long it took for the penny to drop that the basic approach to upholstery didnt need to be varied from chair to chair, but that was part of my transition from bench upholsterer to upholstery tutor. By focusing on the similarities rather than the differences, it becomes clear that a few basic cornerstone principles can be applied to a wide variety of visual styles. Seeing through the fog of chair styles, materials and fabrics was key to my identifying the most important aspects of producing well-upholstered chairs.
Obviously it is impossible to cover all aspects of upholstery in one book so, rather than collecting many chair styles and dazzling you with the latest fabrics applied to dozens of examples, I have used my experience to break down the upholstery process and focus on the tools and techniques required to produce generic types of pad that can be adapted to a myriad of different chairs. I would be doing my mentors and peers an injustice to suggest that upholstery is easy to master, but by limiting the vast spectrum of techniques and building from the foundation of a few core techniques, you will be amazed at how many styles of upholstered chair can be successfully tackled and successfully transformed.
So whether you have inherited a masterpiece from the past, found a treat in a backstreet market on a foreign shore, conceived a new idea in the form of a chair or simply fancy applying yourself to a worthy craft, following the methods described in this book will help you to create upholstery that should stand the test of time and survive the rigours of use.

CHAPTER 1
Tools & materials
Hand tools
Many of the hand tools used in upholstery are specific to the craft, but there are also some general woodworking and sewing tools that have cross-over uses. You may well have some of these tools already, so there is no need to rush out and buy every tool on the market. Be aware, however, that some general tools may not be robust enough for upholstery applications. This is a brief overview of what you will need and the pros and cons of different types. It is a personal selection and not exhaustive: every upholsterer has his or her own preferences but, if youre new to upholstery, the list below is a good starting point.
Tools for ripping down
Ripping down otherwise known as stripping out the old upholstery is generally the starting point for most projects. It can mean anything from simply removing the existing covering carefully so as to not disturb the stuffing layers underneath, right through to removing all of the upholstery, including any broken tacks or staples, in order to repair or renovate the frame.
Mallets
The principal use of a mallet is to deliver a short, sharp burst of force to the tool you are using. It will often help to knock out tacks and staples in fewer attempts than simply digging or poking at the fixing with a chisel or tack lifter. Mallets are also useful when carefully tapping frame joints apart and occasionally persuading things to fit. It can take a few hours to remove the existing upholstery from even small chairs and possibly even days for much larger pieces of furniture, so you need to feel comfortable wielding the mallet you have chosen. Your choice of mallet depends more on the material you are tapping than on the shape of the mallet head: for materials that are likely to shatter on impact or where you might damage the fabric for example, plastic wood-effect components a rubber-headed mallet is best. However, your choice will also be determined by the space in which you have to work (smaller mallets for smaller spaces) and the amount of force you need to apply (heavier mallets where more force is required).
Most people who have done any kind of woodworking in the past will have a wooden carpenters mallet. These tend to be made of beech and the heads are square in appearance. They come in different weights and sizes and I recommend one with a head size of around 15 10 cm (6 4 in.); it is lightweight and its relatively small size makes it easy to swing it around inside the confines of a chair frame.
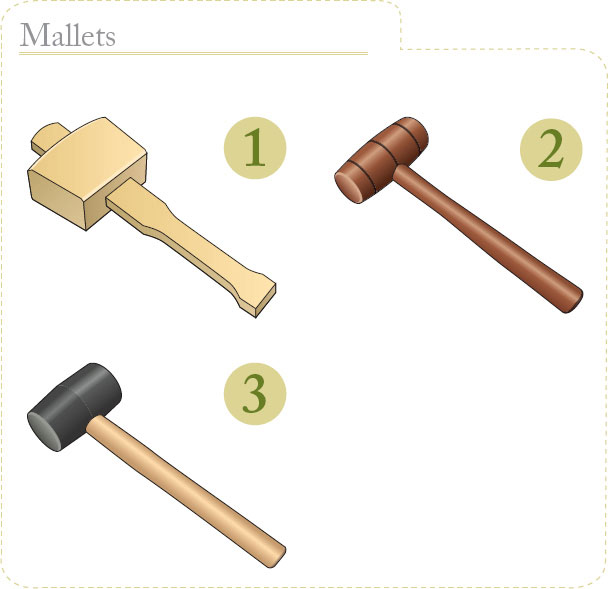
Carpenters mallet
Wooden round-headed mallet
Rubber round-headed mallet
Round-headed mallets are made in a variety of materials and can range from lightweight camping mallets to large-headed mallets used for tamping paving slabs. Wooden round-headed mallets are similar to the square carpenters mallet but, as there is less wood in the head, they are slightly lighter than a carpenters mallet of a similar size and wood type. They are useful for general applications, but their compact nature and lighter weight require a firmer strike to deliver the same impact as a square mallet.
Rubber round-headed mallets are made from a dense, vulcanized rubber and can be used for most processes. The rubber dulls the sound when hitting another tool, so they are quieter to work with; I often use one when a colleague is on the phone to a customer or when I am simply listening to a good play on the radio. They are also handy when tapping rails or non-metal components, as they are less likely to bruise or shatter the thing that you are tapping.
Nylon-headed and hickory barrel-shaped mallets are heavier than beech or rubber round-headed mallets and are only really useful when a good clout is required, so they are the least frequently used types of mallet. It can be very useful to have one in your tool kit if you can afford the space to have a mallet that you use only a few times a year.
Ripping chisels
The main aim of a ripping chisel is to lift tacks out of a wooden rail cleanly and efficiently, without biting into the rail. Upholsterers ripping chisels are very different from carpenters chisels, in that the bevel or sharp end is not honed to anywhere near as sharp a point. A carpenters chisel will blunt extremely quickly and could fracture, allowing small fragments to ping off, which could be very dangerous if they flew into your eye. (I cant imagine that youd get a warm reception from the carpenter if you returned a battered chisel that had taken hours to sharpen and hone, either.)

Straight ripping chisel
Cranked ripping chisel
There are two types: the straight ripping chisel


