Chris Johnson - The Practical Zone System for Film and Digital Photography: Classic Tool, Universal Applications
Here you can read online Chris Johnson - The Practical Zone System for Film and Digital Photography: Classic Tool, Universal Applications full text of the book (entire story) in english for free. Download pdf and epub, get meaning, cover and reviews about this ebook. year: 2017, publisher: Routledge, genre: Art. Description of the work, (preface) as well as reviews are available. Best literature library LitArk.com created for fans of good reading and offers a wide selection of genres:
Romance novel
Science fiction
Adventure
Detective
Science
History
Home and family
Prose
Art
Politics
Computer
Non-fiction
Religion
Business
Children
Humor
Choose a favorite category and find really read worthwhile books. Enjoy immersion in the world of imagination, feel the emotions of the characters or learn something new for yourself, make an fascinating discovery.
- Book:The Practical Zone System for Film and Digital Photography: Classic Tool, Universal Applications
- Author:
- Publisher:Routledge
- Genre:
- Year:2017
- Rating:5 / 5
- Favourites:Add to favourites
- Your mark:
The Practical Zone System for Film and Digital Photography: Classic Tool, Universal Applications: summary, description and annotation
We offer to read an annotation, description, summary or preface (depends on what the author of the book "The Practical Zone System for Film and Digital Photography: Classic Tool, Universal Applications" wrote himself). If you haven't found the necessary information about the book — write in the comments, we will try to find it.
This sixth edition of The Practical Zone System by Chris Johnson updates the classic manual on Ansel Adamss landmark technique for the digital age. For photographers working digitally or with film, in color or black and white, in the studio or on the go, this simple visual language helps to control contrast and, through a process called Previsualization, provides photographers with the power of free creative expression.
This new edition discusses recent advances in technology and potentials for their use in zone photography, including HDR, smartphone cameras that shoot in raw format and smartphone light meters. Johnson demonstrates how the Zone System is a universal visual and conceptual language that dramatically simplifies the problem of creating and rendering complex lighting setups.
Chris Johnson: author's other books
Who wrote The Practical Zone System for Film and Digital Photography: Classic Tool, Universal Applications? Find out the surname, the name of the author of the book and a list of all author's works by series.


The Practical Zone System for Film and Digital Photography: Classic Tool, Universal Applications — read online for free the complete book (whole text) full work
Below is the text of the book, divided by pages. System saving the place of the last page read, allows you to conveniently read the book "The Practical Zone System for Film and Digital Photography: Classic Tool, Universal Applications" online for free, without having to search again every time where you left off. Put a bookmark, and you can go to the page where you finished reading at any time.
Font size:
Interval:
Bookmark:
A Primer on Basic Film Photography
This appendix is designed for students who need a brief review of basic photography to better understand some of the terms and concepts used throughout this book. In general, this appendix provides a summary of those principles and techniques that relate to film exposure and development. Because the primer is intended to serve only as an aid to learning the Zone System, many important subjects arent covered in detail. For a more comprehensive text on basic photography, I recommend the following books:
Black and White Photography: A Basic Manual , (3rd ed.) unabridged
Henry Horenstein
Little, Brown and Company
The Ansel Adams Photography Series , (10th ed.)
Ansel Adams
Little, Brown and Company
Photography
Barbara London, Jim Stone, and John Upton
Prentice Hall
Unfortunately, photography is notorious for being complicated and difficult to learn. In the beginning, it is easy to get lost in the maze of photographys many inverse relationships. At every step, it seems as if something light is turning something dark, which in turn causes something else to become light again. Confusion is understandable, but photographic processes are easier to comprehend if you keep in mind that youll have to deal with a limited number of very simple materials that consistently perform very simple functions.
The essential component of photography is a light-sensitive coating called an emulsion . When this emulsion is spread on one side of a piece of transparent material, we call it film . When an emulsion is applied to a piece of paper, it is used to make photographic prints . Film and prints may appear to be very different, but their emulsions are essentially the same.

Figure G.1 Film and paper emulsions.
All photographic emulsions respond to light in a simple way: Wherever the emulsion is exposed to light, a fine layer of metallic silver will be formed after development. The greater the amount of exposure, the more dense the deposit of silver will be.
On the film, these densities of silver are seen as the shadow-like reversed images we call the negative . The negative image is tonally reversed because any area of the scene that is bright will produce a dark layer of silver on the film. Conversely, a darker area of the scene will result in a relatively thin or transparent area on the film. See the left side of .
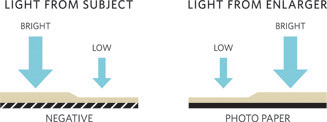
Film and paper densities.
The photographic printing process reverses the light-to-dark effect of the negative. The enlarger projects the shadow of the negative onto the emulsion of the paper. Once again, the light that passes through the transparent parts of the negative (corresponding to the darker parts of the subject) produce dark layers of silver on the white paper after development. The more transparent a given area of the negative, the more light it will transmit to expose the paper and the darker that area of the print will become. The areas of the negative that are more dense (corresponding to the lighter areas of the scene) block more light. As a result, those areas of the print remain light. In this way, the lifelike image of the print will be produced.
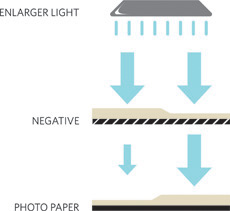
Figure G.3 Enlarger, negative, and print.
The overall tonality of a print can be made lighter or darker by increasing or decreasing the amount of light that exposes the paper. Selected areas of the print can be darkened by adding more light to those areas. This is called burning in . If you want to make a certain part of the print lighter, all you have to do is hold back the light in that area with your hand or a tool. This is called dodging .
To distinguish between the light and dark areas of the subject and the light and dark areas of the print, subject brightnesses are called subject values . The gray, black, and white areas of the print are called print values , or tones .
Lets summarize what we have learned about emulsions, negatives, and prints:
- The photographic emulsions of the films and prints are essentially the same. When an emulsion is exposed to light, it produces a density of silver after being developed. The greater the exposure, the greater the density.
- A light value in the subject produces a high density in the negative, which results in a light tone in the print.
- A dark value in the subject produces a low density in the negative, which results in a dark tone in the print.
Memorize these three principles before you go on.
After a photographic emulsion has been exposed, it must be processed for the image to appear and remain stable. Processing means putting the emulsion through a series of chemical baths called developer, stop bath, and fixer. The chemistry and procedures are essentially the same for processing film and paper. The main difference is that film processing must be done in complete darkness to prevent the film from becoming fogged. Print processing can be done under a red-filtered light called a safelight . You should read the instructions supplied with all chemicals before using them.
Before an exposed emulsion has been processed, there is no noticeable change in its appearance. At this point, the negative is said to contain a latent image. The developer chemically converts this latent image to the visible silver image that makes up the negative and print. Remember that the longer the emulsion is left in the developer, the more dense these deposits of silver will be . If film is left in the developer for too long, these deposits of silver will become so dense that they will block too much of the light from the enlarger, and the print will be too white and contrasty. This effect is called overdevelopment. If a negative is underdeveloped, areas of the print that should be white will instead be gray, and the print will be dark and muddy. Prints that are under- or overdeveloped will either be too light or too dark, respectively. For this reason, the development stage of the process must be timed carefully. As you will learn from this book, the correct development time for film depends on the contrast of the subject. The standard development time for most photographic paper is from 2 to 4 minutes. (For more information on developers, refer to .)
Because the timing of the development stage of the process is so critical, it is important that the emulsion stops developing as soon as the proper density has been reached. Developers must be alkaline to work. Because stop baths are acidic, immersing films or papers in a stop-bath solution will stop the developing process immediately. A 15- to 30-second rinse in fresh stop bath is sufficient.
The fixing bath dissolves the remaining unexposed silver in the emulsion and allows it to be washed away. It is important that the fixing stage of the process be complete because any residues of unexposed silver will eventually stain the film or print and ruin the image. If your fixer is fresh and properly diluted, the minimum time that you should fix your negatives and prints before turning on the white light is 2 minutes for negatives and 1 minute for prints. Certain rapid fixers reduce the time required for complete fixing. Be sure that you read the manufacturers instructions very carefully for proper dilutions and times.
Font size:
Interval:
Bookmark:
Similar books «The Practical Zone System for Film and Digital Photography: Classic Tool, Universal Applications»
Look at similar books to The Practical Zone System for Film and Digital Photography: Classic Tool, Universal Applications. We have selected literature similar in name and meaning in the hope of providing readers with more options to find new, interesting, not yet read works.
Discussion, reviews of the book The Practical Zone System for Film and Digital Photography: Classic Tool, Universal Applications and just readers' own opinions. Leave your comments, write what you think about the work, its meaning or the main characters. Specify what exactly you liked and what you didn't like, and why you think so.