Boyce Flori - Replacing The Sky In A Photo: Step-By-Step Guide To Replace A Sky In Your Images
Here you can read online Boyce Flori - Replacing The Sky In A Photo: Step-By-Step Guide To Replace A Sky In Your Images full text of the book (entire story) in english for free. Download pdf and epub, get meaning, cover and reviews about this ebook. year: 2021, publisher: Independently published, genre: Art. Description of the work, (preface) as well as reviews are available. Best literature library LitArk.com created for fans of good reading and offers a wide selection of genres:
Romance novel
Science fiction
Adventure
Detective
Science
History
Home and family
Prose
Art
Politics
Computer
Non-fiction
Religion
Business
Children
Humor
Choose a favorite category and find really read worthwhile books. Enjoy immersion in the world of imagination, feel the emotions of the characters or learn something new for yourself, make an fascinating discovery.

- Book:Replacing The Sky In A Photo: Step-By-Step Guide To Replace A Sky In Your Images
- Author:
- Publisher:Independently published
- Genre:
- Year:2021
- Rating:5 / 5
- Favourites:Add to favourites
- Your mark:
Replacing The Sky In A Photo: Step-By-Step Guide To Replace A Sky In Your Images: summary, description and annotation
We offer to read an annotation, description, summary or preface (depends on what the author of the book "Replacing The Sky In A Photo: Step-By-Step Guide To Replace A Sky In Your Images" wrote himself). If you haven't found the necessary information about the book — write in the comments, we will try to find it.
This book will show you how to use Lightroom and Photoshop to create gorgeous skies in your photos. You will learn how to take boring skies and create breathtaking new skies with Photoshop and Lightroom. This is a step by step introductions on how to replace the sky which helps you to create a great image
Boyce Flori: author's other books
Who wrote Replacing The Sky In A Photo: Step-By-Step Guide To Replace A Sky In Your Images? Find out the surname, the name of the author of the book and a list of all author's works by series.


Replacing The Sky In A Photo: Step-By-Step Guide To Replace A Sky In Your Images — read online for free the complete book (whole text) full work
Below is the text of the book, divided by pages. System saving the place of the last page read, allows you to conveniently read the book "Replacing The Sky In A Photo: Step-By-Step Guide To Replace A Sky In Your Images" online for free, without having to search again every time where you left off. Put a bookmark, and you can go to the page where you finished reading at any time.
Font size:
Interval:
Bookmark:
Welcome to the first lesson about Sky Replacement! Why should you learn thevarious techniques to replace sky? You have two options when it comes to sky replacement: if you're out taking photos and the sky is bad, you can either returnon another day (or make another trip later) or do the efficient thing and put in great skies.
It is not easy to replace skies. Although the technique is simple, finding the right sky for the photo and how to implement it took me months of practice. I will besharing my best practices in this book.
It is important to achieve a seamless blend of the photo and the video.The sky that you put in should look natural and not Photoshop-ed. It is nice when people can't tell the difference between the original sky and what has been altered. A sky without clouds can be transformed into a dramatic one, which willtransform a boring photo into something very dramatic.
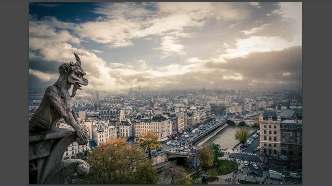
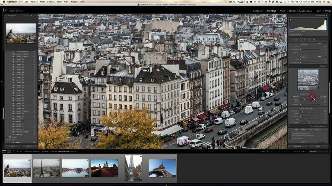
Let's begin with this example I shot from the Notre Dame roof. Notre Dame, aParisian church, has 284 steps to reach the top. This is not a problem for Olympic athletes, but it is a big deal for me. This famous shot is because of the Eiffel Towerand the Seine River.
The statue was what I wanted as a foreground, but the sky was too boring. It'sdisappointing after spending the entire day trying to take photos. If the photo youtook isn't good enough, it won't be a photo. I think having a great sky is the bestthing. I don't like doing sky replacements, but I do like to experiment with it sometimes. Sometimes I can create really nice effects by replacing the sky. I want to show you that.
Open the photo in Adobe Lightroom. 1. Let theShadows In!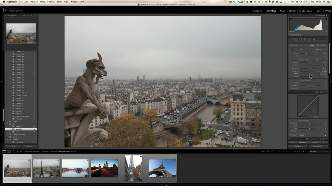
Because I believe repetition will help people learn the basics of what should bedone for each photo, I'm going repeat many of the same steps in every lesson.You've probably seen my videos, read blogs and viewed other courses to get anidea of how I work.
Open the Basic Panel and increase the Shadows to +100. However, don't reduce theHighlights as I would normally. Instead, increase the Highlights to
+10.
Although I usually bring my Highlights to -100, Photoshop will allow us to use ablending mode to preserve the white sky so that we can replace it. It doesn't matterif it sounds confusing. We will explain it as we go.
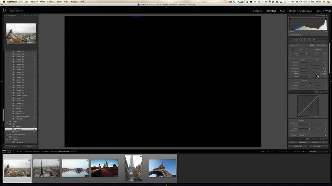
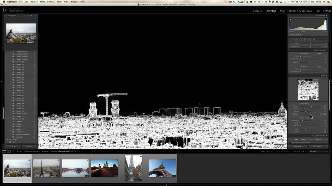
You can control clipping by playing with your Whites slider or your Blacksslider. This means that the image will either become completely white withoutany color information, or blacken to the extreme.
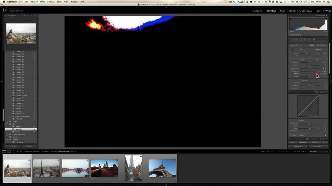
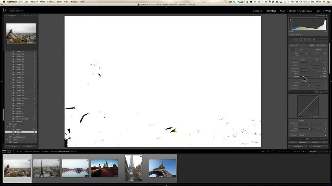
This will help you identify what is clipping. Press the Alt key and push the sliders.The colored areas that appear will help you determine what is clipping. You'll seesomething similar to the above image if you press the Alt key while pushing theWhites slider towards the right. These colored areas
are 100% pure white. This is not what we want. You can back it down toaround +60. There should be no more than a few scattered colors.
Next, let's adjust the Black point. The Black point will darken the photo a lot. We want some areas to be 100% black to give it a nice contrast. You can adjust theBlacks slider to approximately -65. You will see pixels that are 100% black.
 That's already looking better.
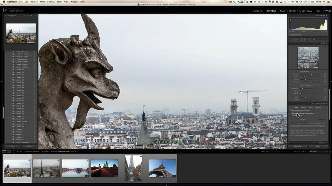
 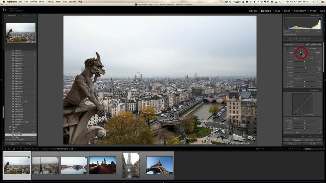 Let's make this image even more crisp by adding clarity. The Clarity Slidershould be set to +27.
The details that we see in the buildings are very appealing to me. It's really cool.
We will remove any noise from the photo to make it stronger. Although thereis very little noise, I take 10 out just in case. Go to the Detail Panel, and adjustthe Luminance Slider until it reaches 10.
Ok, now I have this formula. The luminance value and sharpness should equal100. Now that our Luminance has reached 10, let's push the Sharpening Slider up to 90.
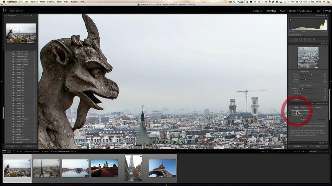
Okay, that's perfect. Here's the thing: sharpening can make a photo sharp, but it can also introduce grain to areas that have no detail, such as the sky. You can seethe sky is becoming very grainy if you zoom in. Masking is used for this purpose.Press the Alt key, and then push the Masking Slider to blacken your sky. This istypically around 50. The black areas are being honed, while the white areas are being rounded.
Now we have a beautiful diffused sky and a sharpened city. This is kind of cool.
You will notice some fringes of green and red color around the edges. This isknown as Chromatic Aberration, and it's easy to get rid of. Click on RemoveChromatic Aberration. It's not difficult, right?
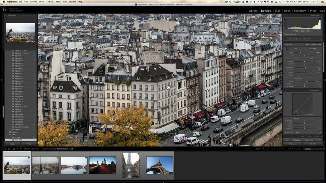
Let's now levelize the city so that our horizon line remains straight.
Click on Auto under the Upright function.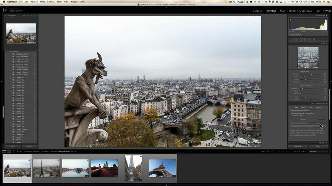
Open the image in Photoshop, then bring the sky into Photoshop.
The basic retouching is not over. Right-click on the image to open Photoshop CC.
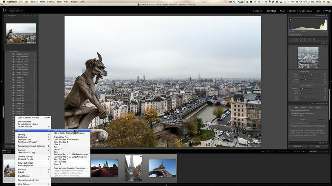
Don't worry if Photoshop is older, these techniques will still work with it. Aftera few seconds, the image should now be opened in Photoshop.
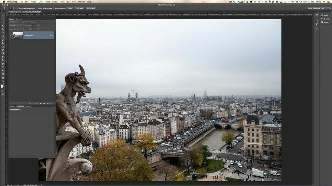
Photoshop is not something that many of you are familiar with, but don't bediscouraged. This will be explained step-by-step. Before we can get intoPhotoshop, we need to pick our sky and import it into Photoshop. Open Lightroom, select your sky photos from this course, and let's start looking for a sky that will work. Navigate to the location of your photos in Lightroom'scollections panel.
Font size:
Interval:
Bookmark:
Similar books «Replacing The Sky In A Photo: Step-By-Step Guide To Replace A Sky In Your Images»
Look at similar books to Replacing The Sky In A Photo: Step-By-Step Guide To Replace A Sky In Your Images. We have selected literature similar in name and meaning in the hope of providing readers with more options to find new, interesting, not yet read works.
Discussion, reviews of the book Replacing The Sky In A Photo: Step-By-Step Guide To Replace A Sky In Your Images and just readers' own opinions. Leave your comments, write what you think about the work, its meaning or the main characters. Specify what exactly you liked and what you didn't like, and why you think so.