Marijuana: Lets Grow A Pound
A Day-By-Day Guide to Growing More Than You Can Use
Copyright 2012 SeeMoreBuds
Published by Quick American
A Division of Quick Trading Co.
Oakland, CA
ISBN 978-1-936807-17-8
Executive Editor: Ed Rosenthal
Cover and Interior Design: Hera Lee
Photo Editor: Hera Lee
All Photos: SeeMoreBuds except for product photos on pages 5-7, 15, and 138-140, which are property of R&M Supply.
The material offered in this book is presented as information that should be available to the public. The Publisher does not advocate breaking the law. However, we urge readers to support secure passage of fair marijuana legislation.
All rights reserved. No part of this book may be used or reproduced in any manner whatsoever without written permission of the Publisher, except in the case of brief quotations embodied in critical articles or reviews.
Contents

I f you or your buddies smoked an eighth a day, every day, all year long, you would need an ounce of weed every eight days. This was the thought that started it all for me. I did the math: I was spending $60 a day for a sack that lasted me 24 hours. I figured that if I could grow a pound of weed in eight to nine weeks, I would have more than I could, would, or should smoke for more than four months.
My first attempt at growing 20 years ago was dismal. I was so eager to get started that I failed to do any homework. Ive learned a great deal since then.
The intro that you are reading now is the longest section of this book. I have made it so that you can tackle the setup of the garden and its maintenance in short, simple steps. The set up is simple, yet one level more involved than shown in Marijuana Buds for Less, where only energy-efficient compact fluorescent bulbs were used in the garden.
Today, the would-be grower wants a pound of the finest herb using the easiest, fastest, most affordable method. In this book we follow two parallel grows, both using HPS (high pressure sodium) lights: Editor Ed Rosenthal challenged me to supplement the garden with CO2 and compare the results. With the right equipment assembly I went ahead, laying the groundwork for you to follow along.
Hundreds of pounds have been grown and smoked by CEOs, pro athletes, and Fortune-500 executives, using the same methods you see in this book. And some of the weed you see in Lets Grow A Pound has actually been smoked by these high-level performers. They dont settle for second-rate weed, and neither should you.
Each time you do this grow it will be easier and more successful. By the third cycle, it will seem effortless. Take a deep breath and dig in. There is no easier method to growing a pound of the worlds finest chronic.
~SeeMoreBuds
Garden Preparation

The first step is to select a location for your garden. Choose a safe, low traffic spot with convenient access to water, air and electricity. In this book you will see a closet location used for the garden. Each growing location is unique and will require some modifications, ingenuity, and imagination. Minimum space to grow a pound of chronic is 20 square feet, which is the size of our closet (2.6 8 feet). A 5 6-foot closet (30 sq. feet) would be ideal, providing greater access to the plants.

You will need to find your breaker box and make sure you have a free 15-amp breaker to run your 1000-watt garden. Only garden equipment should be plugged into outlets designated to the garden breaker. The 1000-watt HPS (High Pressure Sodium) bulb will use 9.5 amps, giving the garden another 5.5 amps for accessories (fan, etc.). All electrical items have a sticker on them that discloses the number of amps used by the product.
The first step is to gather materials to build the garden. Here is my list:
A.C.A.P. 1000-watt Quantum digital ballast
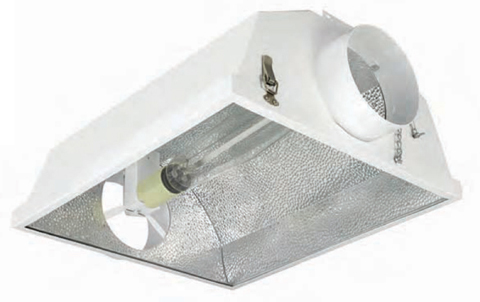
B.C.A.P. Xtreme LumenAire 6" air-cooled reflector
C.C.A.P. 6" inline fan for carbon filter
D.1000-watt HPS bulb (DigiLux brand pictured)
E.Soil: three 64-quart bags of nutrient-supplemented mix for vegetables
F.Carbon air filter that fits inline fan; here both fan and filter are 6" wide
G.Lamp/appliance timer, with at least one on/off per 24 hours
H.Thermometer
I. Cloning tray
J. Rockwool cubes
K.pH tester and pH Up and pH Down
These supplies are not pictured but should also be collected:
18 3-gallon containers with drainage holes, and water trays to place the containers in
Plastic tarp to line trays and protect floors from overflow
Watering can
Oscillating fan or centrifugal fan mounted to wall
Panda white/black poly film, or other reflective material
Ducting 6" wide to connect light reflector to fan
Light mover (optional)
To supplement your garden with CO2 youll need this equipment (more details on pages 7 and 26):
Second lamp/appliance timer
20-pound tank of CO2
CO2 controller
CO2 regulator
Drilled CO2 tubing with micro holes (3-10 feet), and a plastic tubing T-connector
Reflective foil or insulation to seal grow room

Recommended Lighting Equipment

C.A.P. Quantum Digital Ballast
Ballasts convert house current to the appropriate voltage for high intensity lights. Digital ballasts offer significant advantages over magnetic ballasts, as they are more power efficient, generate greater lumens, are lightweight, are silent, and emit less heat. The Quantum digital ballast is a 1000-watt dimmable ballast with three separate power settings (50, 75, or 100 percent) for maximum lighting control.

C.A.P. LumenAire Air-Cooled Reflector
HPS and other high intensity bulbs emit intense heat that can build to lethal temperatures (for the plants) if left unattended. Air-cooled lights keep the garden from overheating by removing much of the heat before it reaches the grow room. Otherwise you need an air conditioner, which uses more electricity. The LumenAire reflector has 6-inch flanges for air cooling that attach to the air hose and inline fan. Its tempered hinged glass bottom allows for easy cleaning and bulb replacement.
Next page


