Gary Hallberg - Building a Simple Rover
Here you can read online Gary Hallberg - Building a Simple Rover full text of the book (entire story) in english for free. Download pdf and epub, get meaning, cover and reviews about this ebook. year: 2021, publisher: North Border Tech Training, genre: Children. Description of the work, (preface) as well as reviews are available. Best literature library LitArk.com created for fans of good reading and offers a wide selection of genres:
Romance novel
Science fiction
Adventure
Detective
Science
History
Home and family
Prose
Art
Politics
Computer
Non-fiction
Religion
Business
Children
Humor
Choose a favorite category and find really read worthwhile books. Enjoy immersion in the world of imagination, feel the emotions of the characters or learn something new for yourself, make an fascinating discovery.

- Book:Building a Simple Rover
- Author:
- Publisher:North Border Tech Training
- Genre:
- Year:2021
- Rating:4 / 5
- Favourites:Add to favourites
- Your mark:
Building a Simple Rover: summary, description and annotation
We offer to read an annotation, description, summary or preface (depends on what the author of the book "Building a Simple Rover" wrote himself). If you haven't found the necessary information about the book — write in the comments, we will try to find it.
This, the fifth book in the Arduino Short Reads Series, takes a different tack compared to the others as it much more project focused. This book takes the reader through every detail in the construction of an Arduino based autonomous vehicle. It provides a structured approach and goes into detail for every step from sourcing a chassis, understanding the drive system, programming the vehicle to follow lines and avoid objects. The book shows you how to use the freely available Processing IDE to develop an app to control the rover via Bluetooth. All using low cost and readily available components. There is a lot of compelling and informative content for the novice engineer or the hobbyist looking to have fun in STEM education, microelectronics, and coding.
Gary Hallberg: author's other books
Who wrote Building a Simple Rover? Find out the surname, the name of the author of the book and a list of all author's works by series.


Building a Simple Rover — read online for free the complete book (whole text) full work
Below is the text of the book, divided by pages. System saving the place of the last page read, allows you to conveniently read the book "Building a Simple Rover" online for free, without having to search again every time where you left off. Put a bookmark, and you can go to the page where you finished reading at any time.
Font size:
Interval:
Bookmark:
Building a Simple Rover Book 5 of the Arduino Short Reads Series Gary Hallberg North Border Tech Training First Edition Copyright 2021 Gary Hallberg and North Border Tech Training All reserved. This book or any portion thereof may not be reproduced or used in any manner whatsoever without the express written permission of the publisher except for the use of brief quotations in a book review. First Published, 2021 Contents About the Arduino Short Reads Series The idea underpinning the Arduino short reads series is to provide a comprehensive, easy to follow tutorial set and reference guide for anybody wanting to learn about Arduino and basic electronics. Having a short reads series means that students and hobbyists can select key topics of interest in the field with minimal outlay. The series aims to provide an easy introduction to all topics of interest and expand on these topics to provide a broader and deeper understanding of that focus area. The books are currently only available in Kindle format to provide a very inexpensive package backed up by video content and interactive social media.
The series is aimed at youngsters and adults interested in getting into electronics and it takes a modern approach, combining the use of the inexpensive software driven Arduino controller board, with a multitude of sensors and discreet electronic components. The experiments in this series of books are easy to follow, inexpensive to implement and compelling for all interested in STEM education. I hope to inspire anybody looking for a future career in technology or to simply to have fun. The first book of this series looks at the Arduino microcontroller and explains its operation and purpose. Experiments look to show you how to set up the programming environment and drive LEDs as well as read input from switches, thermistors and photocells. Book 1 will give you a solid foundation of how some basic electronic components work and how to use them to make simple designs.
Books 6 to 8 in this Arduino short reads series are still being written but the series focuses on the following: Book 1 First Steps with Arduino (published) Book 2 Working with Displays (published) Book 3 Controlling Motors (published) Book 4 Range Finding, Object Detection and Object Avoidance (published) Book 6 Arduino Special Functions Book 7 Communications with Arduino Book 8 The Arduino Leonardo If you find this series of books useful then please leave your review and rating on Amazon. Follow North Border Tech Training on Facebook and Twitter for the latest news and insights as to how this series will develop. Foreword Book 1 of this series sets out to provide a basic understanding of the Arduino platform, how to program it and how to interface simple electronics. This book takes a different tack to the others in so far that it is more project based. Those who have followed the previous books will be able to apply that knowledge, but there is also enough information presented to allow those who are new to this series to understand and follow the experiments provided you have a basic understanding of Arduino. In this book we will build a simple autonomous vehicle.
We will also look at utilizing Arduino shields for the first time. The code for the rover will be very modular such that the code for any operational function can be substituted with more sophisticated code. You will have a great test bed for developing your skills and applying them to a popular area of STEM education that is both fun and rewarding. Our rover will have the ability to follow lines, avoid objects and we will build a PC based app with Processing to control the rover via Bluetooth. I have no doubt the skills learnt here will allow you to develop more engaging and useful projects. Without further delay let us get into the content.
Prerequisites for this Book This book assumes you have read Book 1 of the series (First Steps with Arduino) or you already have some experience of the Arduino platform, how to set up the IDE and undertake some basic Arduino programming tasks. Basic functions such as digitalRead and digitalWrite are not covered here but are explained in Book 1. We will call on some of the material covered in Books 3 and 4 as motor control and object avoidance play a key part in our rover build, and so I will touch on some key aspects of these subjects so that anybody starting with this book of the series, and does not have the relevant knowledge, can still follow the experiments. Download the Code You can download the Arduino Code for the experiments in this book from GitHub using the link below. https://github.com/ghallberg-nbtt/congenial-tribble I recommend that you do this as I have removed some of the comments from the code in the book listings to aid readability in print form. 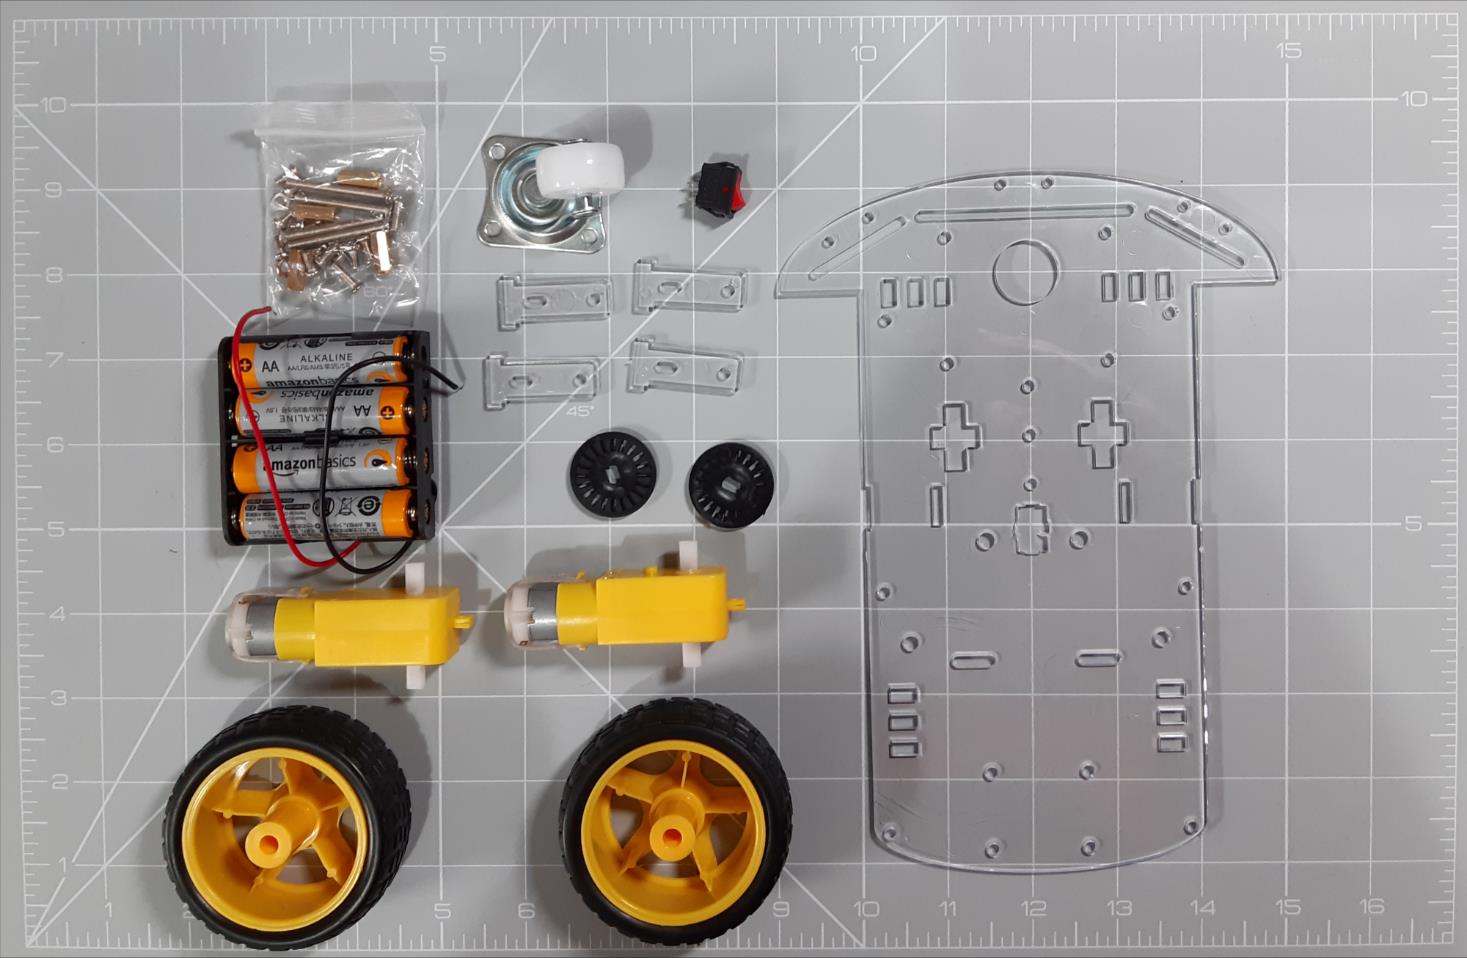 Chapter 1: The Chassis, Motors, Power and Basic Components In this chapter we will look at the foundation for your rover. Chapter 1: The Chassis, Motors, Power and Basic Components In this chapter we will look at the foundation for your rover.
You will need a chassis, a pair of geared DC motors and a decent battery power source. We will also look at some of the motor control electronics and sensors that you will need. We will not look at these in much detail here but will cover them all in the following chapters. The Chassis I will be using an extremely common and inexpensive chassis. This ships with geared DC motors suitable for the chassis and the kit has the benefit of component mounting holes already in place. Figure 1-1: The Rover Chassis Kit I will be usingImage source: The author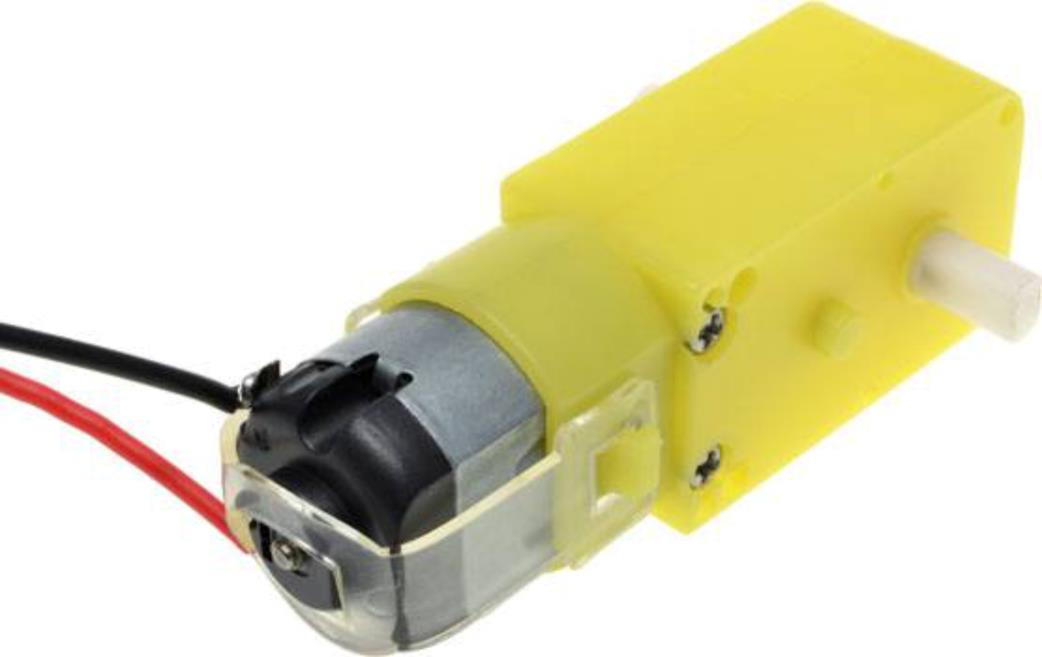 This type of chassis has 2 driving wheels, each powered by a DC motor. Figure 1-1: The Rover Chassis Kit I will be usingImage source: The author This type of chassis has 2 driving wheels, each powered by a DC motor.
The caster is mounted at the rear of the chassis. The battery bank will be replaced with more powerful rechargeable lithium-ion batteries. There are similar 4 wheeled versions of this chassis but bear in mind the extra motors will increase cost and draw more power. Either way, these chassis have mounting holes pre-drilled for sensors and other electronics and will make our build easier. I have no doubt the more adventurous reader will want to build their own chassis. The Geared DC Motor You need to consider the DC motor.
The type I will be using ships with the chassis kit. They need to be geared, but do not need to be particularly powerful. My motors work from 3VDC to 6VDC and draw about 160mA. The point is they need to be geared so that the rotational speed of about 2000rpm can be converted to torque at the wheels. A gear reduction of about 1:48 is fine. Figure 1-2: A Geared DC MotorImage source: The Web (public domain) Motor Control Electronics Space is at a premium on any chassis. Figure 1-2: A Geared DC MotorImage source: The Web (public domain) Motor Control Electronics Space is at a premium on any chassis.
Therefore, I chose to make use of Arduino shields to stack the main electronics elements and contain them within the footprint of the Arduino board. A shield is simply a functional electronic module that is built to match the form factor of the Arduino board and has header pins soldered to the underside such that it can be inserted into the headers of the Arduino. I will be using the Arduino motor shield and we will cover this in detail in Chapter 2. It contains the H-Bridge needed to control the speed and direction of our motors. Figure 1-3 shows the motors shield mounted to the Arduino Uno. 
Font size:
Interval:
Bookmark:
Similar books «Building a Simple Rover»
Look at similar books to Building a Simple Rover. We have selected literature similar in name and meaning in the hope of providing readers with more options to find new, interesting, not yet read works.
Discussion, reviews of the book Building a Simple Rover and just readers' own opinions. Leave your comments, write what you think about the work, its meaning or the main characters. Specify what exactly you liked and what you didn't like, and why you think so.