Contents
Guide

2023 by Lora S. Irish and Fox Chapel Publishing Company, Inc., 903 Square Street, Mount Joy, PA 17552.
Lettering on Wood, Paper, and Leather is an original work, first published in 2023 by Fox Chapel Publishing Company, Inc. The patterns contained herein are copyrighted by the author. Readers may make copies of these patterns for personal use. The patterns themselves, however, are not to be duplicated for resale or distribution under any circumstances. Any such copying is a violation of copyright law.
Print ISBN 978-1-4971-0328-3
ISBN 978-1-63741-160-5
Library of Congress Control Number: 2022943913
To learn more about the other great books from Fox Chapel Publishing, or to find a retailer near you, call toll-free
800-457-9112 or visit us at www.FoxChapelPublishing.com.
We are always looking for talented authors. To submit an idea, please send a brief inquiry to .
, brown paper).
For a printable PDF of the patterns used in this book, please contact Fox Chapel Publishing at , with 9781497103283 Lettering on Wood, Paper, and Leather in the subject line.
Contents
What Is Pyrography?
Pyrography (also called woodburning) is the art of creating simple line designs, highly detailed renderings, and shaded drawings using a hot-tipped pen on natural wood or wood-like surfaces. As the pen is pulled across the surface of the media, the tip literally burns it to create pale through dark tonal value lines. The pattern of lines and shading strokes that you use in your woodburning work determines the art style of the finished project. Any pattern can be worked in any art style or in a combination of styles.
Lettering patterns for woodburning work exactly like any other pyrography design. It begins with choosing your pattern, choosing your wood or other burning media, and preparing the media. The basic tools, supplies, and techniques that you learn in the how-to sections of this book are the very same methods and processes that a pyrographer uses on pet portraits, landscapes, and wildlife themes.
We will explore how the shapes of our common fonts can affect the emotional tone, status, and impact of your wording, how using several fonts in one design can emphasize your message, and how you can apply your lettering skills to wood, paper, and leather.
Lets get started.

Large craft stores have a wide variety of precut wood shapes that you can use for both practice and projects as you work through this book.
Safety Tips
Lets take a moment and consider a few simple safety precautions to ensure a greater pyrography experience.
Your project medium should be an untreated, unpainted, and unfinished natural surface. Paints, polyurethane sealers, varnishes, and chemicals used in treating wood can release toxic fumes during the burning process. Leather pyrography should be worked on vegetable-tanned animal hide. Chemically dyed, synthetic, and faux leathers are not suitable for burning.
Do an internet search on the media that you will be burning to discover if it has any toxic properties. There are several excellent databases available.
Work in a well-ventilated area. A small fan set on your table that points away from your work will circulate the smoke and fumes away from your face. Whenever possible, work near an open window.
Avoid laying your project in your lap during the burning steps. This places your face directly above the fumes, which increases your chances of inhaling smoke.
Unplug your burning unit from the wall socket whenever you are not working. An unattended hot pen tip can cause fires.
While working, set your pens either on the pen stand provided by the manufacturer or on a ceramic tile.
Remember that your pen tip can easily reach over 700F, causing your pen tips to glow bright red. Having a too-hot temperature not only overburns your media, but it can also damage your pen tips and burning unit.
Pyrography BasicsTools and Techniques
Before delving into lettering techniques, its important to learn the basics of woodburning, pyrography units, and burning media. A woodburning is created with five elements: the woodburning unit, the pen tips, the media on which you are working, the pattern or design you will burn, and the art style you will use to create the design. Lets look at the pyrography systems first.
Woodburning Systems
For a total beginner to pyrography, this craft can feel overwhelming at first. But even those with experience may be asking, What burning unit and pen style is best for what I want to do?
There are three styles of woodburning units: one-temperature tools, rheostat-controlled tools, and variable-temperature tools. Which you choose depends on both your interest in this craft, your pyrography budget, and the media on which you will be working.
One-Temperature Tools
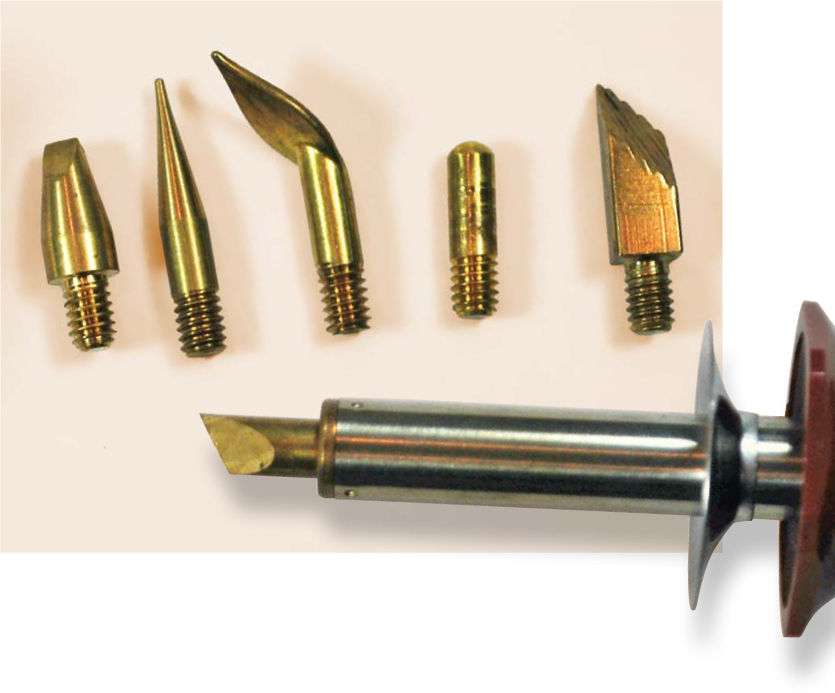
A one-temperature tool has the heating element inside of the handle. It comes with a variety of interchangeable brass tips that are placed in a threaded receptacle at the end of the tool. Tool tips for this burning system include the universal tip, calligraphy tip, cone tip, large ball shader, and large flat shader.

One-temperature, soldering-style tools can be obtained at most craft stores for under $20 USD. Rheostat burning tools cost in the range of $20$30 USD. Variable-temperature units begin around $75 USD.
Once plugged into an electrical outlet, the tool quickly reaches an even but high temperature. This means that the tonal value work in your project must be controlled through the textures or strokes that you use and the speed of the stroke. Very pale tonal values are burned by using a light pressure against the wood and moving the tool tip quickly through the burn stroke. Darker tones use a medium pressure and slower motion.
A full range of tonal values can be burned using a one-temperature tool. Burn your pale tones as the tool tip begins to heat, and save your darkest tones for when the tool tip has reached its full setting.
Originally, this style of tool was used for soldering. Today, it can be found in almost all pyrographers tool kits. One-temperature burning tools are inexpensive, readily available at your local craft or hobby store, and excellent for first-time woodburners to give the craft a try. I began woodburning 25 years ago with this style of tool. Several years ago, I purchased a new one-temperature unit so I would have two tools on the table, each with a different tip, ready for use in my projects. Although I now favor two variable-temperature tools, I still use my one-temperature system on a regular basis.

One-temperature tools hold a steady amount of heat, making each burned line identical to the rest. By layering burned strokes, you can increase the darkness of your shading.
