Draw In Perspective By THIS Weekend: For the Extreme Beginner
Copyright: Liron Yankonsky
Published: September 2013
All rights reserved. No part of this publication may be reproduced, stored in retrieval system, copied in any form or by any means, electronic, mechanical, photocopying, recording or otherwise transmitted without written permission from the publisher. You must not circulate this book in any format.
This book is licensed for your personal enjoyment only. This ebook may not be resold or given away to other people. If you would like to share this book with another person, please purchase an additional copy for each recipient. Thank you for respecting my hard work.
Kindle edition
Table of contents:
1. Introduction
2. Tools
3. How to draw in perspective
a. Introduction to perspective
b. Perspective terms and basics
c. One point perspective
d. Two point perspective
e. Three point perspective
4. Shadows and light sources
a. Why is this important?
b. Factors that affect the shadows
5. Applying what we learned step by step
a. One point perspective
b. Two point perspective
c. Three point perspective
6. Wrapping things up
Introduction
Hello, my dear reader!
My name is Liron, and I have been drawing ever since I was born. I am very passionate about art, and have always been fascinated with the ability to portray reality on the canvas.
My goal with this book is to provide you with a SUPER easy to understand resource, that will help you on your way of learning how to draw in perspective . The drawings arent going to be extremely complicated. The language is going to be simple. Thats because my biggest goal here is to help you truly UNDERSTAND perspective, and so I will put a strong emphasis on understanding the logic behind what well do.
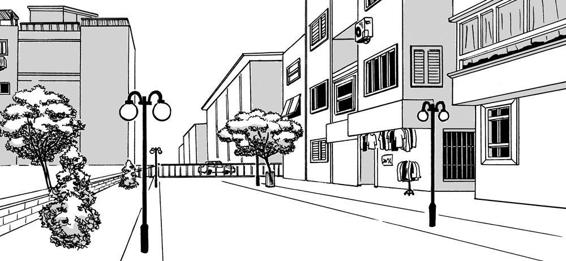
This book is built in a simple way. First I will teach you the general rules of perspective. Then I will explain each basic type of perspective. Then, I will teach you how to apply that to drawing different 3D shapes and objects.
I am going to make one of two assumptions, in order to make learning from this book easier.
- You have some talent and / or attraction towards art and drawing, but havent yet learned and acquired the tools for drawing in perspective.
- You are specifically interested in learning how to draw in perspective and how perspective works, but not necessarily in art in general.
Even if you do not fit in these categories, fear not. Even if you are at a different level, or have a different background, you will definitely learn a lot from this book.
A few important things, regarding how to use this book:
- Anyone can do it (especially perspective) . I truly believe anyone can get better at drawing and art. And this is especially true in perspective drawing, because the ruler is your best friend, and helps you draw most of the important lines. Also, its all a matter of discipline and hard work. One of my best friends wasnt born with this talent (trust me) and now he is better than me.
- Read and practice simultaneously . This book is NOT meant to be read from cover to cover and only THEN applied. If you truly want to internalize everything, I suggest drawing and experimenting while reading the book. Also, in the Applying what we learned part, you will acquire some basic experience.
- I want you to approach this subject with an open mind . Drawing in perspective requires some technical understanding of how things work in the real world, and it may require you to unlearn wrong concepts and ideas in your head, and learn new ones.
- Be patient . Remember that this is a new skillset you learn, and that takes time. Always keep a positive approach, and never beat yourself up for not understanding something. I have no doubt you will eventually get the hang of perspective.
- As you learn new concepts, put an emphasis on searching for them in the real world. Observe how things are constructed and how they behave, and you will grasp the concepts much more easily.
- Dont worry if you dont understand all these suggestions just yet. I promise it will all come together nicely when you finish this book.
So without further ado, lets jump right into the world of drawing in perspective and 3D!
***
Tools
To start this adventure, lets first look at the tools well need. These are very simple tools, which you probably have at home. Remember that the quality of your art is affected far more greatly by your hard work and skills, and less by the tools you use.
- Pencil This will be our main tool for drawing, and making rough sketches. I recommend using a standard HB pencil for most of the drawings, and a mechanical pencil for drawings which require finer details and thinner lines.
- Eraser I use the eraser on the tip of the pencil, but I also suggest getting a kneaded eraser, which is an eraser you can knead to any shape you want, and doesnt leave debris when erasing.
- Pen This will be used to turn our sketches into finished drawings. Also, feel free to sketch using a pen, if it feels more comfortable to you. Just keep in mind that you wont be able to erase it
- Ruler This is one of our most important tools! You will find yourself drawing A LOT of straight lines, and this will make the job much easier! We will only need a triangle ruler, which will help us draw perpendicular and parallel lines.
- Paper I suggest you use a standard A4 sized paper for everything, any normal paper will do. Make sure you dont use a crumpled paper.
- Desk any flat desk would do.
And thats it! I like the approach of KISS Keep It Simple, Stupid!
***
How to draw in perspective
Introduction to perspective
This chapters goal is to help you understand and learn how to use perspective to create wonderful drawings and sketches. We will talk about different kinds of perspectives, and later on apply everything we learn in each type, so that you understand the differences, advantages and downsides of each type of perspective.
So what is perspective anyway? This is not a stupid question at all. To make a super huge generalization, perspective is that which determines how things are going to look from a specific point of view. It is a set of rules designed to help you bring reality (and even distort reality) onto paper.
There are three main types of perspectives:
- One point perspective
- Two point perspective
- Three point perspective
There are a two more types of perspective, which are distorted. We will not get into them in this book.
There are a few basic rules that apply to all types of perspective, and then there are specific rules for each type of perspective.
So what are the basic rules? Read on
Perspective terms and basics
Rule number one to drawing in perspective is this one simple rule:
Objects that are closer to us appear to be bigger in relation to objects that are farther from us.
Thats it. Its that simple!
Here is an example to help you understand this:
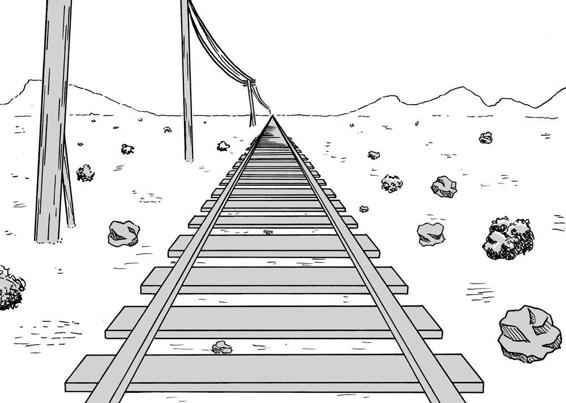
As you can see here, the rail road is getting smaller, the farther away it goes from us. Also note that the farther bushes and rocks are smaller than the closer ones. Even more so, the rock on the lower right side actually appears to be BIGGER than the most distant utility pole. Thats how powerful perspective is. To see this in action RIGHT NOW, put one finger in front of your face, and see how big it looks. Can you block people from your field of view, using only one finger? Of course you can!
Next page
