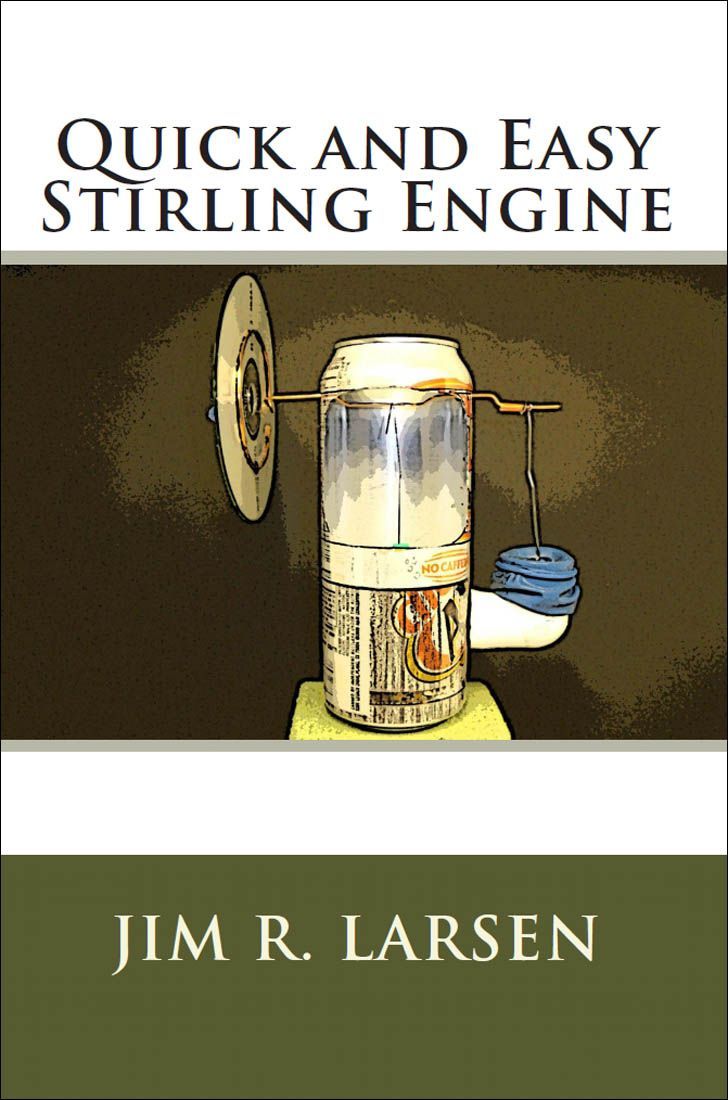
Jim R. Larsen - Quick and Easy Stirling Engine
Here you can read online Jim R. Larsen - Quick and Easy Stirling Engine full text of the book (entire story) in english for free. Download pdf and epub, get meaning, cover and reviews about this ebook. year: 2011, publisher: CreateSpace Independent Publishing Platform, genre: Children. Description of the work, (preface) as well as reviews are available. Best literature library LitArk.com created for fans of good reading and offers a wide selection of genres:
Romance novel
Science fiction
Adventure
Detective
Science
History
Home and family
Prose
Art
Politics
Computer
Non-fiction
Religion
Business
Children
Humor
Choose a favorite category and find really read worthwhile books. Enjoy immersion in the world of imagination, feel the emotions of the characters or learn something new for yourself, make an fascinating discovery.
- Book:Quick and Easy Stirling Engine
- Author:
- Publisher:CreateSpace Independent Publishing Platform
- Genre:
- Year:2011
- Rating:3 / 5
- Favourites:Add to favourites
- Your mark:
Quick and Easy Stirling Engine: summary, description and annotation
We offer to read an annotation, description, summary or preface (depends on what the author of the book "Quick and Easy Stirling Engine" wrote himself). If you haven't found the necessary information about the book — write in the comments, we will try to find it.
Jim R. Larsen: author's other books
Who wrote Quick and Easy Stirling Engine? Find out the surname, the name of the author of the book and a list of all author's works by series.


Quick and Easy Stirling Engine — read online for free the complete book (whole text) full work
Below is the text of the book, divided by pages. System saving the place of the last page read, allows you to conveniently read the book "Quick and Easy Stirling Engine" online for free, without having to search again every time where you left off. Put a bookmark, and you can go to the page where you finished reading at any time.
Font size:
Interval:
Bookmark:
Copyright 2011, 2012 Jim R. Larsen
All rights reserved.
Published by: Jim R. Larsen, P.O. Box 813, Olympia, WA 98507
ISBN-13: 978-1466277779
ISBN-10: 1466277777
eBook ISBN: 978-1-63001-811-5
Revised 2/1/2012 Minor formatting changes and corrections.
About the Author
Jim R. Larsen is a big fan of the Stirling Cycle Engine, and the author of other popular Stirling engine titles, including Three LTD Stirling Engines You Can Build Without a Machine Shop, and Eleven Stirling Engine Projects You Can Build. He has been designing and building model Stirling Engines for many years. Jim is a teacher, a trainer, an author, and an artist. He strives to design and make models that are unique, fascinating, and that you can build yourself.
Contacting Jim R. Larsen
YouTube
Jim periodically posts videos of Stirling engines on YouTube. His YouTube username is 16Strings. The web address for Jims YouTube channel is http://www.youtube.com/16strings.
Web Page
Visit http://Stirlingbuilder.com.
Email
You can send email to Jim at .
Jims Blog
Visit http://woodenmusic.blogspot.com/
Work Safe! The publisher takes no responsibility for the use of any of the materials or methods described in this book, or for the products thereof. Always use power tools and hand tools in a safe manner.
Table of Contents
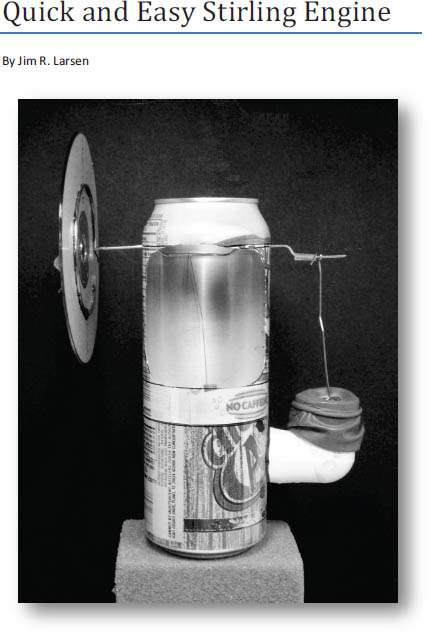
The Quick and Easy Stirling Engine can be assembled from soda cans with simple hand tools in as little as three hours. This engine was designed by Jim Larsen for use in educational settings with students young and old.
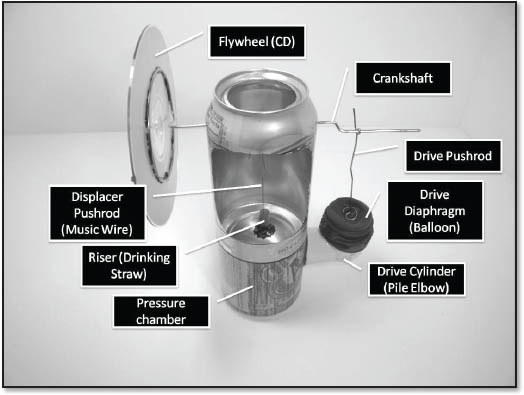
Figure 1 - Quick and Easy Stirling Engine
- 2 (or more) empty 12 ounce aluminum soda cans
- 1 unopened 12 ounce aluminum soda can
- 1 medium size helium quality latex balloon
- 3/4 (19 mm) x 1/2 (13 mm) PVC pipe elbow
- 1 piece of 0.015 (0.38 mm) music wire (or guitar string) at least 10 (254 mm) long
- 16 (406 mm) copper wire, 12 or 14 gauge
- J-B Kwik fast setting epoxy
- Scissors
- Pliers with wire cutters
- Paper hole punch
- Heat gun
- Gloves (for heat protection)
- Permanent marker
- Sand paper
- Small pin or needle
- Floral arrangement foam (one 4 x 9 brick makes 8 engines)
- Large diameter drinking straw
- Paper and pencil
- 1 CD
- Ruler
- Small coin (US dime or equivalent)
- Tape
- Super Glue
- 19 gauge steel wire (or craft wire)
If you are working as part of a group, many of the supplies can be shared. Things like music wire, drinking straws, and floral foam provide enough material to be used in several motors.
About the Materials
All the soda cans used should be of the same size. The brand name does not matter, just as long as the cans are the same diameter. If you are using European soda cans, they will work in the same manner described here.
The helium quality balloons can be found in most any toy department.
The PVC pipe elbow is available in the plumbing department at most any hardware store. It does not matter if the inside of the fitting is smooth or threaded. If there is raised lettering or mold marks on the outside of the fitting they may need to be removed with sand paper to prevent the balloon diaphragm from leaking.
0.015 music wire can be purchased at model shops (where radio controlled models are sold) and some hardware stores for about 20 cents for a 36 piece. Smooth (non-wound) guitar strings are about the same size and will also work.
Copper wire was chosen for the crankshaft because it is easy to bend, yet stiff enough to hold its shape under these light loads. It can be purchased in the electrical department at hardware stores. It is also possible to use coat hanger wire for crankshaft construction. It is harder to bend, but holds its shape better due to increased stiffness.
J-B Kwik epoxy was chosen for this project for two important reasons. It cures in a matter of minutes, and it is able to withstand temperatures up to 300 F. If you substitute a different adhesive, check the temperature rating to make sure it can tolerate at least 300 F.
Small scissors with a sharp point work very well for cutting aluminum cans. Medium sized scissors work well for the final straight cuts.
The heat gun is perhaps the least common of the tools in this list. They are not expensive. If this engine is being built as a project in a class, the entire class should be able to share the use of a single heat gun. The same is true for the gloves.
Floral arrangement foam is available in craft stores or online under a variety of product names. It is usually green, and often sold in blocks that measure about 3 (76 mm) x 3 (76 mm) x 8 (203 mm). One block will make displacers for 7 or 8 engines. The foam will specify if it is for dry flowers or for live (wet) flowers. Either product will work. This product was chosen because it does not melt when it gets hot, but it will burn, so be careful around open flames. It is very easy to shape and form, and very light weight.
The drinking straw is the type commonly used when serving sodas at the local hamburger establishment. Larger diameter drinking straws are preferred for this application because it makes them easier to install. There is sometimes a need for a small diameter coffee straw, but only for some troubleshooting applications.
The CD can be new or used, blank or with media. It can have a label or not. Just dont use anything that you ever want to use as a CD again in the future. Once it becomes a flywheel, it is rendered useless from its previous life.
The 19 gauge steel wire (or craft wire) is used to make the pushrod for the drive diaphragm. It is light gauge steel wire, similar to what is used in floral arrangements. The music wire or copper wire will work as a substitute.
The pressure chamber contains a small amount of air that is held captive inside the engine. One end of the engine is warm, and the other end is cool. The displacer moves the air inside the engine back and forth repeatedly, from warm, to cold, and to warm again.
The air inside the engine expands when it gets warm, and pushes outward on the drive mechanism. When this same air is moved to the cool side of the engine, it contracts. This pulls in on the drive mechanism.
The drive mechanism pushes and pulls on the crankshaft. This causes the crankshaft and flywheel to rotate. The rotation of the crankshaft causes the displacer to rise and fall inside the pressure chamber.
The rotating crankshaft causes the cycle to repeat. The air heats, expands, and pushes the crankshaft through the expansion phase. This moves the displacer and causes the air to enter the cool side of the engine. The air then cools, contracts, and pulls the crankshaft through the contraction phase. This starts the next expansion phase and the pattern continues to repeat itself.
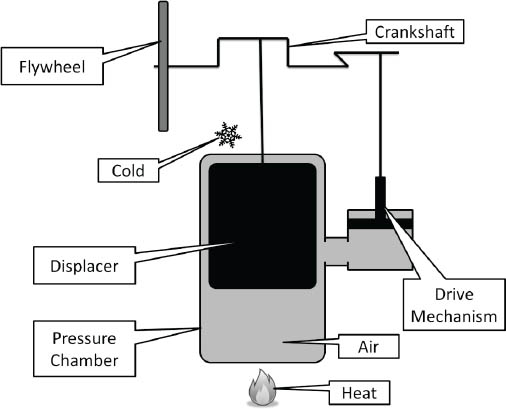
Figure 2 - Stirling Engine Parts
This drawing illustrates the basic parts of a Stirling engine. The pressure chamber contains air that is held captive in a closed system. The air is heated when it is on the bottom of the pressure chamber, near the flame. The air is cooled when it is on the top of the pressure chamber. The air is moved about inside the pressure chamber by a loose fitting piston called a displacer.
Next pageFont size:
Interval:
Bookmark:
Similar books «Quick and Easy Stirling Engine»
Look at similar books to Quick and Easy Stirling Engine. We have selected literature similar in name and meaning in the hope of providing readers with more options to find new, interesting, not yet read works.
Discussion, reviews of the book Quick and Easy Stirling Engine and just readers' own opinions. Leave your comments, write what you think about the work, its meaning or the main characters. Specify what exactly you liked and what you didn't like, and why you think so.