Michael Tanaya , Huaming Chen , Jebediah Pavleas and Kelvin Sung , Building a 2D Game Physics Engine , 10.1007/978-1-4842-2583-7_1
1. Introduction to 2D Game Physics Engine Development
Electronic supplementary material
The online version of this chapter (doi: 10.1007/978-1-4842-2583-7_1 ) contains supplementary material, which is available to authorized users.
Physics engines play an important part in many types of games. A believable physics interaction between game objects has become a key element of most modern PC and console games as well as, more recently, browser and smartphone games. The range of topics within physics for games is broad and includes, but is not limited to, areas such as rigid body, fluid dynamics, soft-body, vehicle physics, and particle physics. This book will cover the fundamental topics needed for you to get started in understanding and building a general purpose, rigid body physics engine in two dimensions. The book also aims to provide you with a reusable game physics engine, which can be used for your own games, by guiding you through the process of building a physics engine step-by-step from scratch. This way you will gain a foundational understanding of the concepts and components required for a typical 2D rigid body system.
While you can just download a physics engine library and continue on with your game or engine development, building your own game engine from scratch has its own advantages. Besides giving you an underlying understanding of how the physics engine operates, it gives you more control over the flexibility, performance, functionality, and usability of the engine itself.
As stated, this book will cover the foundation of 2D rigid body physics . The topics will include properties and behavior of rigid bodies, collision detection, collision information encoding, and collision response. The goal is to obtain a fundamental understanding of these concepts which are required to build a usable physics engine.
The book approaches physics engine development from three important avenues: practicality, approachability, and reusability. While reading the book, we want you to get involved and experience the process of building the game engine. The step-by-step guide should facilitate the practicality of this book. The theories and practices introduced in this book are based on research and investigation from many sources which cover the topics in varying detail. The information is presented in a way that is approachable, by allowing you to follow along as each code snippet is explained in parallel to the overall concepts behind each component of the engine. After following along and creating your own engine, you will be able to extend and reuse the finished product by adding your own features.
This chapter describes the implementation technology and organization of the book. The discussion then leads you through the steps of downloading, installing, and setting up the development environment; guides you through building your first HTML5 application; and extends this first application with the JavaScript programming language to run your first simulation.
Setting Up Your Development Environment
The physics engine you are going to build will be accessible through web browsers that could be running on any operating system (OS). The development environment you are about to set up is also OS agnostic. For simplicity, the following instructions are based on a Windows 7/8/10 OS. You should be able to reproduce a similar environment with minor modifications in a Unix-based environment like the Apple macOS or Ubuntu.
Your development process includes an integrated development environment (IDE) and a runtime web browser that is capable of hosting the running game engine. The most convenient systems we have found are the NetBeans IDE with the Google Chrome web browser as the runtime environment. Here are the details:
IDE: All projects in this book are based on the NetBeans IDE. You can download and install the bundle for HTML5 and PHP from https://netbeans.org/downloads .
Runtime environment: You will execute your projects in the Google Chrome web browser. You can download and install this browser from https://www.google.com/chrome/browser/ .
Connector Google Chrome plug-in: This is a Google Chrome extension that connects the web browser to the NetBeans IDE to support HTML5 development. You can download and install this extension from https://chrome.google.com/webstore/detail/netbeans-connector/hafdlehgocfcodbgjnpecfajgkeejnaa . The download will automatically install the plug-in to Google Chrome. You may have to restart your computer to complete the installation.
Notice that there are no specific system requirements to support the JavaScript programming language or HTML5. All these technologies are embedded in the web browser runtime environment.
Note
As mentioned, we chose a NetBeans-based development environment because we found it to be the most convenient. There are many other alternatives that are also free, including and not limited to IntelliJ IDEA, Eclipse, Sublime, Microsofts Visual Studio Code, and Adobe Brackets.
Downloading and Installing JavaScript Syntax Checker
We have found JSLint to be an effective tool in detecting potential JavaScript source code errors. You can download and install JSLint as a plug-in to the NetBeans IDE with the following steps:
Download it from http://plugins.netbeans.org/plugin/40893/jslint . Make sure to take note of the location of the downloaded file.
Start NetBeans, select Tools Plugins, and go to the Downloaded tab.
Click the Add Plugins button and search for the downloaded file from step 1. Double-click this file to install the plug-in.
The following are some useful references for working with JSLint:
For instructions on how to work with JSLint, see http://www.jslint.com/help.html .
For details on how JSLint works, see http://plugins.netbeans.org/plugin/40893/jslint .
Working in the NetBeans Development Environment
The NetBeans IDE is easy to work with, and the projects in this book require only the editor and debugger. To open a project, select File Open Projects. Once a project is open, you need to become familiarized with three basic windows , as illustrated in Figure .
Projects window: This window displays the source code files of the project.
Editor window: This window displays and allows you to edit the source code of your project. You can select the source code file to work with by double-clicking the corresponding file name in the Projects window.
Action Items window: This window displays the error message output from the JSLint checker.
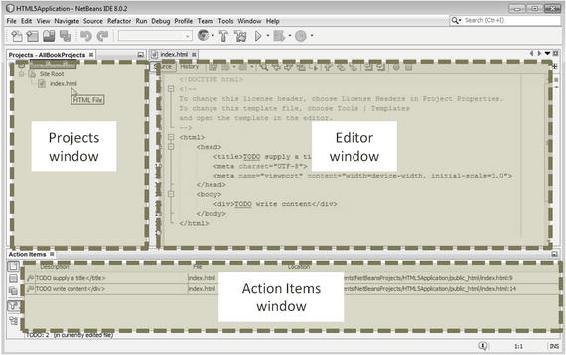
Figure 1-1. The NetBeans IDE
Note
If you cannot see a window in the IDE, you can click the Window menu and select the name of the missing window to cause it to appear. For example, if you cannot see the Projects window in the IDE, you can select Window Projects to open it.
Creating an HTML5 Project in NetBeans
You are now ready to create your first HTML5 project .


![Aditya Ravi Shankar [Aditya Ravi Shankar] - Pro HTML5 Games](/uploads/posts/book/121402/thumbs/aditya-ravi-shankar-aditya-ravi-shankar-pro.jpg)
![Gabor Szauer [Gabor Szauer] - Game Physics Cookbook](/uploads/posts/book/121399/thumbs/gabor-szauer-gabor-szauer-game-physics-cookbook.jpg)
