• Complain

Indira Knight - Connecting Arduino to the Web: Front End Development Using JavaScript

Here you can read online Indira Knight - Connecting Arduino to the Web: Front End Development Using JavaScript full text of the book (entire story) in english for free. Download pdf and epub, get meaning, cover and reviews about this ebook. year: 2018, publisher: Apress, genre: Computer. Description of the work, (preface) as well as reviews are available. Best literature library LitArk.com created for fans of good reading and offers a wide selection of genres:

Romance novel Science fiction Adventure Detective Science History Home and family Prose Art Politics Computer Non-fiction Religion Business Children Humor

Choose a favorite category and find really read worthwhile books. Enjoy immersion in the world of imagination, feel the emotions of the characters or learn something new for yourself, make an fascinating discovery.

Indira Knight Connecting Arduino to the Web: Front End Development Using JavaScript
  • Book:
    Connecting Arduino to the Web: Front End Development Using JavaScript
  • Author:
  • Publisher:
    Apress
  • Genre:
  • Year:
    2018
  • Rating:
    5 / 5
  • Favourites:
    Add to favourites
  • Your mark:
    • 100
    • 1
    • 2
    • 3
    • 4
    • 5

Connecting Arduino to the Web: Front End Development Using JavaScript: summary, description and annotation

We offer to read an annotation, description, summary or preface (depends on what the author of the book "Connecting Arduino to the Web: Front End Development Using JavaScript" wrote himself). If you haven't found the necessary information about the book — write in the comments, we will try to find it.

Create physical interfaces that interact with the Internet and web pages. With Arduino and JavaScript you can create interactive physical displays and connected devices that send data to or receive data from the web. Youll take advantage of the processes needed to set up electronic components, collect data, and create web pages able to interact with electronic components.Through exercises, projects, and explanations, this book will give you the core front end web development and electronics skills needed to create connected physical interfaces and build compelling visualizations with a range of JavaScript libraries.By the end of the book you will have developed fully working interactive prototypes capable of sending data to and receiving data from a physical interface. Most importantly, Connecting Arduino to the Web will give you a taste of what is possible and the knowledge to create your own connected physical interfaces and bring the web into your electronics projects.What Youll LearnBuild an Internet of Things dashboard that updates with electronics attached to an ArduinoUse components to interact with online 3D displaysCreate web pages with HTML and CSSSet up a Node.js serverUse WebSockets to process live dataInteract with scalable vector graphics (SVG)Who This Book Is ForTechnologists, developers, and enthusiasts looking to extend their skills, be able to develop physical prototypes with connected devices, and with an interest in getting started with IoT. Also, those excited by the possibilities of connecting the physical and the web.

Indira Knight: author's other books


Who wrote Connecting Arduino to the Web: Front End Development Using JavaScript? Find out the surname, the name of the author of the book and a list of all author's works by series.

Connecting Arduino to the Web: Front End Development Using JavaScript — read online for free the complete book (whole text) full work

Below is the text of the book, divided by pages. System saving the place of the last page read, allows you to conveniently read the book "Connecting Arduino to the Web: Front End Development Using JavaScript" online for free, without having to search again every time where you left off. Put a bookmark, and you can go to the page where you finished reading at any time.

Light

Font size:

Reset

Interval:

Bookmark:

Make
Indira Knight 2018
Indira Knight Connecting Arduino to the Web
1. Arduino, Circuits and Components
Indira Knight 1
(1)
London, UK
This chapter is an introduction to electronics for Arduino. It will explain how an Arduino is set up and how electricity flows through the circuits and the components. By the end of this chapter you will have used some basic components and created the four base circuits: analog input, analog output, digital input, and digital output.
Arduino
Arduino allows you to create your own electronics projects. It is a collection of open source hardware and software that allows you to attach and control other components to create an electrical circuit. Projects such as an automated plant watering system, a pizza oven, or a remote controlled toy car can be made with an Arduino. When you use an Arduino for a project you need to do the following:
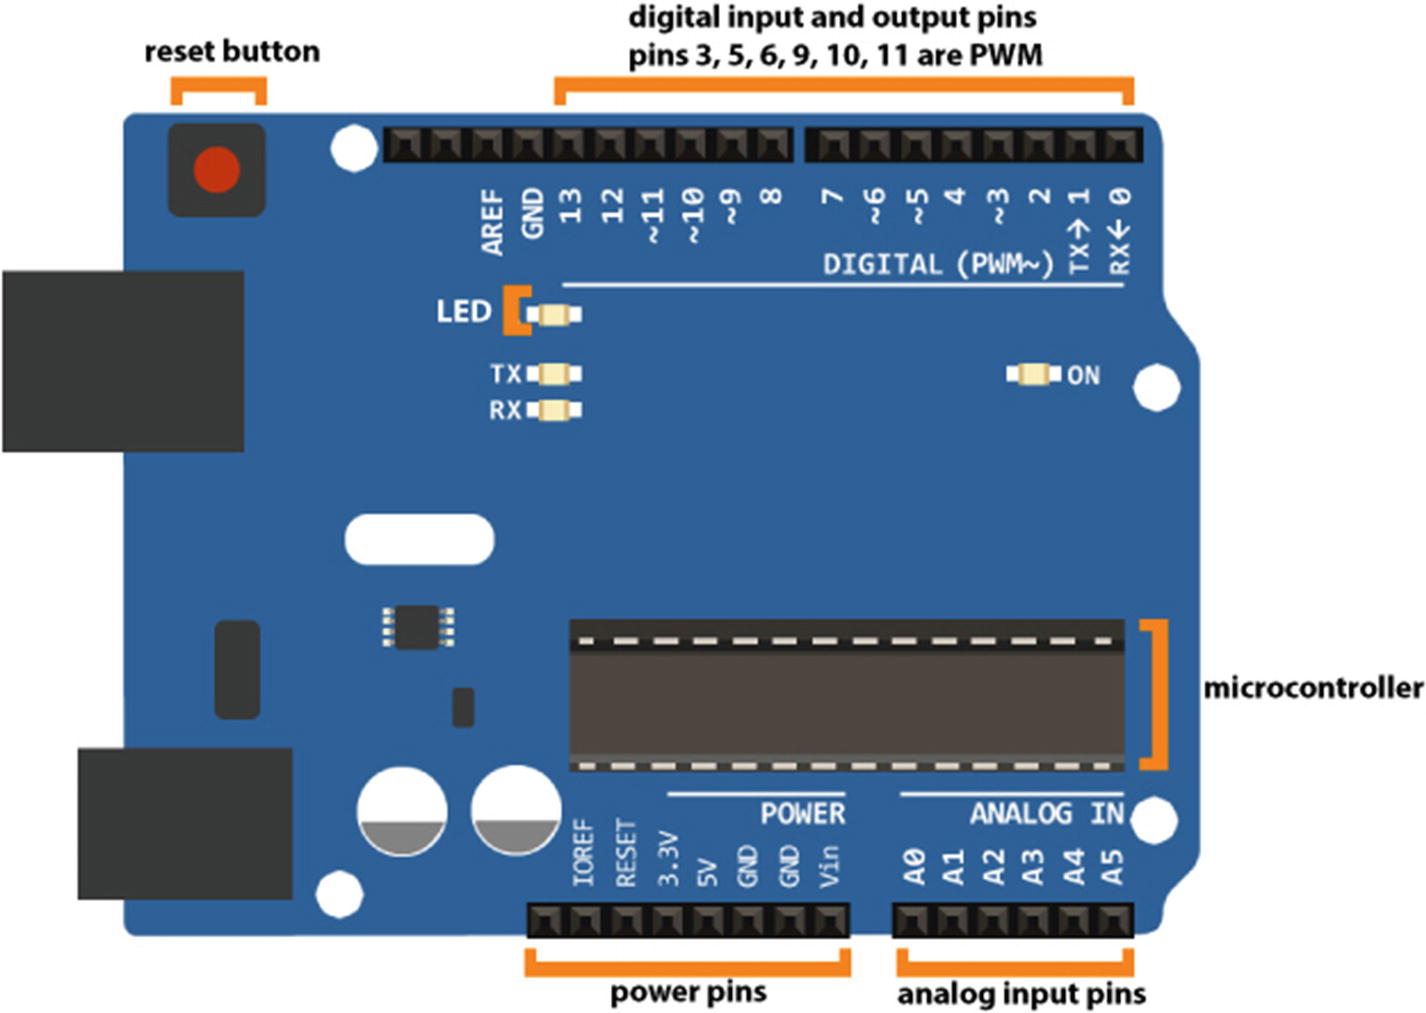
  • Connect components to it.
  • Write a program to control the components.
  • Verify that the program is written correctly.
  • Upload the program to the Arduino.
The Arduino needs to be connected to a computer via a USB port to upload a program to it. Programs for Arduinos are called sketches . Once the sketch is uploaded, it is stored on the microcontroller and will stay there until another sketch is uploaded. Once a new sketch is uploaded the old sketch is no longer available.
Once the sketch is uploaded you can disconnect the Arduino from the computer, and if it is connected to another power source the program will still run.
Note
Once a sketch has been uploaded to an Arduino, it is not represented in the same way you wrote it. You cannot get the sketch back from the Arduino in a form that can be read as the original sketch, so make sure that you save your original code if you want to keep it.
Arduino Hardware
An Arduino board is made up of a number of components, including a microcontroller, digital and analog pins, power pins, resistors, a diode, a capacitor, and an LED. Figure shows an Arduino Uno .
Figure 1-1 An Arduino Uno A Microcontroller has a central processing unit - photo 1
Figure 1-1
An Arduino Uno
A Microcontroller has a central processing unit (CPU); it stores the uploaded sketch and processes and directs the commands.
The digital and analog pins are used for sending and receiving digital and analog data.
The Arduino also has a serial interface that allows the Arduino to send data to a computer via the serial port; this is the way we will be sending data to and from a computer in this book.
Electricity
With an Arduino you create an electronic circuit that powers the components attached to it. Wires made of a conductive material connect the components that let electricity flow through them.
Electricity is the movement of electrons through a conductive material. In conductive materials, electrons can move easily between atoms, but in non-conductive materials they cant.
Atoms are made up of protons, neutrons, and electrons. In the center of the atom are the nucleus, protons and neutrons; electrons are on the outside. Protons have a positive charge and electrons have a negative charge. These two charges are attracted to each other. The electrons are in orbit around the nucleus. In non-conductive materials such as wood or porcelain, it is difficult for the electrons to move; they are tightly bound to the atom. In conductive materials such as copper and other metals, there are electrons that are quite loosely bound to the atoms, so they can move easily. These electrons are on the outer edge of the atom and are called valence electrons.
Electrons move around the circuit from negative to positive. When electricity was first discovered, it was thought that they moved from positive to negative, so by convention the electronic circuits are often drawn from positive to negative, positive to ground (GND). In the circuits in this book the electricity will be flowing in one direction; this is called a direct current (DC), and in an alternating current (AC) the direction changes a certain number of times a second.
To get the electrons in a conductive material to start moving they need a push, and this push is the voltage. Voltage is the difference between higher potential energy and lower potential energy in a circuit. The electrons want to flow from higher potential energy to lower potential energy, from the positive to the ground.
There are a number of ways that voltage is produced. In a battery, it is produced by a chemical reaction. A build-up of electrons is created at the negative end of the battery. When a connection is made to the positive end of the battery, the negative electrons are attracted to the positive, from the higher potential energy to the lower potential energy. This causes them to push the electrons on the wire; the electrons are shunted along the wire.
In Electricity current is the amount of electrons per second that passes a certain point. The current is measured in amps. Each component on the circuit uses up part of the electricity and turns it into another form of energy such as light or sound. The components on the circuit use all the energy in the circuit.
A circuit also has resistance. Resistance is how much the material the current is flowing through slows it down. Resistance is like an obstacle in the way of the current. Resistance is measured in ohms and uses the symbol . Electricity will always choose the easiest way to flow, the path of least resistance. Figure is an interpretation of the relationship between voltage, current, and resistance .
Figure 1-2 An interpretation of voltage current and resistance Ohms Law - photo 2
Figure 1-2
An interpretation of voltage, current, and resistance
Ohms Law
The physicist and mathematician Georg Simon Ohm discovered a relationship between voltage, current, and resistance; this relationship is called Ohms law. Ohms law says that voltage is equal to amps multiplied by resistance, and it is written as V = I * R where V is volts, I is current, and R is resistance. With this formula you can also find resistance R = V / I and to find current I = V / R, these can be seen in Figure .
Figure 1-3 Ohms law The components on a circuit use part of the energy in - photo 3
Figure 1-3
Ohms law
The components on a circuit use part of the energy in the circuit and turn it into another form of energy such as light or sound. All the energy on a circuit needs to be used by the circuit. If all the energy isnt used up it needs to go somewhere, or this can cause it to overheat or catch fire. For example, if there is an LED on circuit and it receives too much energy, the light will be very bright and it can blow out. With Ohms law you can calculate the resistance, instead of V = I * R you can find resistance using R = V / I, resistance equals voltage divided by current.
Resistors
Resistors are a crucial component for circuits as they limit the amount of current on the circuit. A resistor has a certain amount of resistance to the current flow. Every component has a maximum amount of current, measured in amps that it can safely use. For example, if a component can take a maximum of 0.023 amps, which is 23 milliamps, and your circuit is receiving 5V (volts), then a 220-ohm resistor will need to be added to the circuit to use the LED safely. The electrical components will use some of the power from the circuit; this is called a voltage drop so this can be taken into account when working out resistance. Figure shows an example of how this is worked out with Ohms law, with different voltages and current.
Next page
Light

Font size:

Reset

Interval:

Bookmark:

Make

Similar books «Connecting Arduino to the Web: Front End Development Using JavaScript»

Look at similar books to Connecting Arduino to the Web: Front End Development Using JavaScript. We have selected literature similar in name and meaning in the hope of providing readers with more options to find new, interesting, not yet read works.


Reviews about «Connecting Arduino to the Web: Front End Development Using JavaScript»

Discussion, reviews of the book Connecting Arduino to the Web: Front End Development Using JavaScript and just readers' own opinions. Leave your comments, write what you think about the work, its meaning or the main characters. Specify what exactly you liked and what you didn't like, and why you think so.