Xcode
Objective-C is a programming language that extends the C programming language to include object-oriented programming capabilities. This means that most classic C programming procedures are used in Objective-C programs. For the purposes of this book, you will need to have an idea of how C programming works.
Before you write any Objective-C code, you will need to have the proper tool for the job. For Objective-C, this tool is Xcode. Xcode will be your primary code editor and integrated development environment (IDE).
Note
Xcode requires a Mac. You cannot install Xcode on a Windows-or Linux-based computer.
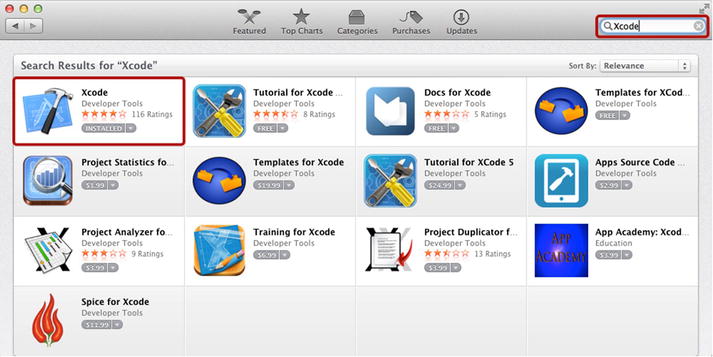
To install Xcode, go to the Mac App Store by selecting your Macs menu bar and then choosing App Store . Use the App Store search feature to locate Xcode by typing the word Xcode into the textbox next to the hourglass. Press return to search for Xcode. You will be presented with a list of apps, and Xcode should be the first app in the list. Install Xcode by clicking the button with the word free next to the Xcode icon. See Figure for the screen that you should see once you searched for Xcode in the App Store.
Figure 1-1.
Downloading Xcode from the App Store
Creating a New Project
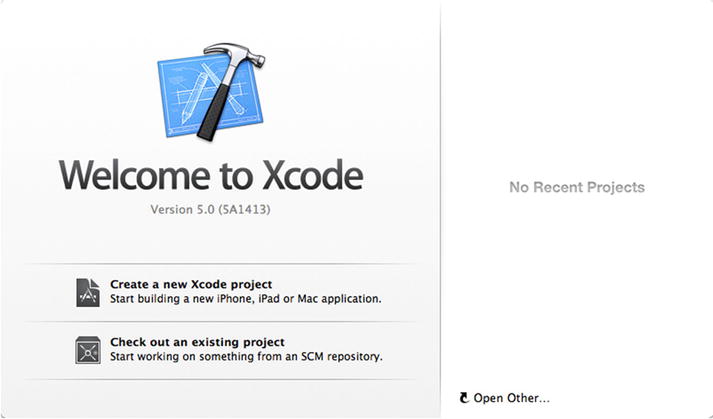
Open Xcode by going to your Applications folder and clicking the Xcode app. You will be presented with a welcome screen that includes text that reads Create a new Xcode project (see Figure ). Click the text Create a new Xcode project to get started.
Figure 1-2.
Xcode welcome screen
The next screen that appears will list options for creating apps both for iOS and Mac. In this book, you will be using a Mac Command Line Tool app, so set up this by choosing OSX Application Command Line Tool .
When the next screen appears, just give your new project a name, choose the type Foundation, leave the other settings as they are, and then click Next .
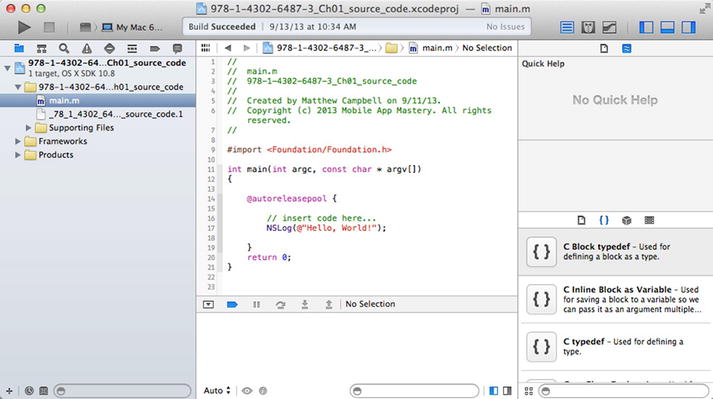
Now choose a folder to save the Xcode project on your Mac. Once you do this, an Xcode screen will appear. The Xcode screen will include a list of files on the left and a code editor in the center (see Figure ).
Figure 1-3.
Code editor and project navigator
Hello World
Writing Hello World in code is what we do when want to make sure that we have set up a code project correctly. Xcode makes this really easy to do because new Command Line Tool projects come with Hello World already coded.
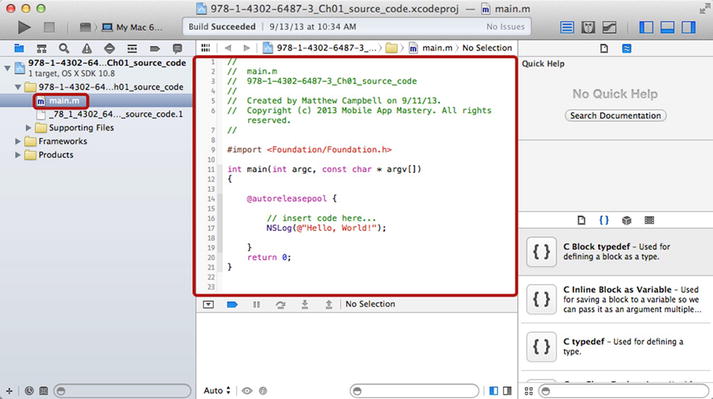
All you need to do is use the Project Navigator , the widget on the left-hand area of your Xcode screen, to locate the file named main.m . Click main.m to open the file in the code editor (Figure ).
Figure 1-4.
Editing main.m
When you do this you will see code that looks a bit like this:
#import
int main(int argc, const char * argv[]){
@autoreleasepool {
// insert code here...
NSLog(@"Hello, World!");
}
return 0;
}
Much of the code above sets up the application, starting with the #import statement. This statement imports the code that you need, called Foundation , for your Objective-C program to work.
The next part of the code above is the function named main , which contains all the program code and returns the integer when the program is complete.
Inside the main function you will see an Objective-C auto release pool. Auto release pools are required to support the memory management system used with Objective-C. The auto release pool is declared with the @autoreleasepool keyword.
In the middle of all this code, you can see the Hello World code, which looks like this:
NSLog(@"Hello, World!");
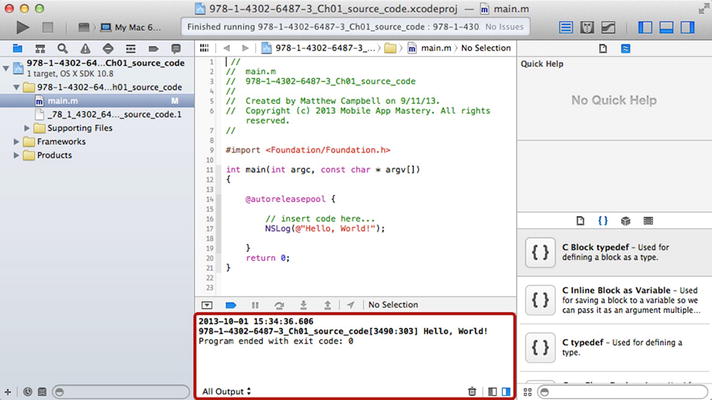
The first piece of this is the function NSLog . NSLog is used to write messages to the console log. Xcodes console log is located at the bottom of the Xcode screen (Figure ) and presents error messages along with messages that you send using NSLog .
Figure 1-5.
Hello World output in console screen
Note
By default the console log is hidden along with the debugger at the bottom of the screen. To see these two components you must unhide the bottom screen by clicking the Hide or Show Debug Area toggle located in the top right-hand part of the Xcode screen. This button is located in the middle of a set of three buttons.
The string Hello World is enclosed with quotes ( "") and the Objective-C escape character @ . The @ character is used in Objective-C to let the compiler know that certain keywords or code have special Objective-C properties. When @ is before a string in double quotes, as in @"Hello, World!" , it means that the string is an Objective-C NSString object.
Code Comments
There is one more line of code that Xcode helpfully inserted into this project for you. This line of code is a good example of a code comment and begins with these two special characters: //. Here is what the code comment looks like:
// insert code here...
Code comments are used to help document your code by giving you a way to insert text into the program that will not be compiled into a working program.
Build and Run
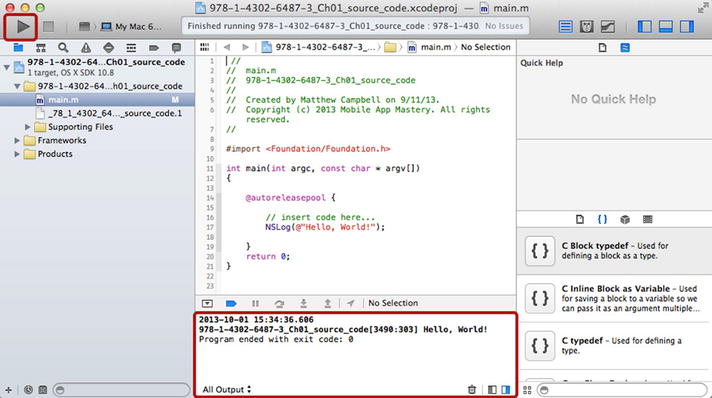
To test the code, click the Run button in the top upper left area of the Xcode screen. See Figure to see which button to push.
Figure 1-6.
Building and running the Hello World code
When you click the Run button, Xcode will compile the code in the Xcode project and then run the program. The program you have been working on will print out the words Hello World. You can see the output circled in Figure .
Where to Get More Information
This book is a quick reference for Objective-C, and I have focused on the code and patterns that I judge will be most useful for most people. However, this means that I cant include everything in this book.
The best place to get complete information on Objective-C and the Mac and iOS applications that you can create with Objective-C is the Apple Developer web site. You can get to the Apple Developer web site by using a web browser to navigate to http://developer.apple.com/resources .
