In this book, we use the latest stable version available, which is, at the time of writing, the 2.0.0-p247 . If you are using a Linux distribution or Mac OS X, youll find a Ruby interpreter already installed. However, it might be an outdated version and usually it also has some limitations caused by the package manager on your operating system (for example, apt for Debian/Ubuntu linux distributions).
There are several ways to install the latest version of the Ruby interpreter, depending on the operating system you are using. If you already have this version installed, feel free to skip the following section.
Installing on Linux or Mac OS X
Even if Linux and Mac OS X are completely different operating systems, they both share the same UNIX philosophy and tools under the hood, so we have grouped them in the same section.
It is usually a good idea to install Ruby from source as this gives you more control over the installed version and, sometimes, lets you customize the installation. However, instead of manually downloading and compiling the Ruby source code, we are going to to use a tool called Ruby Version Manager (https://rvm.io) that helps you to easily install, manage, and work with multiple Ruby environments and interpreters. This means that, in theory, you can use several versions installed. Before you can install RVM and Ruby you need to install some dependencies. These can be development tools such as the compiler, or just external libraries like OpenSSL.
Linux Dependencies
On Debian/Ubuntu Linux, you can install these dependencies using the following command inside a terminal:
sudo apt-get install build-essential openssl libreadline6 libreadline6-dev curl git-core zlib1g zlib1g-dev libssl-dev libyaml-dev libsqlite3-dev sqlite3 libxml2-dev libxslt-dev autoconf libc6-dev ncurses-dev automake libtool bison subversion pkg-config libgdbm-dev libffi-dev libreadline-dev
Some of the preceding packages are already installed because they are pretty common dependencies. This is not a problem; the apt tool manages this for you automatically.
If you are using another Linux distribution (Fedora/RedHat/CentOS, Arch Linux, etc.), dont worry, they all have a package management system that will help you install the dependencies.
Mac OS X Dependencies
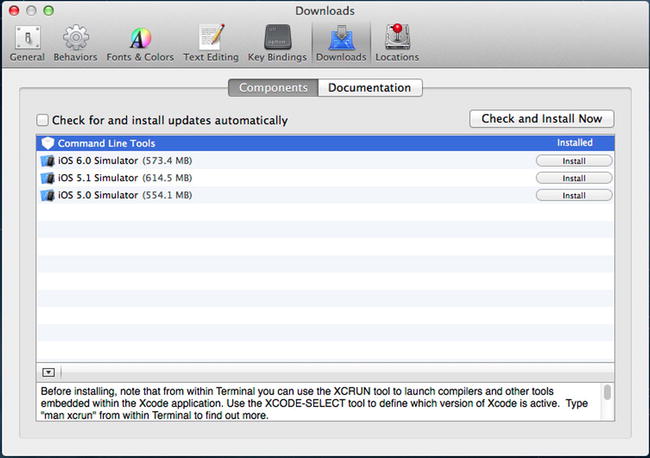
On Mac OS X there isnt a default package manager; however, most people use Homebrew (http://brew.sh) and so do we. To do this, you need to have Xcode installed along with its command line tools. If you dont have Xcode installed, we suggest you install it from the Apple Mac App Store and install the command line tools in Xcode Preferences (Figure )
Figure 1-1.
Command line tools
Once Xcode and its command line tools are installed, you can proceed with the Homebrew installation. As we mentioned previously, Mac OS X ships with its default Ruby, we are going to use it to bootstrap Homebrew, which is written in Ruby too. Open Term.app and run the following command:
ruby -e "$(curl -fsSL https://raw.github.com/mxcl/homebrew/go )"
To check whether all the process went correctly, run:
brew doctor
This checks whether your system has all the tools and settings to run Homebrew properly. For example, you might be faced with this error:
Error: No such file or directory - /usr/local/Cellar
Dont worry, its just telling you that the default directory used by Homebrew to store all its stuff is missing. You can fix this with the following commands:
sudo mkdir /usr/local/Cellar
sudo chown -R `whoami` /usr/local
Setting Up RVM
Now that you have the tools for compiling and installing programs from source, you can finally install RVM. For now it doesnt matter if you are on Linux or Mac OS X, in both cases you have all the requirements. Run the following command inside your shell:
curl -L get.rvm.io | bash
This command installs and sets up RVM tools in your user directory, which means that RVM is available only for your current user and all the files are installed under your home directory. Once the installation is complete, you need two more steps. Run the following command to use RVM in the current shell:
source /.rvm/scripts/rvm
Add the following line to your /.profile to load RVM every time you open your terminal:
[[ -s "$HOME/.rvm/scripts/rvm" ]] && source "$HOME/.rvm/scripts/rvm"
As we have already seen for Homebrew, even RVM has a tool to check that all its requirements are met. Run the following command:
rvm requirements
If you have any missing required packages, you will need to install them before continuing by running brew install or apt-get install .
Installing Ruby 2.0.0
As stated before, RVM lets you install and use different Ruby versions on your system with ease. However, for our purposes, we are going to install only the latest stable available release. In your terminal, run the following command:
rvm install 2.0.0-p247
Now RVM downloads, compiles, and installs the specified version. Once it finishes, you need to set it as default Ruby interpreter and check that it works:
rvm use 2.0.0-p247 --default
ruby v
The output may vary depending on the operating system you are using; however it should look something like this:
ruby 2.0.0p247 (2013-06-27 revision 41674) [x86_64-darwin12.4.0]
