Contents
Chapter 1: Getting started with JavaScript ..................................................................................................... 2
Section 1.1: Using console.log() ..................................................................................................................................... 2
Section 1.2: Using the DOM API .................................................................................................................................... 4
Section 1.3: Using window.alert() .................................................................................................................................. 5
Credits ............................................................................................................................................................................ 463 You may also like ...................................................................................................................................................... 474
Chapter 1: Getting started with JavaScript
Version Release Date
1997-06-01
1998-06-01
1998-12-01
E4X 2004-06-01
2009-12-01
5.1 2011-06-01
2015-06-01
2016-06-14
2017-06-27
Section 1.1: Using console.log()
Introduction
All modern web browsers, Node.js as well as almost every other JavaScript environments support writing messages to a console using a suite of logging methods. The most common of these methods is console. log () .
In a browser environment, the console. log () function is predominantly used for debugging purposes.
Getting Started
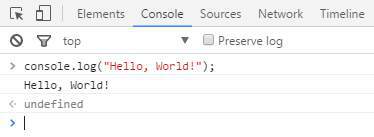
Open up the JavaScript Console in your browser, type the following, and press Enter :
console. log ( "Hello, World!" );
This will log the following to the console:

In the example above, the console. log () function prints Hello , World ! to the console and returns undefined (shown above in the console output window). This is because console. log () has no explicit return value .
Logging variables
console. log () can be used to log variables of any kind; not only strings. Just pass in the variable that you want to be displayed in the console, for example:
var foo = "bar" ;
console. log ( foo );
This will log the following to the console:
If you want to log two or more values, simply separate them with commas. Spaces will be automatically added between each argument during concatenation:
var thisVar = 'first value' ;
var thatVar = 'second value' ;
console. log ( "thisVar:" , thisVar , "and thatVar:" , thatVar );
This will log the following to the console:

Placeholders
You can use console. log () in combination with placeholders:
var greet = "Hello" , who = "World" ;
console. log ( "%s, %s!" , greet , who );
This will log the following to the console:

Logging Objects
Below we see the result of logging an object. This is often useful for logging JSON responses from API calls.
console. log ({
'Email' : '' ,
'Groups' : {},
'Id' : ,
'IsHiddenInUI' : false ,
'IsSiteAdmin' : false ,
'LoginName' : 'i:0#.w|virtualdomain \\ user2' ,
'PrincipalType' : ,
'Title' : 'user2'
});
This will log the following to the console:

Logging HTML elements
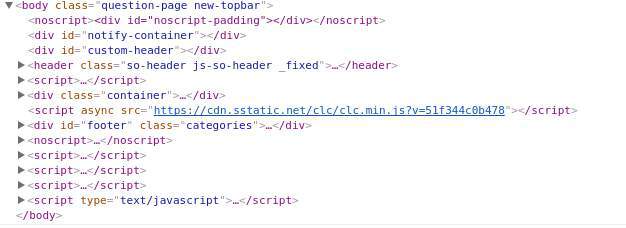
You have the ability to log any element which exists within the DOM . In this case we log the body element:
console. log ( document. body );
This will log the following to the console:

End Note
For more information on the capabilities of the console, see the Console topic.
Section 1.2: Using the DOM API
DOM stands for D ocument O bject M odel. It is an object-oriented representation of structured documents like XML and HTML.
Setting the textContent property of an Element is one way to output text on a web page.
For example, consider the following HTML tag:
id = "paragraph" >
To change its textContent property, we can run the following JavaScript:
document. getElementById ( "paragraph" ) . textContent = "Hello, World" ;
This will select the element that with the id paragraph and set its text content to "Hello, World":
id = "paragraph" > Hello, World
(See also this demo)
You can also use JavaScript to create a new HTML element programmatically. For example, consider an HTML document with the following body:
In our JavaScript, we create a new
tag with a textContent property of and add it at the end of the html body:
var element = document. createElement ( 'p' );
element. textContent = "Hello, World" ;
document. body . appendChild ( element ); //add the newly created element to the DOM
That will change your HTML body to the following:
Adding an element
Hello, World
Note that in order to manipulate elements in the DOM using JavaScript, the JavaScript code must be run after the relevant element has been created in the document. This can be achieved by putting the JavaScript tags after all of your other content. Alternatively, you can also use an event listener to listen to eg. window's onload event , adding your code to that event listener will delay running your code until after the whole content on your page has been loaded.
A third way to make sure all your DOM has been loaded, is to wrap the DOM manipulation code with a timeout function of 0 ms . This way, this JavaScript code is re-queued at the end of the execution queue, which gives the browser a chance to nish doing some non-JavaScript things that have been waiting to nish before attending to this new piece of JavaScript.
Section 1.3: Using window.alert()
The alert method displays a visual alert box on screen. The alert method parameter is displayed to the user in plain text:
window. alert ( message );
Because window is the global object, you can call also use the following shorthand:
alert ( message );
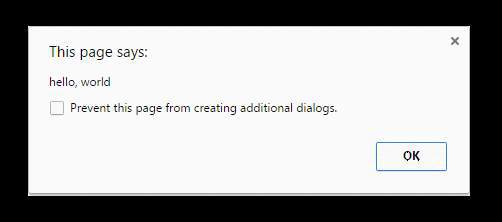
So what does window. alert () do? Well, let's take the following example:
alert ( 'hello, world' );
In Chrome, that would produce a pop-up like this:

Notes
The alert method is technically a property of window object, but since all window properties are automatically global variables, we can use alert as a global variable instead of as a property of window meaning you can directly use alert () instead of window. alert () .
Unlike using console. log , alert acts as a modal prompt meaning that the code calling alert will pause until the prompt is answered. Traditionally this means that no other JavaScript code will execute until the alert is dismissed:


 In the example above, the console. log () function prints Hello , World ! to the console and returns undefined (shown above in the console output window). This is because console. log () has no explicit return value .
 Placeholders
 Logging Objects
 Logging HTML elements
 End Note
 Notes
Notes