1. Setting Up a Java 8 Game Development Environment
Welcome to the book Beginning Java 8 Games Development ! Lets get started by creating a solid development software foundation for use with this book. The core of this foundation will be Java SDK ( Software Development Kit ) , also called JDK (Java Development Kit) 8 . I will also set you up with NetBeans IDE 8.0 ( Integrated Development Environment ), which will make coding Java 8 games much easier. After that, I will introduce you to the latest open-source new media content creation software packages for digital illustration (Inkscape), digital imaging (GIMP [GNU Image Manipulation Program]), digital video (EditShare Lightworks), digital audio (Audacity), and 3D modeling and animation (Blender). At the end of the chapter, I will also suggest some other professional-level software packages that you should consider adding to the professional game development workstation that you will be creating over the course of this chapter.
To get the best results from all this free, professional-level software, you will want to have a modern, 64-bit workstation with at least 4GB of system memory (6GB or 8GB would be even better) and a multicore processor (central processing unit [CPU]), such as an AMD FX-6300 (hexa-core), AMD FX-8350 (octa-core), or Intel i7 (quad-core). Workstations such as these have become commodity items and can be purchased at Walmart or Pricewatch.com at an affordable price.
The first thing that you will do in this chapter is make sure that you have removed any of the outdated versions of Java, such as Java 7 or Java 6, or any outdated versions of NetBeans, such as NetBeans 7 or NetBeans 6. This involves uninstalling (removing or deleting completely) these older development software versions from your workstation.
You will do this using the Windows program management utility Programs and Features , which can be found in the Windows operating system (OS) Control Panel suite of Windows OS Management Utilities . There are similar utilities on the Linux and Mac platforms, if you happen to be using one of these less commonly used OSs. Because most developers use Windows 7, 8, or 9, you will be using the Windows 64-bit platform for the examples in this book.
Next, I will show you where exactly to go on the Internet to get these software packages, so get ready to fire up your speedy Internet connection so that you can download nearly a gigabyte of all-new game content production software! After you download the latest versions of all this software, you will install the programming and content development packages and configure them for use with this book.
The order in which you perform these software installations is important, because Java JDK 8 and Java 8 Runtime Environment (JRE) form the foundation of NetBeans IDE 8.0. This is because NetBeans IDE 8.0 was originally coded using the Java programming language, so you will see just how incredibly professional a piece of software can be using this language. Thus, the Java 8 software will be the first software you install.
After you install Java 8, you will then install NetBeans 8.0, so that you have a graphical user interface (GUI), on top of the Java programming language, which will make the Java software development work process easier. After you have these two primary software development tools installed, you will get a plethora of new media content creation software packages, which you can use in conjunction with Java 8 and NetBeans 8.0 to create 2D and 3D games.
Prepare a Workstation for Java 8 Game Development
Assuming that you already have a professional-level workstation in place for new media content development and game development, you need to remove all the outdated JDKs and IDEs and make sure that you have the latest V8 (not the drink, silly!) Java and NetBeans software installed on your system and ready to go. If you are new to this and do not have a game-appropriate workstation, go to Walmart or Pricewatch.com, and purchase an affordable multicore (use a 4-, 6- or 8-core) 64-bit computer running Windows 8.1 (or 9.0 if it is available) that has 4GB, 6GB, or 8GB of DDR3 (1333 or 1600 memory access speed) system memory at the very least and a 750GB, or even 1TB, hard disk drive.
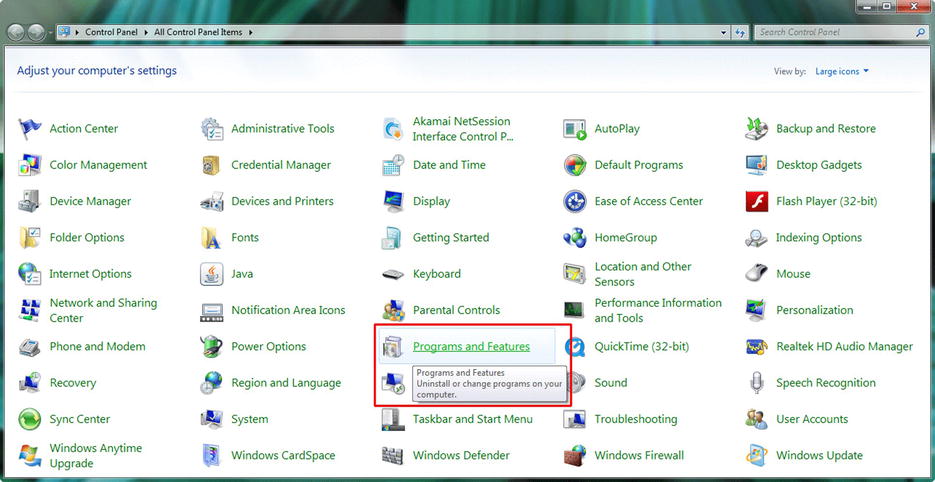
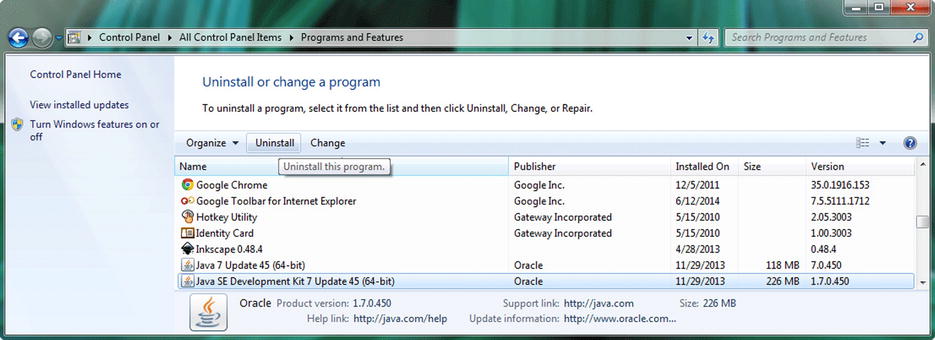
The way that you remove old software is through the Windows Control Panel and its set of utility icons, one of which is the Programs and Features icon (Windows 7 and 8), displayed in Figure . Note that in earlier versions of Windows, this utility icon may be labeled differently, probably as something like Add or Remove Programs .
Figure 1-1.
Use the Programs and Features utility icon to uninstall or change programs on your computer workstation
Click the Programs and Features link, or double-click the icon in previous versions of Windows, to launch the utility. Then, scroll down to see if you have any old versions of the Java development tools (Java 5, Java 6, or Java 7) installed on your workstation. Note that if you have a brand new workstation, you should find no preinstalled versions of Java or NetBeans on your system. If you do find them, return the system, as it may have been used previously!
As you can see in Figure , on my Windows 7 HTML5 development workstation, I had an older version of Java, Java 7, installed (on November 29, 2013), taking up 344MB of space. To remove a piece of software, select it by clicking it (it will turn light blue), and then click the Uninstall button, shown at the top of the figure. I left the tool tip , which says, Uninstall this program, showing in the screenshot so that you can see that if you hover your mouse over anything in the Programs and Features utility, it will tell you what that feature is used for.
Once you click the Uninstall button, the utility will remove the older version of Java. If you want to keep your old Java project files, make sure to back up your Java project files folder (if you have not done so already, that is). Make sure that you back up your workstations hard disk drive regularly so that you do not lose any of your work.
Figure 1-2.
Select any version of Java older than the current version (Java 8), and click the Uninstall button at the top
Also make sure that you uninstall all versions of Java; in my case, there were 64-bit Java 7 update 45 and Java SDK 7u45, used to run or execute IDEs, such as NetBeans (or Eclipse), that were coded using the Java programming language.
Next, you will want to ascertain if there are any older versions of the NetBeans IDE on your workstation. In my case, as you can see in Figure , there was indeed a NetBeans 7 IDE installation currently on my 64-bit Windows 7 workstation. I selected this for removal and then clicked the Uninstall/Change button, shown at left, which brought up a custom Uninstall Summary dialog, shown at right.
Manufacturers (in this case, the NetBeans development team) can create custom Uninstall Summary dialogs for their products to use during the uninstall process, as you can see here. This dialog allows you to select whether you want to uninstall GlassFish Server 4 and the NetBeans UserDir Configuration folder. Because you are installing new versions of NetBeans and GlassFish, select both check boxes, and then click the Uninstall button.




![Wallace Jackson [Wallace Jackson] - Beginning Java 8 Games Development](/uploads/posts/book/119391/thumbs/wallace-jackson-wallace-jackson-beginning-java.jpg)
