Android Studio Development Essentials Android 6 Edition
2015 Neil Smyth. All Rights Reserved.
This book is provided for personal use only. Unauthorized use, reproduction and/or distribution strictly prohibited. All rights reserved.
The content of this book is provided for informational purposes only. Neither the publisher nor the author offers any warranties or representation, express or implied, with regard to the accuracy of information contained in this book, nor do they accept any liability for any loss or damage arising from any errors or omissions.
This book contains trademarked terms that are used solely for editorial purposes and to the benefit of the respective trademark owner. The terms used within this book are not intended as infringement of any trademarks.
Rev: 1.0
Table of Contents
1. Introduction
The goal of this book is to teach the skills necessary to develop Android based applications using the Android Studio Integrated Development Environment (IDE) and the Android 6 Software Development Kit (SDK).
Beginning with the basics, this book provides an outline of the steps necessary to set up an Android development and testing environment. An overview of Android Studio is included covering areas such as tool windows, the code editor and the Designer tool. An introduction to the architecture of Android is followed by an in-depth look at the design of Android applications and user interfaces using the Android Studio environment. More advanced topics such as database management, content providers and intents are also covered, as are touch screen handling, gesture recognition, camera access and the playback and recording of both video and audio. This edition of the book also covers printing, transitions and cloud-based file storage.
The concepts of material design are also covered in detail, including the use of floating action buttons, Snackbars, tabbed interfaces, card views, navigation drawers and collapsing toolbars.
In addition to covering general Android development techniques, the book also includes Google Play specific topics such as implementing maps using the Google Maps Android API, in-app billing and submitting apps to the Google Play Developer Console.
Chapters also cover advanced features of Android Studio such as Gradle build configuration and the implementation of build variants to target multiple Android device types from a single project code base.
Assuming you already have some Java programming experience, are ready to download Android Studio and the Android SDK, have access to a Windows, Mac or Linux system and ideas for some apps to develop, you are ready to get started.
1.1 Downloading the Code Samples
The source code and Android Studio project files for the examples contained in this book are available for download at:
http://www.ebookfrenzy.com/retail/androidstudioA6/index.php
The steps to load a project from the code samples into Android Studio are as follows:
1. From the Welcome to Android Studio dialog, select the Open an existing Android Studio project option.
2. In the project selection dialog, navigate to and select the folder containing the project to be imported and click on OK.
1.2 Feedback
We want you to be satisfied with your purchase of this book. If you find any errors in the book, or have any comments, questions or concerns please contact us at .
1.3 Errata
While we make every effort to ensure the accuracy of the content of this book, it is inevitable that a book covering a subject area of this size and complexity may include some errors and oversights. Any known issues with the book will be outlined, together with solutions, at the following URL:
http://www.ebookfrenzy.com/errata/androidstudioA6.html
In the event that you find an error not listed in the errata, please let us know by emailing our technical support team at . They are there to help you and will work to resolve any problems you may encounter.
2. Setting up an Android Studio Development Environment
Before any work can begin on the development of an Android application, the first step is to configure a computer system to act as the development platform. This involves a number of steps consisting of installing the Java Development Kit (JDK) and the Android Studio Integrated Development Environment (IDE) which also includes the Android Software Development Kit (SDK).
This chapter will cover the steps necessary to install the requisite components for Android application development on Windows, Mac OS X and Linux based systems.
2.1 System Requirements
Android application development may be performed on any of the following system types:
Windows Vista (32-bit or 64-bit)
Windows 7 (32-bit or 64-bit)
Windows 8 / Windows 8.1 or later
Mac OS X 10.8.5 or later (Intel based systems only)
Linux systems with version 2.15 or later of GNU C Library (glibc)
Minimum of 2GB of RAM (4GB is preferred)
Approximately 4.5GB of available disk space
2.2 Installing the Java Development Kit (JDK)
The Android SDK was developed using the Java programming language. Similarly, Android applications are also developed using Java. As a result, the Java Development Kit (JDK) is the first component that must be installed.
Android development requires the installation of version 7 of the Standard Edition of the Java Platform Development Kit. Java is provided in both development (JDK) and runtime (JRE) packages. For the purposes of Android development, the JDK must be installed.
2.2.1 Windows JDK Installation
For Windows systems, the JDK may be obtained from Oracle Corporations website using the following URL:
http://www.oracle.com/technetwork/java/javase/downloads/jdk7-downloads-1880260.html
Assuming that a suitable JDK is not already installed on your system, download version 7 of the JDK package that matches the destination computer system. Once downloaded, launch the installation executable and follow the on screen instructions to complete the installation process.
2.2.2 Mac OS X JDK Installation
Java is not installed by default on recent versions of Mac OS X. To confirm the presence or otherwise of Java, open a Terminal window and enter the following command:
java -version
Assuming that Java is currently installed, output similar to the following will appear in the terminal window:
java version "1.7.0_79-b15" Java(TM) SE Runtime Environment (build 1.7.0_79-b15) Java HotSpot(TM) 64-Bit Server VM (build 24.79-b02, mixed mode)
In the event that Java is not installed, issuing the java command in the terminal window will result in the appearance of a message which reads as follows together with a dialog on the desktop providing a More Info button which, when clicked will display the Oracle Java web page:
No Java runtime present, requesting install
On the Oracle Java web page, locate and download the Java SE 7 JDK installation package for Mac OS X.
Open the downloaded disk image (.dmg file) and double-click on the icon to install the Java package (Figure 2-1):
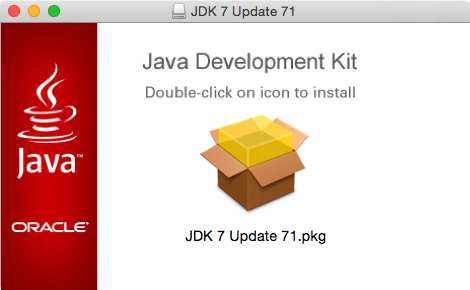
Figure 2-1
The Java for OS X installer window will appear and take you through the steps involved in installing the JDK. Once the installation is complete, return to the Terminal window and run the following command, at which point the previously outlined Java version information should appear:
java -version
2.3 Linux JDK Installation
First, if the chosen development system is running the 64-bit version of Ubuntu then it is essential that a 32-bit library support package be installed:
sudo apt-get install lib32stdc++6
As with Windows based JDK installation, it is possible to install the JDK on Linux by downloading the appropriate package from the Oracle web site, the URL for which is as follows:
Next page






![J. F. DiMarzio [J. F. DiMarzio] - Android Studio Game Development: Concepts and Design](/uploads/posts/book/119418/thumbs/j-f-dimarzio-j-f-dimarzio-android-studio.jpg)
