Scott Kelby - Adobe Lightroom EBook for Digital Photographers
Here you can read online Scott Kelby - Adobe Lightroom EBook for Digital Photographers full text of the book (entire story) in english for free. Download pdf and epub, get meaning, cover and reviews about this ebook. year: 2006, publisher: New Riders, genre: Home and family. Description of the work, (preface) as well as reviews are available. Best literature library LitArk.com created for fans of good reading and offers a wide selection of genres:
Romance novel
Science fiction
Adventure
Detective
Science
History
Home and family
Prose
Art
Politics
Computer
Non-fiction
Religion
Business
Children
Humor
Choose a favorite category and find really read worthwhile books. Enjoy immersion in the world of imagination, feel the emotions of the characters or learn something new for yourself, make an fascinating discovery.

- Book:Adobe Lightroom EBook for Digital Photographers
- Author:
- Publisher:New Riders
- Genre:
- Year:2006
- Rating:3 / 5
- Favourites:Add to favourites
- Your mark:
Adobe Lightroom EBook for Digital Photographers: summary, description and annotation
We offer to read an annotation, description, summary or preface (depends on what the author of the book "Adobe Lightroom EBook for Digital Photographers" wrote himself). If you haven't found the necessary information about the book — write in the comments, we will try to find it.
Scott Kelby: author's other books
Who wrote Adobe Lightroom EBook for Digital Photographers? Find out the surname, the name of the author of the book and a list of all author's works by series.


Adobe Lightroom EBook for Digital Photographers — read online for free the complete book (whole text) full work
Below is the text of the book, divided by pages. System saving the place of the last page read, allows you to conveniently read the book "Adobe Lightroom EBook for Digital Photographers" online for free, without having to search again every time where you left off. Put a bookmark, and you can go to the page where you finished reading at any time.
Font size:
Interval:
Bookmark:

Now, do we really need an entire chapter just on importing photos? Nope. We could just skip it, but then the book would start with , and that it would be on importing photos, because there's more to it than it first seems. See, it all makes perfect sense once you look at it calmly and logically.
This is where it all startsbringing your photos into Adobe Lightroom so you can begin organizing, editing, and printing them. Lightroom is set up to let you import from two different sources: (1) it lets you manage photos that are already on your computer, and it gives you a number of options of just how it does that; and (2) it lets you import photos directly from your digital camera or a memory card reader. If you're smart about importing now, it will save you a lot more time and trouble, and make managing your images that much easier.
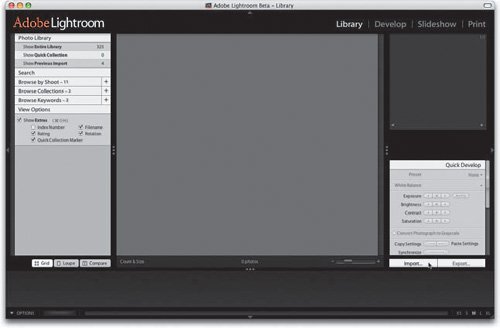
First, we'll start with importing photos that are already on your computer (my guess is, you probably already have at least some, if not more, already on there). To begin importing, first click on the Library link (found along the top-right side of the Lightroom window), and then click the Import button on the lower-right side of the window (shown here circled in red).
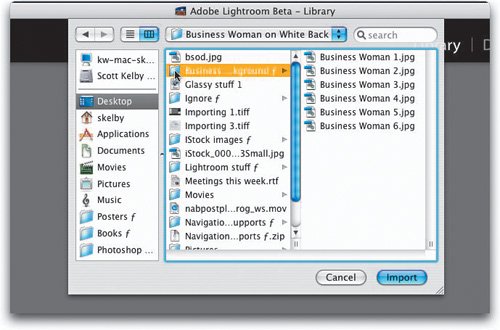
Lightroom needs to know where the photos are on your hard disk, so when you click the Import button an Open dialog appears from the top of the Lightroom window (as shown here). Navigate your way to the folder of images you want to import and click the Import button (of course, you can import individual photos, not just folders, but for our example we're importing a folder of images with six photos inside).
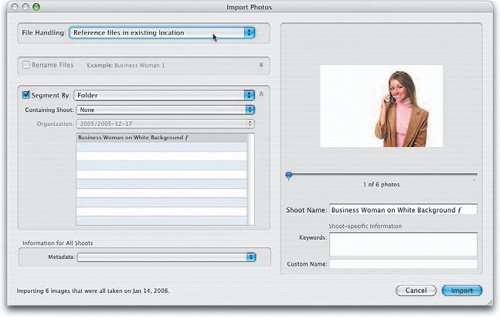
Once you click the Import button in the Open dialog, the Import Photos dialog appears (shown here). This is a very important dialog for two reasons: (1) you need to make some simple decisions on how you want your imported photos treated, and (2) you can save yourself a lot of work down the road if you spend a few extra moments here now. We'll start in the top-left corner with File Handling (your first important decision).
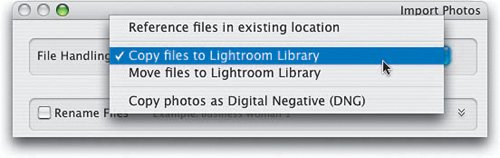
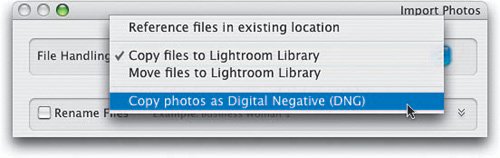
Here's a close-up of the File Handling pop-up menu. You have four options here. The first, Reference Files in Existing Location (shown here), lets you leave the photos right where they are on your computer, but now you can manage and edit them using Lightroom. If you choose Copy Files to Lightroom Library (also shown here), it makes a copy of your photos and moves them into one central folder called the Lightroom Library. So this way, you'll have your original files and then an additional copy. Personally, I don't like this option because it just eats up space on your computer's hard disk. Another option here is Move Files to Lightroom Library, which doesn't copy them, it just picks up the images and moves them into the central library.
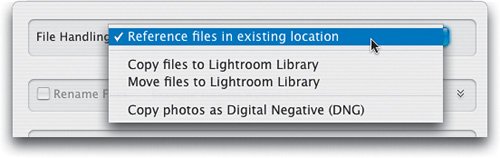
The last option, Copy Photos as Digital Negative (DNG) makes a copy of your photos and puts them into the central library but it changes their file format to Adobe's DNG (digital negative format, which is an open source archival format for RAW images. For the full scoop on the Adobe DNG file format, visit www.adobe.com/products/dng/main.html).
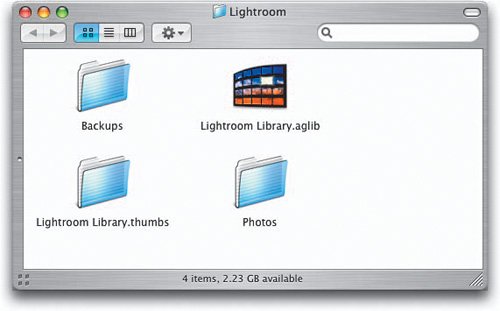
So which is the right choice here? There really isn't a right choice. It's up to you how you want to manage your images: Do you want all your photos in one location, like in the Lightroom Library (shown here, which is in Hard Drive:Users:Home: Pictures:Lightroom:Photos on your Mac)? Here's another question: How do you feel about having multiple copies of the same photo on your hard disk? Personally, I'm always fighting the battle of too little free hard disk space, so I don't copy my images into the Lightroom Library. Of course, I could use the Move Files to Lightroom Library option (so there would only be one copy on my hard disk), but I guess I'm just used to them being where they already are. See what I mean? You have to make the choice that you're most comfortable with.
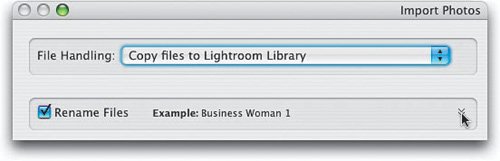
Once you get past the only hard part of this dialog (deciding where, or where not, to move your files), you can start to put this dialog to work. One of the most important things you do for organizing your photos is to give them usable names, and luckily there's an option that lets you automatically give your files custom names as they're imported. To enter the custom name you want, turn on the Rename Files checkbox and then click directly on the downward facing arrows on the right (as shown here) to reveal the Rename Files options.
Once you reveal the Rename Files options, you'll see a Name field, and a collection of tokens (think of these tokens as naming templates). You start the renaming process by typing in a name. When you look in the Name field, you see a light blue pill-shaped token called Filename. That represents the image's current name. To get rid of the current name, just click directly on Filename and hit Delete. Now the Name field is blank, so just type in the name you want for all your imported photos. Then, from the Tokens field, you can add a sequential number by clicking-and-dragging the Seq# (001) token up to the Name field, after your name. You choose the starting number by typing a number in the First Sequence Number field.
Font size:
Interval:
Bookmark:
Similar books «Adobe Lightroom EBook for Digital Photographers»
Look at similar books to Adobe Lightroom EBook for Digital Photographers. We have selected literature similar in name and meaning in the hope of providing readers with more options to find new, interesting, not yet read works.
Discussion, reviews of the book Adobe Lightroom EBook for Digital Photographers and just readers' own opinions. Leave your comments, write what you think about the work, its meaning or the main characters. Specify what exactly you liked and what you didn't like, and why you think so.