Balzer - Carve, Stamp, Play
Here you can read online Balzer - Carve, Stamp, Play full text of the book (entire story) in english for free. Download pdf and epub, get meaning, cover and reviews about this ebook. year: 2013, publisher: F+W Media, genre: Home and family. Description of the work, (preface) as well as reviews are available. Best literature library LitArk.com created for fans of good reading and offers a wide selection of genres:
Romance novel
Science fiction
Adventure
Detective
Science
History
Home and family
Prose
Art
Politics
Computer
Non-fiction
Religion
Business
Children
Humor
Choose a favorite category and find really read worthwhile books. Enjoy immersion in the world of imagination, feel the emotions of the characters or learn something new for yourself, make an fascinating discovery.

- Book:Carve, Stamp, Play
- Author:
- Publisher:F+W Media
- Genre:
- Year:2013
- Rating:4 / 5
- Favourites:Add to favourites
- Your mark:
Carve, Stamp, Play: summary, description and annotation
We offer to read an annotation, description, summary or preface (depends on what the author of the book "Carve, Stamp, Play" wrote himself). If you haven't found the necessary information about the book — write in the comments, we will try to find it.
Balzer: author's other books
Who wrote Carve, Stamp, Play? Find out the surname, the name of the author of the book and a list of all author's works by series.


Carve, Stamp, Play — read online for free the complete book (whole text) full work
Below is the text of the book, divided by pages. System saving the place of the last page read, allows you to conveniently read the book "Carve, Stamp, Play" online for free, without having to search again every time where you left off. Put a bookmark, and you can go to the page where you finished reading at any time.
Font size:
Interval:
Bookmark:
![]()
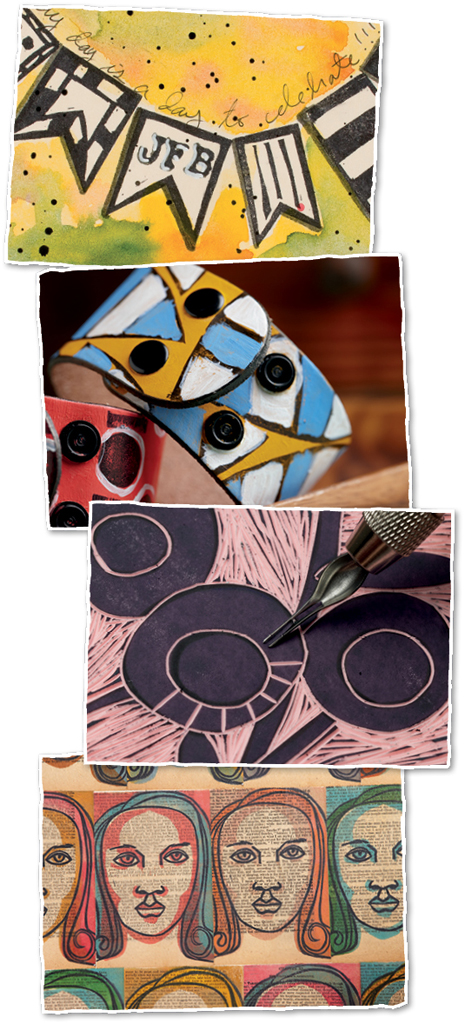
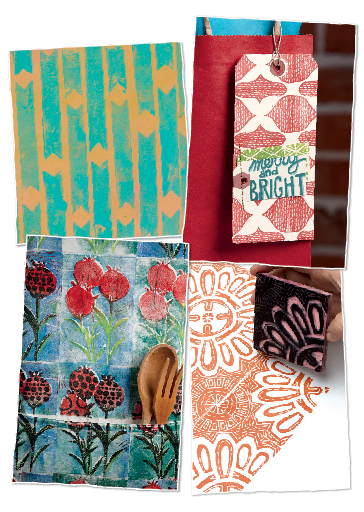
Block printing is a vibrant art form that has been practiced across the world for many centuries. Some of these prints are probably a part of your everyday life, as they can be found on myriad items from fabric to stationery to clothing and more. Block printing is any printing done by taking a carved material (wood, foam, rubber, linoleum, stone), covering it in ink and then transferring the image by pressing paper or fabric against the carved material.
For the purposes of this book, we are going to explore a single aspect of block printing: carving rubber stamps. I fell in love with carving rubber stamps many years ago and have been thrilled to share that passion with anyone and everyone who will listen! As someone who has lived in a tiny apartment in New York City for the last thirteen years, Im always looking for projects that dont require a lot of space or materials, and stamp carving definitely fits the bill. Its also a very portable art form. I have a little travel kit that I like to take with me when I go places. I even spent two weeks of grand-jury duty carving stamps during our expansive downtime.
I love that hand-carved stamps have a strong sense of the artists hand, and yet its easy to make multiple identical prints. And I adore that those prints are authentically mine. In my mind, being artistically authentic is about accepting who I am as an artist and embracing my strengths and weaknesses. There are things Im good at and things Im not good at. Its not about comparing myself to anyone else, but rather about creating art with my hands and my heart that only I could have created. Authentic prints are a part of that. I can use a commercial stamp in an authentic way, but it takes many layers and a bit of work to really make it my own. When I use a hand-carved stamp, its immediately, authentically mine.
Whether Im teaching, blogging, or making art with a friend, one of the first phrases out of my mouth is always, There are no mistakes, only creative opportunities. Many people are intimidated by stamp carving, believing that it requires a certain amount of perfection. I strongly disagree. Stamp carving actually requires flexibility and a relaxed attitude. When Im carving, I create plenty of creative opportunities for myself along the way. The important thing is to remain flexible, embrace the opportunity, and move forward. Im not making perfect stamps; Im making authentic ones.
If youre reading this, then chances are youre interested in carving stamps. Perhaps youre nervous that it will be difficult. In all the years Ive taught carving, no one has ever said, This is a lot harder than I thought. Rather, students have often exclaimed over how much easier it is to do than they previously thought. In fact, carving rubber is addictive because its so shockingly easy to master.
Theres an old saying, Give a man a fish and he will eat for a day. Teach a man to fish and he will eat for a lifetime. My goal in this book is to teach you how to fish. Ive set this book up for progressive learning. The ten lessons in the workshop section are intended to help you master every aspect of the carving process. Each lesson builds upon the previous one. The next two sections of the book are all about designing stamps. It is in this design process that you will really discover your voice as a stamp creator. Im providing the technical know-how so that you can carve any design you can imagine!
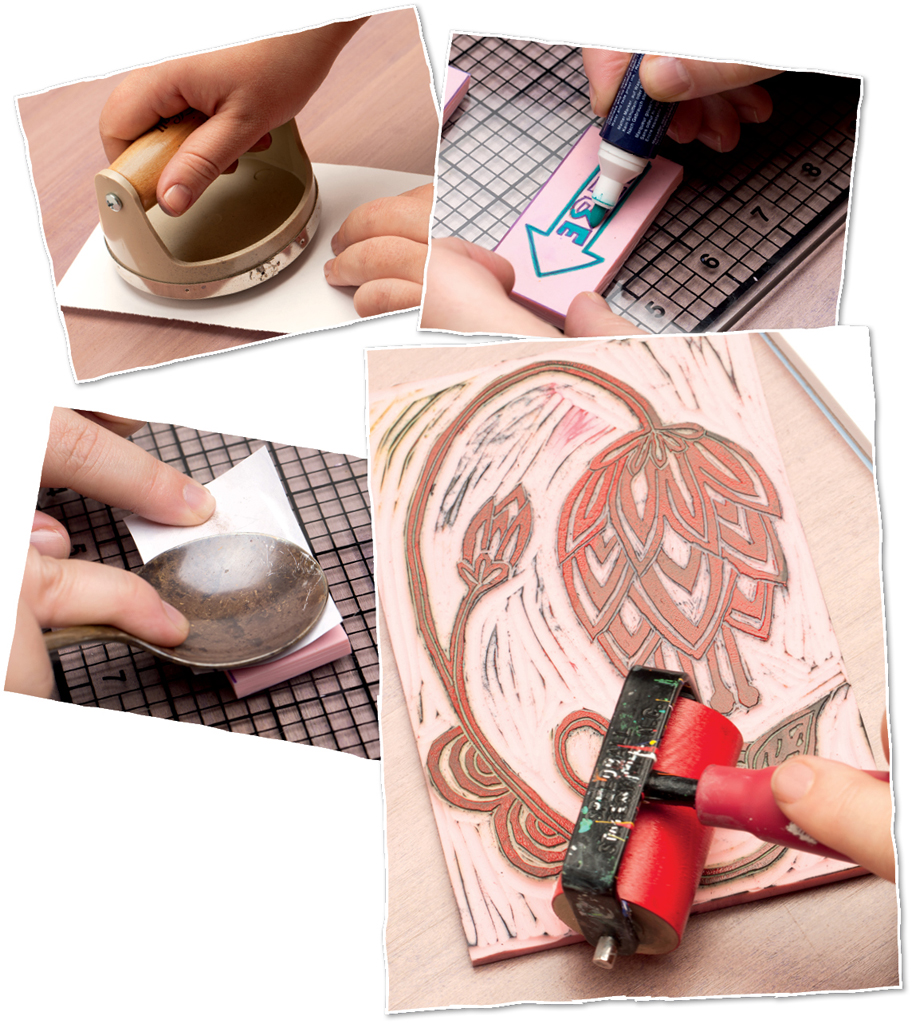
Before you can start creating your own stamp designs and custom prints, you need to know a few basics. In this section, I describe all of the materials and tools youll need to get started as well as the essential carving and printing techniques youll use for every stamp you create.
You dont need a lot of supplies to get started with stamp carving. In fact, in a pinch you can get away with simply your cutter and some carving material. That said, Ive described below all of the supplies that are nice to have. Ive also indicated alternatives where they exist and brand names, if Im particular to one.
This is what you will use to do all of your stamp carving. I like the linoleum cutter from Speedball, which comes with a collection of five blades. The blades can be stored inside the handle when not being used. Each of the blades is numbered, with #1 being the smallest.
Some people like to have a separate handle for each size blade (you can purchase the handles and blades separately), so they dont have to take the time to switch blades. I live in a small apartment and dont have the space for so many handles, so I stick to just twoone holds the #1, or smallest blade, and the other I switch around between the larger blades, usually the #3 and #5.
TIP
Your blades will dull over time. If you notice yourself using a lot more force when carving, its probably time to change your blades. While you can sharpen the blades, its cheaper and easier to simply buy new ones.
There are many soft rubber blocks on the market to choose from. Each brand and style has its own pros and cons. I like Speedy Carve because, for me, it skates the perfect line between firmness and softness and does not crumble. I like to travel with my stamps and have discovered too many of the stamps carved with other blocks cracked in half or discovered the ends broken off after even a small amount of travel.
In addition to rubber, there are many other surfaces you can use for carving stamps, such as linoleum, cork, foam, and erasers. Some of the techniques taught in this book will work for those other surfaces, but my personal preference is to use rubber. Its easy to carve, holds its shape, can be forgiving, and prints extremely clearly.
I use a box cutter with a long blade to cut the rubber blocks into smaller pieces and trim my stamps. This kind of knife usually has break-off blades and is readily available at most hardware stores. Be sure to protect your surface when using the box cutter. No one likes a gouge in the dining room table.
I like to use a glass mat as my cutting and carving surface. Not only does it protect my surface, but its quite slick so the rubber block slides easily as I carve. Additionally, when cutting the rubber with a box cutter, I find that I can really feel the mat and therefore know when the blade has made it through. This is not always true with a self-healing mat. You can use a commercial glass mat or simply a piece of glass. Ive been known to take a framed picture down from the wall, use it as a mat, and then hang it back up. If you use a plain piece of glass, I recommend taping the edges for safetys sake.
Font size:
Interval:
Bookmark:
Similar books «Carve, Stamp, Play»
Look at similar books to Carve, Stamp, Play. We have selected literature similar in name and meaning in the hope of providing readers with more options to find new, interesting, not yet read works.
Discussion, reviews of the book Carve, Stamp, Play and just readers' own opinions. Leave your comments, write what you think about the work, its meaning or the main characters. Specify what exactly you liked and what you didn't like, and why you think so.