Chapter One
How Do I Get Started with Droid?
In This Chapter:
- Setting Up Your Droid Phone
- Using External Controls
- Browsing the Home Screen
- Using the Menu Button
- Exploring Google Apps and Services
- Connecting to a Personal or Business Wi-Fi Network
- Understanding Network Icons
- Connecting a Bluetooth Device
- Protecting the Droid from Unauthorized Access
To start with your Droid phone, you have to install the battery; activate it with your cellular service provider; familiarize yourself with the physical parts; join a Wi-Fi network; learn how to navigate the screens, menus, and other graphical parts; and learn a little about how to use the keyboard. After youre acquainted with the device and can move around successfully in it, you may want to connect a Bluetooth device and protect the Droid from unauthorized access.
Setting Up Your Droid Phone
If you purchased your new phone at a physical store, its highly likely that the salesperson unboxed the phone, inserted the battery, turned it on, activated it, made a test call, and even guided you through inputting the required Google account. If that happened, you can skip forward to the Exploring Google Apps and Services section, stopping to read only the notes and such between here and there. If your new phone is still in the box and has not been activated, you need to continue here.
Unpacking, Charging, and Getting Ready
To start, carefully remove everything from the box. Lay the items out on a roomy table or desk, and take note of everything thats there. You have several pieces of material to read, including information about activation agreements and pricing plans, coverage areas, consumer information, safety and warranty information, and something along the lines of how to master your device. The latter is important; it outlines how to insert the battery, attach the battery cover, and properly charge your phone. It may also tell you how to insert the microSD card, if applicable. The SIM should already be inserted.
Start by following the specific instructions for your device to insert the microSD card and battery, and attach the battery cover. If the directions tell you to charge the phone for a specific amount of time before using it, do so. While your phone is charging, read the rest of the information, specifically noting how to power on the device, what the external ports provide, and how to power off the device. Then, place the packaging back in the box, and keep the box handy. You may need to access the information later.
Completing First-Time Setup Tasks
When you first turn on your new Droid phone (by pressing and holding the Power button for a couple of seconds), you need to work through a few setup processes. Although tasks differ from device to device, they likely include the following:
- Choosing a language
- Activating the phone
- Inputting your Google account information
- Adding email accounts
- Setting up some kind of backup assistant
- Enabling phone location services from your carrier, from standard GPS, and Google location services
Follow these steps to set up the Droid X2 and the Droid 3 (and virtually any other Droid phone):
Turn on the phone and tap Select Language.
Select your language.
Tap the Android icon.
Tap Activate.
Tap Speaker, if wanted.
Follow the instructions to activate your phone, which involves the following:
a. Tapping a specific key, perhaps 1.
b. Tapping Next.
c. Agreeing to the Terms of Service.
After the activation tasks are complete, youre ready to add your Google account. In the next section you learn how to get a Google account if you dont have one, and how to input that account using your phone.
Creating and Inputting a Google Account
During the setup process, you are prompted to input a Google account and complete a few related setup tasks. You can skip the step that involves inputting a Google account and do it later if you want, but we suggest you take the time now. If you dont already have an account, when you get to step 4, tap Create, and follow the prompts to create an account. When it is created, you can continue with the directions to input that information to your Droid phone.
When prompted to input your Google account from your Motorola Droid X2, Droid 3, the Droid Incredible 2, and the Droid Charge, follow these steps:
If the screen has gone dark, press the Power button.
Tap Next.
Read the information offered, and tap Next again.
If you dont have an account, tap Create and follow the prompts. If you have an account, tap Sign In.
Input your Google Account username and password. If you use a virtual keyboard, tap Done.
Tap Sign In.
Youll be prompted that you can use your Google Account to back up your apps, settings, and other data. Tap Next to set this up.
Tap Finish Setup.
Finally, youll be prompted to input a 4-to-8 digit PIN. Enter this, write it down, and keep it somewhere safe, and make any other configuration choices here. You can opt, for instance, to authorize Verizon to send your PIN to your phone if its lost. Tap Submit to complete these tasks.
WHAT IF I WORK FOR A COMPANY THAT USES GOOGLE APPS FOR ENTERPRISE, AND I HAVE ONE OF THOSE ACCOUNTS?
If your company uses Google Apps for Enterprise and you have a related account, you could use that account to set up your Droid phone. We warn against this. Instead, create a new Google account thats yours and yours alone. You can always add the Google Apps account as a second email account if you want to, but this way, if you change jobs, youll still have your personal information through your personal Google account, and you can still use your Droid effectively.
Configuring Additional Accounts and Enabling Location Services
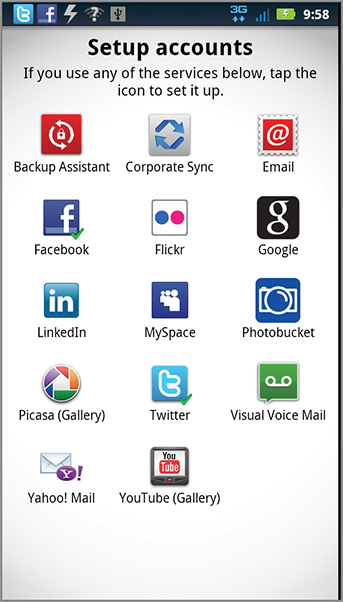
As you can see in , when you finish all the required setup tasks, you are prompted to configure any additional accounts you use. You might want to take this time to input your username and password for Facebook, Twitter, Photobucket, Google, Yahoo! Mail, and others. To input any of these, simply tap the icon and follow the prompts. If you have any difficulty using the keyboard (either physical or virtual), for now, refer to the information booklet that came with your phone. That tells you how to input an @ sign, _ character, uppercase letters, and so on. (There are also a few typing tips offered later in this chapter.) Tap Done Adding Accounts when finished. (If your screen goes dark, press the Power button, and move the Lock icon from left to right to unlock your phone.)
After setup, you have access to the Setup accounts screen.

Finally, you are prompted to enable various forms of location services. You can use location services to determine where you are currently positioned by using location data from cellular towers, Wi-Fi hotspots, or plain-old GPS. Actually, these can tell you where your phone is located, not you!
With your location information pinpointed, apps such as Maps can offer directions from your current location to another, inform you of transportation options in your area, and help you locate restaurants, coffee shops, bars, hotels, gas stations, and other places of interest. Third party apps may offer even more information, let you check in to establishments you frequent, tell others where you are via social networking, and more. Its up to you to enable location services. Some people feel its an invasion of privacy; others, like us, look at it as just another useful service to help apps work better and our phones perform more effectively. Youll be prompted by new apps, as you obtain them, to let them have access to your location, and you can generally opt to allow or disallow the first time you open the app. When you see a Home screen like the one shown in , setup is complete.


