Publisher: Amy Marson Creative Director: Gailen Runge Art Director / Cover Designer: Kristy Zacharias Editors: S. Michele Fry and Joanna Burgarino Technical Editors: Alison M. Schmidt and Nan Powell Book Designer: Katie McIntosh Production Coordinator: Freesia Pearson Blizard Production Editor: Katie Van Amburg Illustrators: Amanda Murphy and Jenny Davis Photo Assistant: Mary Peyton Peppo Style photography by Nissa Brehmer and instructional photography by Diane Pedersen, unless otherwise noted Published by Stash Books, an imprint of C&T Publishing, Inc., P.O. Box 1456, Lafayette, CA 94549 Dedication To my favorite people to celebratemy family Acknowledgments My wholehearted thanks goes to Amy Marson and the entire team at C&T Publishingmy editors Michele Fry, Joanna Burgarino, Alison Schmidt, Katie Van Amburg, and Nan Powell; my book designer Katie McIntosh and cover designer Kristy Zacharias; the photography team of Nissa Brehmer, Diane Pedersen, and Mary Peyton Peppo; production coordinator Freesia Pearson Blizard; illustrator Jenny Davis; and of course Roxane Cerda and Gailen Runge. Also thanks to the wonderful companies that manufacture the fabrics that I used to create the pieces for this book: Art Gallery Fabrics, Blend Fabrics, Riley Blake Fabrics, and Robert Kaufman Fabrics. The talented designers whose fabrics I was fortunate enough to play with are listed in Resources.
A heartfelt thanks goes to Aurifil and the Warm Company. Aurifil threads come in a wonderful array of colors and are such a pleasure with which to sew! All the quilts feature Warm & White battingmy favorite! And last but not least Id like to thank BERNINA. It is a pleasure to sew each and every stitch using your wonderful machines. Thanks for your support. INTRODUCTION It is always wonderful to celebrate the milestones in life with a quiltsomething that will last and commemorate the event. As quilters, we are fortunate that we are able to express our love for those around us with needle and thread.
This book is full of sophisticated and modern designs to help you commemorate lifes memorable, special moments and milestones. I hope you will enjoy making these quilts as much as Ive enjoyed designing them. I have designed a quilt top and a quilt back for each project, which allows you to easily personalize them. You can piece the front design, the back design, or both! Each quilt back design is 5 larger in each direction than the quilt top design, allowing it to be mounted on a quilting machine with ease. (Make sure to center the top over it for a clean finish!) Each back design also features an area to personalize the quilt with a special message. You can read more ideas for how to do this in Personalizing Your Quilts.
I hope you enjoy making memories through quilting for the special people in your life! Happy quilting! Amanda  There are so many ways to personalize a quilt. For a quilt that commemorates one of lifes exceptional moments, personalization is especially important. I chose to customize the quilt backs in this book while keeping the fronts understated; however, there is no reason that you cant piece a back design and use it for the front of a quilt if you desire! (Keep in mind that the quilt backs are designed to be 5 larger on each side than the fronts, so if you use the back design for the front, the finished size of your quilt will be different from the size listed in the project.) All the methods presented in this chapter can be used interchangeably on the different designs. Whatever your tools of choice, use your imagination and make the quilts in Quilted Celebrations your own! LESLEY RILEYS TAP TRANSFER ARTIST PAPER One quick and easy way to personalize a quilt is to use Lesley Rileys TAP Transfer Artist Paper (from C&T Publishing) and an inkjet printer. This paper allows you to print any image on the printer and then transfer the image onto fabric using your iron! I found I had the best results transferring dark letters to light fabric rather than vice versa. To personalize using TAP, follow these steps: Arrange your message in a word-processing or image-editing program, and print out a test on printer paper.
You may need to put the words on different lines to fit. Lay the words on your quilt to check the font size. (Most of the characters I used for these quilts were between 160 and 200 points.) Once youre happy with the appearance of your message, use your computer program or printer settings to invert the text. Print out the inverted text on the transfer paper. Figure 1  Cut out the message from the transfer paper about from the edge of the letters. This often works better than simply cutting a rectangle around the words because the blank areas can leave a bit of film that might show on very light fabrics.
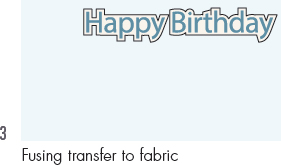
Figure 2  Following the manufacturers directions, transfer the image to your fabric using an iron. Figure 3
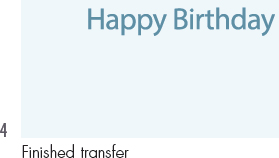
  Touch up any areas with fabric paint, if desired. Figure 4
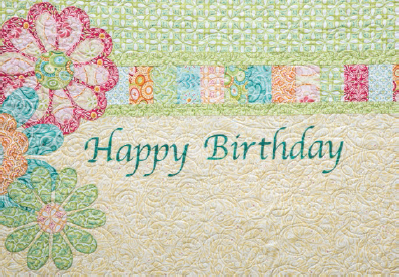 On the back of Flora, this special message, created with TAP, celebrates the day. TIP For more TAP tips and ideas, consult Lesley Rileys book Create with Transfer Artist Paper (from C&T Publishing). HANDWRITING When you would like to have a group of people involved in creating the finished message, fabric markers are a great way to go. Fabrico pens were used to memorialize special recollections in We Remember and they were used again to create an autographed area for the alternative back panel of Congratulations, Grad!.
The Essential Sandboard by Piece O Cake Designs (from C&T Publishing) is a great tool to have on hand to keep the fabric from slipping when working with fabric pens. Remember to follow any specific instructions from the manufacturer to set the ink if necessary. 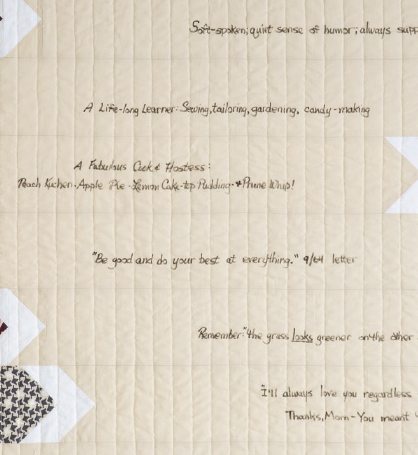 On the back of We Remember , lettering done with fabric markers commemorates wonderful memories. EMBROIDERY Hand Embroidery Hand embroidery is also an option for recording an event. You can embroider over handwritten letters or you can print out letters on a computer and trace them onto the fabric using a lightbox or window. The options are endless.
Machine Embroidery If you are lucky enough to own a sewing machine that can also embroider, machine embroidery is a great option for personalization. Letters created with machine embroidery have a polished look that is unmatched. Bring out the color in your fabric by choosing a fun thread. Light colors can look beautiful on dark fabrics when using this method. Welcome to the World!, Congratulations, Grad!, A Life Together, and I Do! all feature machine embroidery. 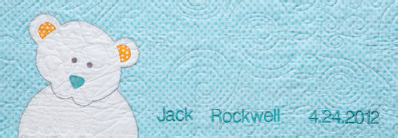
Next page

 There are so many ways to personalize a quilt. For a quilt that commemorates one of lifes exceptional moments, personalization is especially important. I chose to customize the quilt backs in this book while keeping the fronts understated; however, there is no reason that you cant piece a back design and use it for the front of a quilt if you desire! (Keep in mind that the quilt backs are designed to be 5 larger on each side than the fronts, so if you use the back design for the front, the finished size of your quilt will be different from the size listed in the project.) All the methods presented in this chapter can be used interchangeably on the different designs. Whatever your tools of choice, use your imagination and make the quilts in Quilted Celebrations your own! LESLEY RILEYS TAP TRANSFER ARTIST PAPER One quick and easy way to personalize a quilt is to use Lesley Rileys TAP Transfer Artist Paper (from C&T Publishing) and an inkjet printer. This paper allows you to print any image on the printer and then transfer the image onto fabric using your iron! I found I had the best results transferring dark letters to light fabric rather than vice versa. To personalize using TAP, follow these steps: Arrange your message in a word-processing or image-editing program, and print out a test on printer paper.
 Cut out the message from the transfer paper about from the edge of the letters. This often works better than simply cutting a rectangle around the words because the blank areas can leave a bit of film that might show on very light fabrics.
 Following the manufacturers directions, transfer the image to your fabric using an iron. Figure 3
  Touch up any areas with fabric paint, if desired. Figure 4
 On the back of Flora, this special message, created with TAP, celebrates the day. TIP For more TAP tips and ideas, consult Lesley Rileys book Create with Transfer Artist Paper (from C&T Publishing). HANDWRITING When you would like to have a group of people involved in creating the finished message, fabric markers are a great way to go. Fabrico pens were used to memorialize special recollections in We Remember and they were used again to create an autographed area for the alternative back panel of Congratulations, Grad!.
 On the back of We Remember , lettering done with fabric markers commemorates wonderful memories. EMBROIDERY Hand Embroidery Hand embroidery is also an option for recording an event. You can embroider over handwritten letters or you can print out letters on a computer and trace them onto the fabric using a lightbox or window. The options are endless.