
 Text and photographs copyright 2014 Chad Poole. Design and concept copyright 2014 Ulysses Press and its licensors. All rights reserved. Any unauthorized duplication in whole or in part or dissemination of this edition by any means (including but not limited to photocopying, electronic devices, digital versions, and the Internet) will be prosecuted to the fullest extent of the law. Published in the U.S. by Ulysses Press P.O.
Box 3440 Berkeley, CA 94703 www.ulyssespress.com ISBN: 978-1-61243-328-8 Library of Congress Control Number 2013957324 10 9 8 7 6 5 4 3 2 1 Acquisitions Editor: Kelly Reed Managing Editor: Claire Chun Editor: Lauren Harrison Proofreader: Elyce Berrigan-Dunlop Front cover design: Michelle Thompson Interior design and layout: what!design @ whatweb.com Cover photos: Chad Poole Distributed by Publishers Group West IMPORTANT NOTE TO READERS: This book is independently authored and published and no sponsorship or endorsement of this book by, and no affiliation with, any trademarked brands or other products mentioned or pictured within is claimed or suggested. All trademarks that appear in ingredient lists, photographs, and elsewhere in this book belong to their respective owners and are used here for informational purposes only. The author and publishers encourage readers to patronize the quality brands mentioned and pictured in this book. To my parents, who believed in me when others didnt. Without your love and support, I wouldnt be the person I am today. I would also like to dedicate this book to the memory of my beloved sister.
Table of Contents
What Is Paracord? Since paracord is so versatile, everyone should have a hank lying around for emergency purposes. In this book, you will learn some neat ways to put the paracord to use. Paracord is simply nylon cord wrapped in a braided sheath. Though it is fairly easy to find paracord, beware of imitation cord. It may look identical to genuine paracord, and the only way to know if it is the real deal is to see the inner strands. Genuine paracord has three to five internal strands.
Generic imitation cord may have inner strands, but it wont be like the genuine cord; some may have only one inner strand that is quite large. The paracord that I use is known as 450 and 550; I use two different types depending on the design that I am tying. The 450 paracord has only three inner strands and is not as stiff as 550, which has seven inner strands. This photo shows 450 paracord on the left and 550 on the right.  What Supplies Are Needed for Paracord Designs? The supplies required are minimal: paracord, scissors, a ruler, and a lighter are the basic items you will need to get started. Other helpful items you might want to obtain are a few curved side-release buckles, lobster clips, and carabiners.
An advanced tool that I use is a woodburner pen, which is used to cut and melt the cord at the same time; your final result will look better when using this instead of a lighter.  How Do I Determine How Much Cord Will Be Needed to Tie a Design? No matter what design you choose to tie, a simple method can be used to determine the length of cord required. Measure the length of a scrap strand of paracord. Then tie a 1-inch-long version of the design you intend to tie. After tying that inch, measure how much cord you have left. Subtract the amount of cord you have left from the length of the total cord.
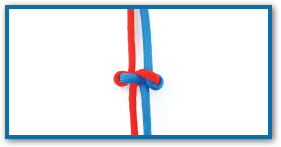
Now take the amount that it takes to tie 1 inch of the design and multiply that by however many inches you intend the design to be. Introductory Knots Once you begin tying paracord designs, you will need to determine how to begin or end the design; these knots can be used on almost any bracelet or keychain. This is how you start a paracord bracelet without using a buckle. The two strands used to tie the loop can be the same or different colors. Start with the two strands placed vertically beside each other. 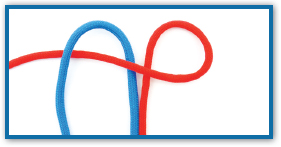 Form a loop with the blue strand, bring it over and around the red strand, and then bring it underneath both core strands and out the red loop.
 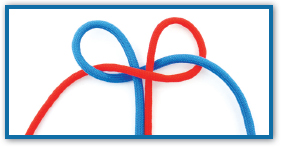 Take the blue strand up, to make a loop, then bring it down through the blue loop on the left side, then under both core strands, under itself, and out the red loop.
 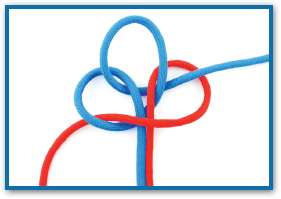 ) that you intend to tie.
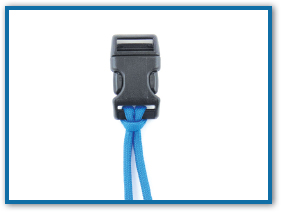
  You will use this Cow Hitch knot to start most bracelet designs that use a buckle.
  You will use this Cow Hitch knot to start most bracelet designs that use a buckle.
Fold the paracord in half and insert it into one end of the buckle. 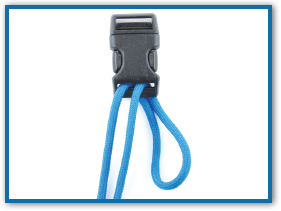 Insert the free ends of the paracord into the loop and then pull it tight.
  When tying a bracelet without a buckle, you will need a knot on the opposite end of the loop to secure the bracelet to your wrist. This is an intricate way of creating the Bracelet Clasp, but simpler methods are available, such as the Overhand Knot (). Start with the two strands placed vertically beside each other.
 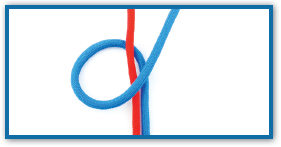 Bring the red strand around and over the blue strand and then underneath itself and the blue strand and then out the loop of the blue strand.
 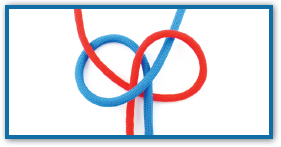 Form a loop on the right with the blue strand, then bring it over the red strand and itself, then under the red strand and out the loop.
 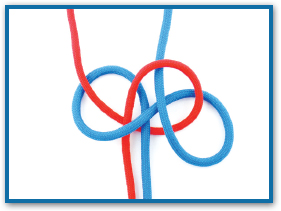 Form a loop on the left with the red strand, then bring it under the blue strand, over itself, then over the blue strand.
  Pull the strands tight.
Next page


 What Supplies Are Needed for Paracord Designs? The supplies required are minimal: paracord, scissors, a ruler, and a lighter are the basic items you will need to get started. Other helpful items you might want to obtain are a few curved side-release buckles, lobster clips, and carabiners.
 How Do I Determine How Much Cord Will Be Needed to Tie a Design? No matter what design you choose to tie, a simple method can be used to determine the length of cord required. Measure the length of a scrap strand of paracord. Then tie a 1-inch-long version of the design you intend to tie. After tying that inch, measure how much cord you have left. Subtract the amount of cord you have left from the length of the total cord.
 Form a loop with the blue strand, bring it over and around the red strand, and then bring it underneath both core strands and out the red loop.
  Take the blue strand up, to make a loop, then bring it down through the blue loop on the left side, then under both core strands, under itself, and out the red loop.
  ) that you intend to tie.
  You will use this Cow Hitch knot to start most bracelet designs that use a buckle.
  Insert the free ends of the paracord into the loop and then pull it tight.
  When tying a bracelet without a buckle, you will need a knot on the opposite end of the loop to secure the bracelet to your wrist. This is an intricate way of creating the Bracelet Clasp, but simpler methods are available, such as the Overhand Knot (). Start with the two strands placed vertically beside each other.
  Bring the red strand around and over the blue strand and then underneath itself and the blue strand and then out the loop of the blue strand.
  Form a loop on the right with the blue strand, then bring it over the red strand and itself, then under the red strand and out the loop.
  Form a loop on the left with the red strand, then bring it under the blue strand, over itself, then over the blue strand.
  Pull the strands tight.