Introduction
All of the recipes are for baked goods, some for dessert items and some for breads. There are recipes for every level of Dutch oven expertise: novice cooks who just bought a new Dutch oven and cant wait to try it out; the occasional cooks who use an oven on campouts, hunting trips, and special backyard events; and the expert cooks who are bitten by the cast iron bug and maybe even compete in Dutch oven cook-offs.
If you are new to Dutch oven cooking or if you are a well-seasoned expert, here are some tips that you will find helpful when baking the recipes in this book or any other recipes you might want to try.
Temperature Control Tips
Throughout the book I refer to charcoal briquettes as coals. I use Kingsford charcoal exclusively because it burns the same way, every time. Consistent temperature is crucial, especially when baking.
Most of the recipes in this book are written for a 12-inch Dutch oven. Sometimes I use a 10-inch oven if I want a smaller version or the recipe doesnt fit well in the larger oven. You can use even bigger ovens if you wish. A 12-inch holds about 1-1/2 times the volume of a 10-inch and a 14-inch holds about 1-1/2 times the volume of a 12-inch.
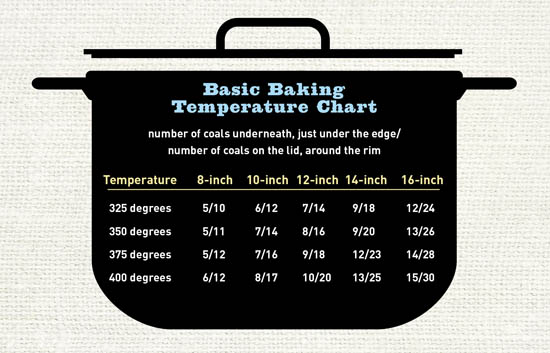
Since baking in your home oven is often done at 350 degrees, most of the recipes I write for 12-inch ovens will use 7 to 8 coals underneath the Dutch oven and 15 to 16 coals on the lid, resulting in 350 degrees. When baking, dont put coals in the middle of the lid or in the middle under the oven, evenly place them around the edges. There are exceptions, however, like when you want to raise the baking temperature higher than 350 degrees for a short time, or if there are weather related issues.
Here is the basic formula for figuring out how many coals to use. If you double the size of the oven (i.e. a 12-inch equals 24 coals) and put 2/3 of the coals on the lid and 1/3 under the oven, you will have the correct ratio for a 350 degree heat, no matter the oven size. The exception is the monster 16-inch oven, which requires more attention. Add or subtract coals for variables like a cold outside temperature, cooking in direct sunlight in July, windy conditions, pouring rain, and etc. A good guide for adjusting the number of coals is when you add 1 more coal to the lid and 1 more under the oven, you raise the cooking temperature by 25 degrees. The same is true if you remove coals. See the handy chart on the following page for a quick reference.
Basic Equipment Tips
Ovens: Which Dutch oven to buy? Buy quality! Camp Chef and Lodge are the best, period! Start with a 12-inch oven and then add various sizes to your collection. My wife gave me a 12-inch Lodge for Fathers Day many years ago. I seasoned it according to the directions that came with the oven and started cooking. This oven is still my prime baking oven today. I now have ovens from each company. These days Dutch ovens arrive pre-seasoned. But even pre-seasoned ovens need a bit more seasoning. As you begin your outdoor cooking adventure, cook something greasy like a bacon, potato, and cheese dish a few times. Also, for the first few times you cook in your oven, avoid highly acidic foods like tomatoes. As you do this, your cast iron will begin to build a black carbon coating called the patina. A well-seasoned oven can be as nonstick as a Teflon pan.
Cooking stand: You will need something to set the oven on when you are cooking. I started with a metal garbage can lid sitting on three bricks. I eventually graduated to a cooking stand made for Dutch ovens. The cheapest and best one for me is a plow disk with legs. Its concave shape keeps more of the heat directed toward the oven and it is easy to empty the spent coals when you are done.
Folding table: The size is up to you according to your cooking needs. I have an 8-foot table. It gives me all of the room I need to prepare food.
Chimney charcoal starter: This is the quickest way to start coals for cooking using crumpled up newspaper. You can buy one of these at any outdoor retail place.
Heavy gloves: You will need these to keep you hands burn free when you are moving around hot ovens and coals.
Lid lifters: I have used everything from a pair of pliers to a claw hammer to lifters made for lifting Dutch oven lids. The one I use now is from Camp Chef that clamps onto the lid for easy handling and coal dumping.
Long food tongs: A cheap set will do to move coals around.
Whisk broom: This will help you quickly clean your cooking stand.
Trivet: This three-sided metal rack is used to hold the oven lid off of the ground or table for serving your dishes. There are many types available.
Wooden spoons: You will need 4 or 5 of different sizes and shapes.
Ice cream scoops: These are very helpful for scooping dough to make rolls and biscuits. Get several sizes such as a number 8, 20, or 50. The number denotes how many scoops in a quart. Use an 8 or 10 for large rolls or biscuits and as small as a 50 for pull-a-parts.
General Tips
Many baked goods will brown too much on one side because of sunshine, wind, or the oven itself. Every 15 minutes, gently turn the oven about a quarter turn over the coals and then turn the lid the opposite direction to prevent hot spots.
Parchment paper lifts for pies: This is a great way to get a pie or tart out of the Dutch oven. For a 12-inch oven, take an 18 to 20-inch long piece of parchment paper, fold it in thirds lengthwise, and cut along the creases. Spray the oven with nonstick cooking spray, evenly arrange the paper strips in the oven one at a time, and spray them, too. This gives you 6 handles. Then add the bottom crust of your pie. Before you put the lid on to bake the dish, trim the strips a little so they wont get in the way of the food. When the pie is done, use the handles to lift the pie out of the oven.

Parchment paper rings for cakes: Use the oven lid to draw a template with a pencil. With scissors, cut 1 inch inside of the pencil mark. I keep several of these premade wonders. When you want to bake a cake, spray the oven with nonstick cooking spray, add the paper ring, and spray that, too. Then carefully pour the batter into the oven. When your cake is done, simply flip the oven over onto a trivet. The lid is now the serving platter. Be sure to remove the paper, its hard to cut and doesnt taste good.

