Swike - Guitar Electronics Understanding Wiring
Here you can read online Swike - Guitar Electronics Understanding Wiring full text of the book (entire story) in english for free. Download pdf and epub, get meaning, cover and reviews about this ebook. year: 2013, publisher: Lightning Source Inc, genre: Home and family. Description of the work, (preface) as well as reviews are available. Best literature library LitArk.com created for fans of good reading and offers a wide selection of genres:
Romance novel
Science fiction
Adventure
Detective
Science
History
Home and family
Prose
Art
Politics
Computer
Non-fiction
Religion
Business
Children
Humor
Choose a favorite category and find really read worthwhile books. Enjoy immersion in the world of imagination, feel the emotions of the characters or learn something new for yourself, make an fascinating discovery.

- Book:Guitar Electronics Understanding Wiring
- Author:
- Publisher:Lightning Source Inc
- Genre:
- Year:2013
- Rating:4 / 5
- Favourites:Add to favourites
- Your mark:
Guitar Electronics Understanding Wiring: summary, description and annotation
We offer to read an annotation, description, summary or preface (depends on what the author of the book "Guitar Electronics Understanding Wiring" wrote himself). If you haven't found the necessary information about the book — write in the comments, we will try to find it.
Swike: author's other books
Who wrote Guitar Electronics Understanding Wiring? Find out the surname, the name of the author of the book and a list of all author's works by series.


Guitar Electronics Understanding Wiring — read online for free the complete book (whole text) full work
Below is the text of the book, divided by pages. System saving the place of the last page read, allows you to conveniently read the book "Guitar Electronics Understanding Wiring" online for free, without having to search again every time where you left off. Put a bookmark, and you can go to the page where you finished reading at any time.
Font size:
Interval:
Bookmark:


Please Read This FIRST
Terms of Use
This Guitar Electronics book is Copyright 2007. All rights reserved. No part of this book may be reproduced, stored in a retrieval system, or transmitted by any means; electronic, mechanical, photo copying, recording or otherwise, without written permission from the copyright holders. You do not have any right to distribute any part of this book. T. Swike and Indy Ebooks are the sole distributors. Violators will be prosecuted.
Adjusting, changing, adding, or removing the electronics in any device can be dangerous and can cause injuries. This author assumes no responsibility for personal injury or property damage caused by the use of this guide, or products we sell, whether by accident, negligence, or otherwise. Please note that this book is for educational purposes only. Only qualified personnel should carry out any electrical work. USE AT YOUR OWN RISK.
Please send questions or comments to: indyebooks@aol.com
0-615 United States ISBN Agency
ISBN-13: 978-0-6151-6541-7
First Edition, September 2007
Contents
Contents
Lets talk about the legendary Stratocaster guitar. Personally, I dont think you can find a better sounding guitar anywhere. The unmistakeable strat sound is more tapered, with less highs and lows than other guitars, and it has more midrange. Much of the strat's popularity comes from its hollow pickup cavity, and it's neck and middle pickups. It is perfect for playing the blues, jazz, or rock. These guitars are described by many as having a quacky, or even smokey sound. Now lets wire one.
TOOLS FOR THE JOB
First, we need to talk about the tools you will need for changing your electronics.
1 - Output jack
3 - 250K pots
1 - .050F capacitor
1 - 5-way lever switch
1 - guitar wire 22AWG, white
1 - guitar wire 22AWG, black
1 - 25+ Watt soldering iron
1 - phillips screwdriver
1 - wire cutting and stripping tool
1 - rosin core solder
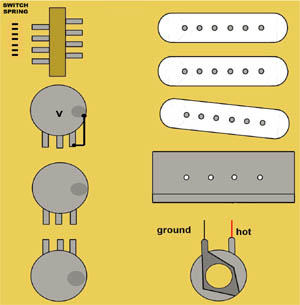
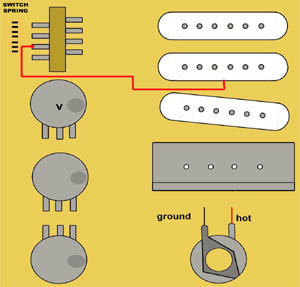
ASSEMBLING THE PICKGUARD
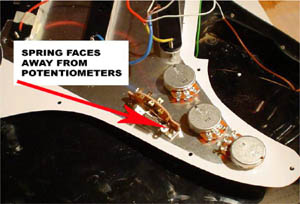
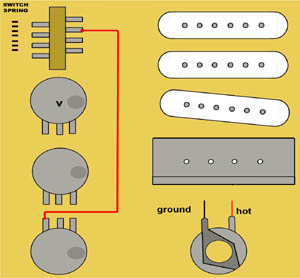
Install the potentiometers, or pots, and the 5-way switch in the pickguard. When the pickguard is upside down, the spring on the 5-way switch will be facing away from the pickups. Align the two tone pots so that the lugs are facing each other. The volume control will be closest to the pickups.
HEATING UP THE SOLDERING IRON
Lets get the soldering iron ready. Plug it in and let it heat up in its holder. Remember, your soldering iron can get up to 700 degrees, or more, so be careful.
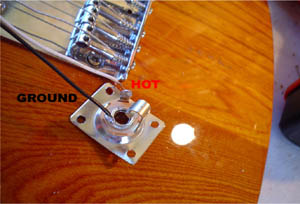
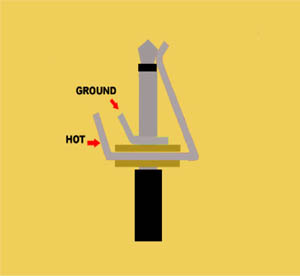
SOLDERING THE OUTPUT JACK
Next, we are going to solder the ground wire and hot wire to the output jack. The lug that connects to the prong is the hot connection. Solder the hot and ground wires to the output jack. Then screw the output jack into the guitar.
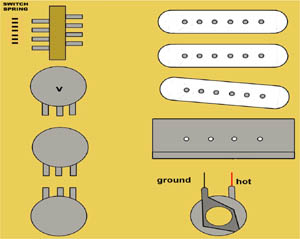
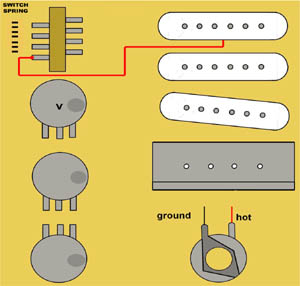
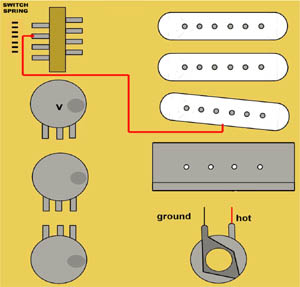
SOLDERING THE POTS
Add solder to the volume pot, and tone pot cases. All of the ground wires will be connected to each other on the pot cases. Now connect the far right volume pot lug to its own case. You can use a wire for this connection, or just bend the lug until it touches the case, and then add solder. Now add solder to the potentiometer cases. Solder the right volume pot lug to its case.
SOLDERING THE PICKUP GROUND WIRES
Find the 3 ground wires that come out of the pickups. Normally, they will be black wires, or they will be unshielded. The colored wires are usually the hot wires. Twist the three ground wires together and solder them to the volume pot case.
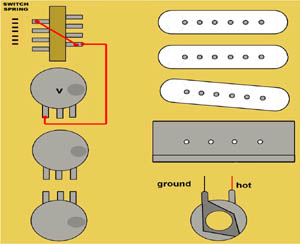
SOLDERING THE REST OF THE GROUND WIRES
Next, you are going to find the bridge ground wire and solder it to the volume pot. You are also going to solder the output jack wire to the volume pot. After that, you will connect the volume and tone pots with 2 more wires. The bridge ground will probably already be connected to the tremolo claw on the back of the guitar if you have a whammy bar. If it is not connected, you can always attach it to the bridge. All you have to do is send the wire under the bridge, and put it through one of the screw holes on the bridge. Then wrap the wire around one of the screws while it is being tightened down. This will prevent the bridge ground from moving.
Now connect the rest of the ground wires.
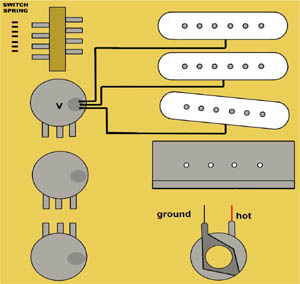
SOLDERING THE PICKUP HOT WIRES
Next, you will solder the hot wires from the pickups to the left side of the 5-way switch. Connect the neck pickup.
Next connect the middle pickup.
Now do the same to the bridge pickup.
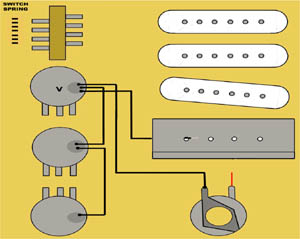
ADDING THE JUMPER
Now connect the top left lug to the bottom right lug on the 5-way switch. Twist another wire to the right lug wire, and solder it to the left volume pot lug. Also connect the left and right sides of the 5-way switch. Then connect them to the volume pot lug.
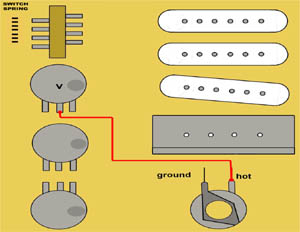
CONNECTING THE VOLUME POT TO THE OUTPUT
Now you can connect the middle volume pot lug to the output jack.
CONNECTING THE 5-WAY SWITCH TO THE TONE POTS
The next step involves soldering the switch to the middle tone pot lug.
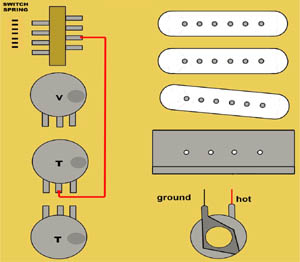
Next you are going to solder the 5-way switch to the bottom tone control. Connect it to the left lug. Also connect the switch to the bottom tone pot.
Font size:
Interval:
Bookmark:
Similar books «Guitar Electronics Understanding Wiring»
Look at similar books to Guitar Electronics Understanding Wiring. We have selected literature similar in name and meaning in the hope of providing readers with more options to find new, interesting, not yet read works.
Discussion, reviews of the book Guitar Electronics Understanding Wiring and just readers' own opinions. Leave your comments, write what you think about the work, its meaning or the main characters. Specify what exactly you liked and what you didn't like, and why you think so.