Build a Wood Fired Oven in a Day
Make a Mini Wood Fired Oven for under 100
Ideal for baking breads, pizzas and other dishes
By The Artisan Bakery School
All contents copyright Penny Williams and Dragan Matijevic 2014
***
Published by Pendragan Publishing

***
This book cannot be copied, reprinted or redistributed for sale by any mechanical, electronic or other means. The design, photographs and text remain the properties of the authors.
The information contained in this text has been verified and documented as carefully as possible. The authors cannot be held liable for the use of its contents. Readers should exercise every possible precaution if they choose, solely at their own risk, to put any of the content into practice.
***
Pendragan Publishing
Old Home Cottage
Sparkwell
Plymouth PL7 5DQ
United Kingdom
First Edition 2014
Table of Contents
Why a little wood fired oven is a big idea!
The wood fired oven at The Artisan Bakery School is massive (see picture below). It has a door opening into the bakery and another one into the garden, with a 1.5 square meter baking area. It's big because we use it for baking bread and pizzas to sell to our village in Devon. But, because it's so big, it takes up to 6 hours of burning wood to reach the right temperature for baking bread, and about 3 hours for baking pizzas.
As we like to bake bread and eat pizza even when we're not feeding the village, we quickly realised we needed something smaller and simpler too. We wanted something that would bake breads and pizzas like a real wood fired oven, but would take much less time and effort and consume much less wood to get going. It has to be useable for teaching baking, and it also had to be cheap and easy to build.
The solution wasn't obvious at first. We tossed around dozens of ideas, and nothing seemed to fit. We didn't want another permanent structure in the garden, and we didn't want to buy something we'd have to store indoors in the winter. So off-the-shelf options weren't right for us. And the self-build plans we could find were all expensive and complicated, or labour-intensive and expertise-demanding, rather the like the big woodfired oven we had just built!
Then one day, Dragan remembered some baking he had done in the past in a type of an oven that his ancestors used for centuries. This oven answered all of our criteria. It took Dragan just one day to put this mini wood fired oven together, and it makes pizzas and breads taste even better than the ones we bake in our professional wood fired oven.
Passionate as we are about teaching and sharing the joys of authentic bread and pizza baking, we decided to share our mini wood fired oven story with you - that's all of you who have always fancied baking the old fashioned way, but could not build or afford to buy a wood fired oven. It currently costs under 100 for materials to build it, and it requires no special skills. You can make your own in just one day.
Happy building and happy baking!
Dragan and Penny

Dedication
This book is dedicated to all the lovers of old ways of baking great bread and pizzas.
Advantages of a Mini Wood Fired Oven
You can build one in even a small garden
It takes very little space
It takes only one hour to get hot enough for baking
It does not require much fuel
It is highly versatile. You can bake:
Pizzas
Breads
Potatoes
Casseroles
and you can use it as a barbecue base.
The Plan
The mini wood fired oven consists of two simple parts: the Hearth and the Peka (half-bell). That's all!
Hearth
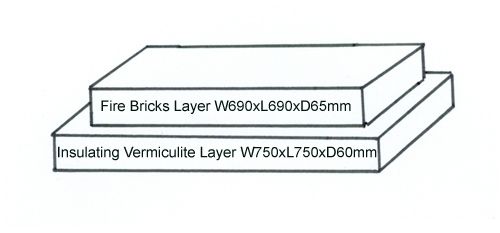
The hearth is made of two layers:
1. Insulating Vermiculite Foundation
2. Fire Bricks Layer
USA Measurements
Fire Bricks Layer W27" x L27" x D2"
Insulating Vermiculite Layer W29" x L29" x D2"
The two layers sit in a dug out hole 800x800mm (31"x31"). The fire brick layer is positioned centrally on the top of the insulating vermiculite concrete foundation. Additional vermiculite concrete insulation is poured around the sides of the fire bricks, thus insulating the hearth from underneath and on all four sides. The only surface of the hearth that is not insulated is the top baking surface. Insulation is essential to prevent heat leaking out of the fire bricks and back into the ground. A properly insulated hearth allows the heat to accumulate and reach ideal baking temperatures of up to 270C/518F.
Peka
The peka performs the function of the dome on brick or clay wood fired ovens. It should be made of steel (1-3mm thick - 1/16" to 1/8") and it can vary in size. A medium-sized one would be 300mm/12" in diameter and 250mm/10" high. Ordinary stainless steel bowls can be turned upside down and used providing they have flat bottoms for the hot ashes to sit on and create the necessary heat on top (winter 360C/680F - summer 300C/572F). Baking temperatures in wood fired ovens are always lower on the oven sole (floor) than above the loaf/pizza, as heat rises. You will need good fireproof gloves to handle the bowl or the bell.
Our peka, below, is made of 3mm/1/8" thick cast iron and has a handle and a removable cast iron ring that serves to keep the hot ashes on top so that they don't slide down.

Materials, Tools and Costs
Essentials for Building
Vermiculite (100 litre/26 gallon bag) 19
Bag of Cement (25kg/55lb) 15
Fire Bricks* x 18 36
Peka (Steel Bell) from around 10
2 lengths sawn timber (L2500mm/98" W60mm/2" D25mm/1") 8
Total 88
*Fire Brick size (230mm/9"x110mm/4"x65mm/2")
Alumina content 35% to 40%. You can use other sizes, but may need more or fewer bricks.
Tools for the Job
Shovel
Trowel
Spirit-level
Piece of straight wood 900mm/35" long
Useful Items for Baking
Infra red thermometer
Pizza Peel
Fire Gloves
Fire Handling Set*
*Fire Handling Set (Fire Tongs; Mini Fire Shovel; Wire Brush)
7 Steps to Building Your Own Mini Wood Fired Oven
Step 1
Find peka (stainless bowl or steel fire bowl)
Step 2
Choose the site and prepare the ground
Step 3
Dig a hole for the hearth
Step 4
Make a simple insulated foundation
Step 5
Lay the fire bricks
Step 6
Insulate the sides
Step 7
Fire up your mini wood fired oven!
Step 1: Find Peka
For the top of the oven you'll need a peka. When choosing your peka, keep in mind the ideal size of your pizzas and breads.
If you want to bake several pizzas at once, you will need to have two smaller bowls that will fit on your hearth at the same time.
Alternatively, steel fire bowls can be purchased online for around 30 and inverted on your hearth; these will bake several loaves or pizzas all at once. You can use the legs as handles if they're welded on.
Otherwise, large stainless steel kitchen bowls will do.
Make sure that the bowl has a flat base so that you can pile some hot embers on the top of it when baking. Ideally, you would want to weld a handle on yours so that it is easy to use. However, a knife and a pair of fire gloves will help you move it off or onto the hearth easily.

