KNITTING PATTERN
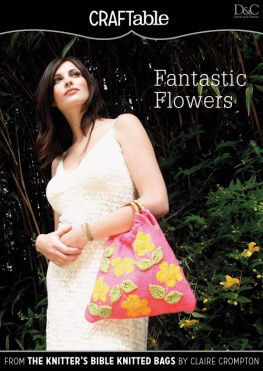
The orange flowers of this colourful bag are worked using intarsia (see ), while the leaves are knitted separately and sewn on. Simple backstitch is used for the stems and centres of the flowers. The sides are decreased to give a roomy flared shape.
Front
Using size 6 (4mm) needles and A, cast on 66 sts.
Work 2 rows in st st (1 row k, 1 row p) starting with a k row.
Commence chart
Refer to . Working RS rows (odd) from right to left and WS rows (even) from left to right, and dec 1 st at each end of 13th and every foll 8th row, work in st st from chart until the 64th row has been completed. 52 sts.
Using A, work 20 rows in st st.
Bind off.
Back
Using size 6 (4mm) needles and A, cast on 66 sts.
Work in st st, starting with a k row, dec 1 st at each end of 15th and every foll 8th row to 52 sts.
Work 23 rows in st st.
Bind off.
Leaves (make 10)
Using size 6 (4mm) needles and C, cast on 3 sts and p 1 row.
Row 1 RS K1, (yo, k1) twice. 5 sts.
Row 2 and every foll WS row P.
Row 3 K2, yo, k1, yo, k2. 7 sts.
Row 5 K3, yo, k1, yo, k3. 9 sts.
Row 7 Ssk, k5, k2tog. 7 sts.
Row 9 Ssk, k3, k2tog. 5 sts.
Row 11 Ssk, k1, k2tog. 3 sts.
Row 13 Sk2po.
Cut yarn, thread through rem st and pull up tightly.
To finish
Sew in all ends. Press according to instructions on ball bands. On front, sew a pair of leaves next to each flower (use the photograph of the finished bag for reference). Using C and backstitch (see ), work a stem between the leaves and flowers and a swirl in the centre of each flower.

Referring to , make up the bag. Join base seam. Join side seams up to penultimate decrease. Pull top edge through one of the handles from front to back and fold over to enclose the handle. Sew turnover neatly in place using a running stitch. Repeat for other handle.

TECHNIQUES
Intarsia

Intarsia is the technique of colour knitting suitable for large blocks of colour or single motifs. Intarsia uses a separate ball or bobbin of colour for each block. For the Fantastic Flowers bag, each flower has a separate bobbin and so does each area of background colour between them. When you change from one colour to another, you need to twist the yarns together to prevent a hole appearing.
Bobbins
You should never knit straight from the ball, unless the design is very simple with only two or three colour changes on each row. With each colour change, the yarns are twisted and they will become tangled and the knitting becomes a chore. If you use bobbins, you can leave them hanging at the back of the work out of the way of other yarns.
You can buy plastic bobbins for intarsia, but it is easy to make your own. Leaving a long end, wind the yarn in a figure of eight around your thumb and little finger. Wind on sufficient to complete the area to be knitted. Cut the yarn and use this cut end to tie a knot around the middle of the bobbin. Use the long end to pull the yarn from the centre of the bobbin.
Tidying up ends
There will be a lot of ends where colours have begun or ended. You should weave these in as you knit or sew them in every ten rows or so. This removes them from the back where they may become tangled with the working yarns. It also means that you wont have them to tidy up when youve finished knitting and want to get on with making up your bag.
Weaving in ends on a knit row
1. Insert the tip of the right-hand needle into the next stitch, bring the cut end over the needle, wrap the yarn around the needle as though to knit.

2. Pull the cut end off the needle and finish knitting the stitch. The cut end is caught into the knitted stitch.

Work the next stitch as normal, then catch the cut end in as before. If you work alternately like this the cut end will lie above and below the row of stitches.
Weaving in ends on a purl row
1. Insert the tip of the right-hand needle into the next stitch, bring the cut end over the needle, wrap the yarn around the needle as though to purl.

2. Pull the cut end off the needle and finish purling the stitch. The cut end is caught into the purled stitch.

Work the next stitch as normal, then catch the cut end in as before. If you work alternately like this the cut end will lie above and below the row of stitches.
Joining in new colours
Knit to where the new colour begins, drop the old colour and pick up a bobbin of new colour. Knit the first stitch with it, then take the cut end and twist it once around the old colour. Weave it in with the new yarn.


Twisting yarns together
Once youve joined in all the colours that you need across the row, on the return row the yarns must be twisted to join the blocks of colour together. When you change colour, always pick up the new colour from under the old colour.
Working from charts
Intarsia patterns are worked from charts. One square represents one stitch and a line of stitches represents one row. The rows are numbered: knit rows (RS rows) are odd numbers and are read from right to left; purl rows (WS rows) are even numbers and are read from left to right. Start knitting from the bottom right-hand corner of the chart at row 1.
Backstitch
Use a large-eyed blunt tapestry needle. Work the embroidery stitches loosely; dont pull too tightly or the knitted fabric will pucker. To begin the embroidery, weave the end of the thread through a few knitted stitches on the back of the fabric, working back through the thread to secure it; if you start with a knot, it may come undone during wear. To begin, bring the needle up at A. In one movement, take the needle down at B and up at C. Take it down at A and up at D, down at C and up at E, down at D and up at F.


