Editors of D - Reversible Bucket Bag
Here you can read online Editors of D - Reversible Bucket Bag full text of the book (entire story) in english for free. Download pdf and epub, get meaning, cover and reviews about this ebook. year: 2012, publisher: F+W Media, genre: Home and family. Description of the work, (preface) as well as reviews are available. Best literature library LitArk.com created for fans of good reading and offers a wide selection of genres:
Romance novel
Science fiction
Adventure
Detective
Science
History
Home and family
Prose
Art
Politics
Computer
Non-fiction
Religion
Business
Children
Humor
Choose a favorite category and find really read worthwhile books. Enjoy immersion in the world of imagination, feel the emotions of the characters or learn something new for yourself, make an fascinating discovery.

- Book:Reversible Bucket Bag
- Author:
- Publisher:F+W Media
- Genre:
- Year:2012
- Rating:5 / 5
- Favourites:Add to favourites
- Your mark:
Reversible Bucket Bag: summary, description and annotation
We offer to read an annotation, description, summary or preface (depends on what the author of the book "Reversible Bucket Bag" wrote himself). If you haven't found the necessary information about the book — write in the comments, we will try to find it.
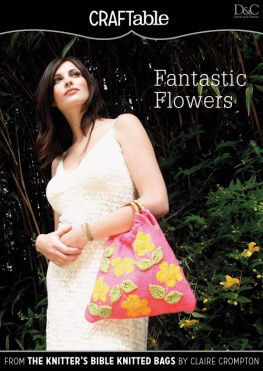
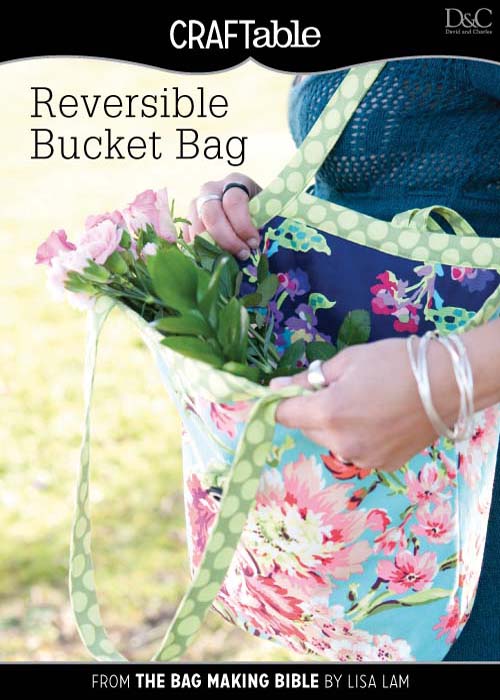
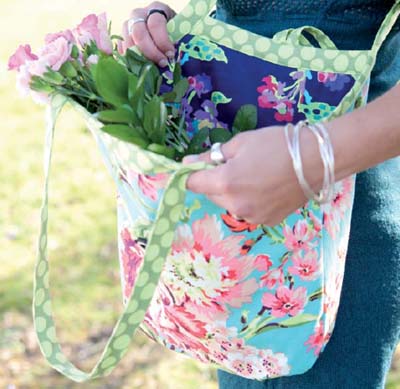
From The Bag Making Bible by Lisa Lam
Half the fun of making this cheerful bag is choosing three fabrics that all look fabulous together. Once you have chosen the fabrics youll find this bag just kind of makes itself! The more you piece it together (like a colorful jigsaw) the more youll want to see the yummy finished result. Pop a pretty fabric flower onto the button closure for an extra touch of cuteness.
Editors of D: author's other books
Who wrote Reversible Bucket Bag? Find out the surname, the name of the author of the book and a list of all author's works by series.


Reversible Bucket Bag — read online for free the complete book (whole text) full work
Below is the text of the book, divided by pages. System saving the place of the last page read, allows you to conveniently read the book "Reversible Bucket Bag" online for free, without having to search again every time where you left off. Put a bookmark, and you can go to the page where you finished reading at any time.
Font size:
Interval:
Bookmark:
by LISA LAM
taken from THE BAG MAKING BIBLE, D&C
Half the fun of making this cheerful bag is choosing three fabrics that all look fabulous together. Once you have chosen the fabrics youll find this bag just kind of makes itself! The more you piece it together (like a colourful jigsaw) the more youll want to see the yummy finished result. Pop a pretty fabric flower onto the button closure for an extra touch of cuteness.
You Will Need
1 piece of medium weight fabric for exterior, 50cm (yd) 112cm (44in) wide
1 piece of medium weight fabric for lining, 50cm (yd) 112cm (44in) wide
1 piece of medium weight fabric for contrast binding, base and button closure, 50cm (yd) 112cm (44in) wide
Fusible interfacing, 1m (1yd)
Fusible fleece, 50cm (yd)
1 self-cover button, 4cm (1in)
Sewing threads to match the fabrics
50mm bias tape maker
1 safety pin, 2cm (in)
Disappearing marker
Yo-yo maker (optional)
Heavier weight fabrics for the exterior are not recommended; medium weight fabric is best because there will be quite a few layers to work with at the top edge of the bag.
Choose three fabrics that are all the same weight.
As long as you are consistent, it doesnt matter which fabric is interfaced with fusible interfacing and which fabric is interfaced with fusible fleece.
All seam allowances are 1cm ( in) unless stated otherwise.
Pattern pieces include the 1cm (in) seam allowance.
Cut the fabric and interfacing pieces as follows:
From The Reversible Bucket Bag (main body) pattern piece
2 exterior fabric
2 lining fabric
2 fusible fleece
2 fusible interfacing
From The Reversible Bucket Bag (base) pattern piece
2 contrast fabric
1 fusible fleece
1 fusible interfacing
Transfer all pattern notches and markings to the fabric with a disappearing marker
Also cut:
2 bias-cut strips of contrast fabric,
86 10cm (34 4in), for the side top edge trim and bag handles
2 bias-cut strips of contrast fabric,
29 10cm (11 4in), for the centre top edge trim
1 strip of contrast fabric 30 6cm
(12in 2in), for the button loop
2 pieces of fusible interfacing, 5cm (2in) square, for the button reinforcement
1. Make the binding take the four bias-cut contrast fabric strips and follow the instructions in the Techniques section to make your own bias binding.
2. Make the button loop take the button loop contrast fabric and follow the instructions in the Techniques section to make one open-end strap. With the short raw edges pointing upwards fold the strap in half widthways. Flatten the tip at the bottom fold to form a neat triangle. Stitch the triangle tip in place (at the base of the triangle) onto the button loop. See .

3. Make the self-cover button take a scrap of contrast fabric and follow the instructions on the pack to make the self-cover button. Decorate the self-cover button with a pretty fabric yo-yo flower if desired. Create the yo-yo using a yo-yo maker, following the product manufacturers instructions. Insert a pretty button in the middle and glue it to the self-cover button. Insert the safety pin though the shank of the self-cover button at the back and set aside.
4. Interface the fabric pieces match the fusible interfacing pattern pieces to their partner exterior pattern pieces and iron them to the WS of the fabric pieces. Select a main body exterior piece to be the bag front and iron one of the button reinforcement squares to the WS centre, 4cm (1in) down from the top edge. Repeat with the lining fabric pattern pieces, fusible fleece pattern pieces and button reinforcement square.
5. Stitch the main body pieces together bring the exterior main body pieces RST. Match all the edges, pin and stitch together at both side edges.
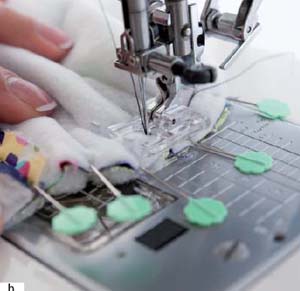
6. Stitch the base to the bag bring the exterior base to the exterior bag RST. Match all edges and match the base notches to the notches on the bottom edge of the bag. Pin and stitch all around. See . If there is excess fabric at the curved edges of the base make small pleats at the curves and stitch through them they will form attractive gathers at the sides. Clip the curved edges. Turn RSO.
7. Make up the lining bag make the lining bag in the same way as the exterior bag (steps 5 and 6).
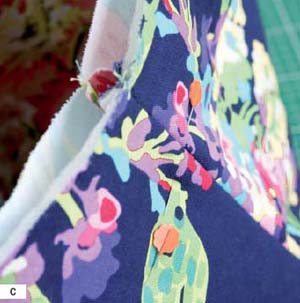
8. Bring the lining bag and the exterior bag together place the lining bag WSO into the exterior bag RSO. The wrong sides of the bags should now be touching each other. Neatly match the raw top edges of both bags and pin together all around, 4cm (1in) down from the top edge. See .
9. Stitch the button loop to the bag take the button loop RSU (with raw edges pointing upwards) and place it onto the centre top edge bag back (on the lining side). Match the top edges and stitch the loop to the bag (through all layers) with a 5mm (316in) seam allowance.
10. Stitch the centre top edge binding to the bag take one of the centre top edge trim bias binding strips and bind the centre top edge of the exterior bag front, following the instructions in the Techniques section (except that there are no overlapping edges to work with). Repeat with the other centre top edge binding piece and the back of the bag. On the back of the bag, lift up the button loop (so the triangle tip on the loop is pointing upwards) and stitch the loop in the up position to the top edge of the bag (through the binding) 3mm (in) down from the edge. See .
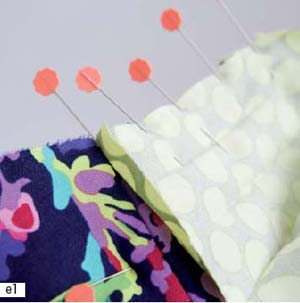
11. Bind the side top edges of the bag back take the side top edge bias-cut contrast fabric strip RSU and start binding the side top edges of the exterior bag back. See steps 12 of Bound Edges in the Techniques section (and the rest of this step). Working from left to right start pinning and stitching the binding to the bag 5mm (316in) to the left of the side seam. See . When your binding stitches reach the top edge of the curved centre top edge, stop stitching and secure with several backstitches. Take the other end of the binding and pin and stitch it to the other side of the bag (begin 5mm /316in to the right of the side seam and work right to left).
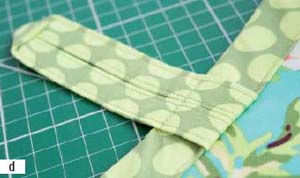
12. Complete the binding process see step 4 of Bound Edges in the Techniques section (and the rest of this step) to complete the binding as follows. Fold up the binding over the top edge of the bag and pin. From the points where the binding curves away from the top edge of the bag, fold the binding perfectly in half to form a bag handle. You may need to iron a new centre fold in the binding to do this. Pin the bag handle edges together. Topstitch the folded binding to the bag. Stitch over the curved top edge corners again to strengthen the base of the bag handles. See .
Font size:
Interval:
Bookmark:
Similar books «Reversible Bucket Bag»
Look at similar books to Reversible Bucket Bag. We have selected literature similar in name and meaning in the hope of providing readers with more options to find new, interesting, not yet read works.
Discussion, reviews of the book Reversible Bucket Bag and just readers' own opinions. Leave your comments, write what you think about the work, its meaning or the main characters. Specify what exactly you liked and what you didn't like, and why you think so.