Contents
Guide
TILDA'S
TOY BOX

Tone Finnanger


www.sewandso.co.uk
Contents
Foreword
Tildas Toy Box has been a wonderful book to create from beginning to end thanks to the excellent help from all the designers and photographers, but also because of the gorgeous projects and the opportunity to immerse myself in the world of children. It was lovely to have a good excuse to play!
This book is entirely devoted to projects that you can sew for children, and weve made sure that all the toys are functional; you can take the clothes on and off them and they will withstand a lot of wear and tear.
Im extremely grateful for the fabulous input from the clever ladies who took part in producing the book: Ingunn Ely, who sewed almost all the projects following my explanations and patterns; Ingrid Skansaar, who helped with the scenes and styled and organised the photoshoots; Slvi Dos Santos, who brought life to the photos; and Emma, our beautiful, charismatic model. The quilting projects were assembled and quilted with Crazy Pussle by Lappelises Quiltestue in Sandefjord.
Many thanks also go to the publisher, Cappelen Damm, who give me a lot of freedom and support in producing my books, and to David & Charles, who take the books out into the big, wide world with such enthusiasm.
And last, but not least, my family, who took it in their stride when the house was turned upside down during photoshoots and who were there for me when needed.
I really hope you find something you enjoy making!
Kindest regards,
Tone Finnanger
Safety
A manufactured toy is tested extensively before it can be put on sale but when you sew one yourself you must ensure it is safe. Please bear in mind the following when sewing for children.
SMALL PARTS
The toys in this book are not recommended for small children who put things in their mouths. Many of the toys have small parts that can become loose, and buttons that can look like sweets to young children.
ELASTICS AND HAIRBANDS
Pay special attention to any elastic and hairbands: these could be a choking hazard if a child puts these around their neck.
ALLERGIES
Children can be allergic to some materials, so choose with care. Always wash fabrics before sewing them for children, as some fabrics can contain allergenic chemicals.
HIDDEN PINS
When sewing for children, it is extremely important not to leave pins or needles in the toy. Always check thoroughly.
Wear and tear
A toy will be as resistant to wear and tear as you make it. To make a more hard-wearing toy, sew double seams and fasten arms and legs with embroidery thread. It is especially important to fasten loose parts securely, such as tufts of hair, buttons and bows on hairbands.
Materials
The toys in this book are all made from washed Tilda cotton fabrics. The range also contains plain cotton, suitable for dolls skin. We use synthetic filling, which is non-allergenic.
Hair and eyes for the dolls and animals are painted using Palett textile paint for light fabrics, obtainable from Panduro Hobby. This is a non-toxic textile paint that has been heat-tempered to withstand washing.
Rouge is applied with the stamp pad included in the Tilda Face Painting Kit, part 71340. It is child-friendly, non-toxic and water-soluble.
Instructions for making the hair and eyes can be found in .
Washing
Stuffed toys, such as dolls and monkeys, are not suitable for washing as the filling can move about or become uneven. If you have to wash a toy, we recommend wiping it with a cloth. Try not to allow the toy to become soaked through.
Tilda rouge is water-soluble and can easily be re-applied. Dolls clothes can be washed carefully on a hand wash at 40 degrees. Machine-sewn patchwork quilts and cushions can be washed in a washing machine on a 40-degree programme.

Faces and hair
The positioning of the hair and eyes makes a big difference to the toys appearance. It is a good idea to use a pen with vanishing ink or an air-erasable pen when outlining the hair. If you cant get hold of one, you could carefully use a pencil or faint pen.
LARGE DOLL
Measure 6cm (214in) down from the seam at the top of the head and insert a pin as the starting point for where the curve of the fringe meets the seam in the face. Outline the hair as shown in and the photos of the dolls.
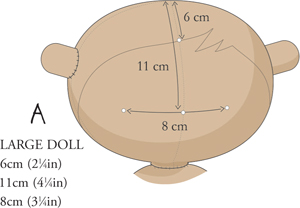
To position the eyes, measure 11cm (414in) down from the seam at the top of the head following the seam in the middle of the face. Insert a pin. Next measure 4cm (112in) either side and insert pins to mark the position of the eyes, so there is 8cm (314in) between them, see . Use your judgement a little, as there will always be some movement and variation when you sew, however, we found that this formula worked on all the dolls we tested.
The simplest way to apply eyes is to use a pin with a large rounded head, such as the largest headed pin in Tilda pins, part 480933. Twist the pin backwards and forwards to make a visible hole to mark where the eye is to be positioned. Dip the pinhead in the Palett textile paint and use it to stamp eyes onto the figure.
If you dont have a pin of this type, you can either find something else to stamp with, or draw an even circle with a diameter of approximately 7mm (14in) around the hole and paint the eyes with a thin paintbrush. Dry the eyes with a hairdryer.
SMALL DOLL
First measure 3.4cm (138in) down to the hairline, then measure a further 6cm (214in) down to determine where the eyes are to be placed, see . There should be 4.2cm (112in) space between the eyes.
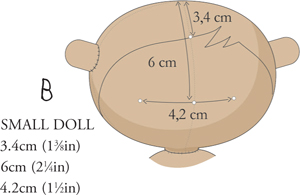
Make the eyes in the same way as for the Large Doll, using a normal large-headed pin, so you have a diameter of 34mm (18316in).
DOLL'S HAIR
Paint an edge that follows the outline of the hair, making sure your lines are sharp and even. On the back of the head, the hair can be outlined in a gentle curve from side to side.
Paint the area inside the edge, including the tufts of hair, see . Dry the paint with a hairdryer. The heat hardens the textile paint.

