Contents
Guide
Tilda
Sunshine
Sewing
Tone Finnanger
Contents
Introduction
As the days grow longer and spring flowers burst through the ground, no one is as excited as we Norwegians. Hope is light green, as the Norwegian author Alexander Kjelland wrote: we survived another long, dark winter. A Norwegian will rest in winter and live through summer, and the level of energy changes drastically as the spring bursts, painting the beautiful nature a glorious light green. The Norwegian spring is generous when it finally comes. As a designer, I get to visit spring and summer on the screen in front of me through the dark winter months, while working with new fabric collections and books. The work is done with a feeling of longing that might just shine through.
In this book we have used the spring and summer collections Lemontree and Sunkiss. When designing these fabrics, my mind wandered to warmer climates and recalled childhood memories spending time at my grandparents place in southern Europe, where the lemon trees thrived, the water was turquoise and the flowers were colourful. My grandparents are gone, but there is still a date palm left in their old garden named after me and planted the day I was born.
We hope you will find something to inspire you in this book, to get your house into a happy, colourful spring and summer mode. Many of the projects are suitable for children or grandchildren.
As always, I work with a team of wonderful people and I am so grateful for their talents. Seamstress Ingun Eldy sews all the models and Linda Clements writes the explanations. Line Dammen works with styling and planning and Inger Marie Grini takes the wonderful pictures. I would also like to thank my publisher F&W Media for their fantastic cooperation.
Have a creative spring and summer!
Best regards

Lemonade Quilt
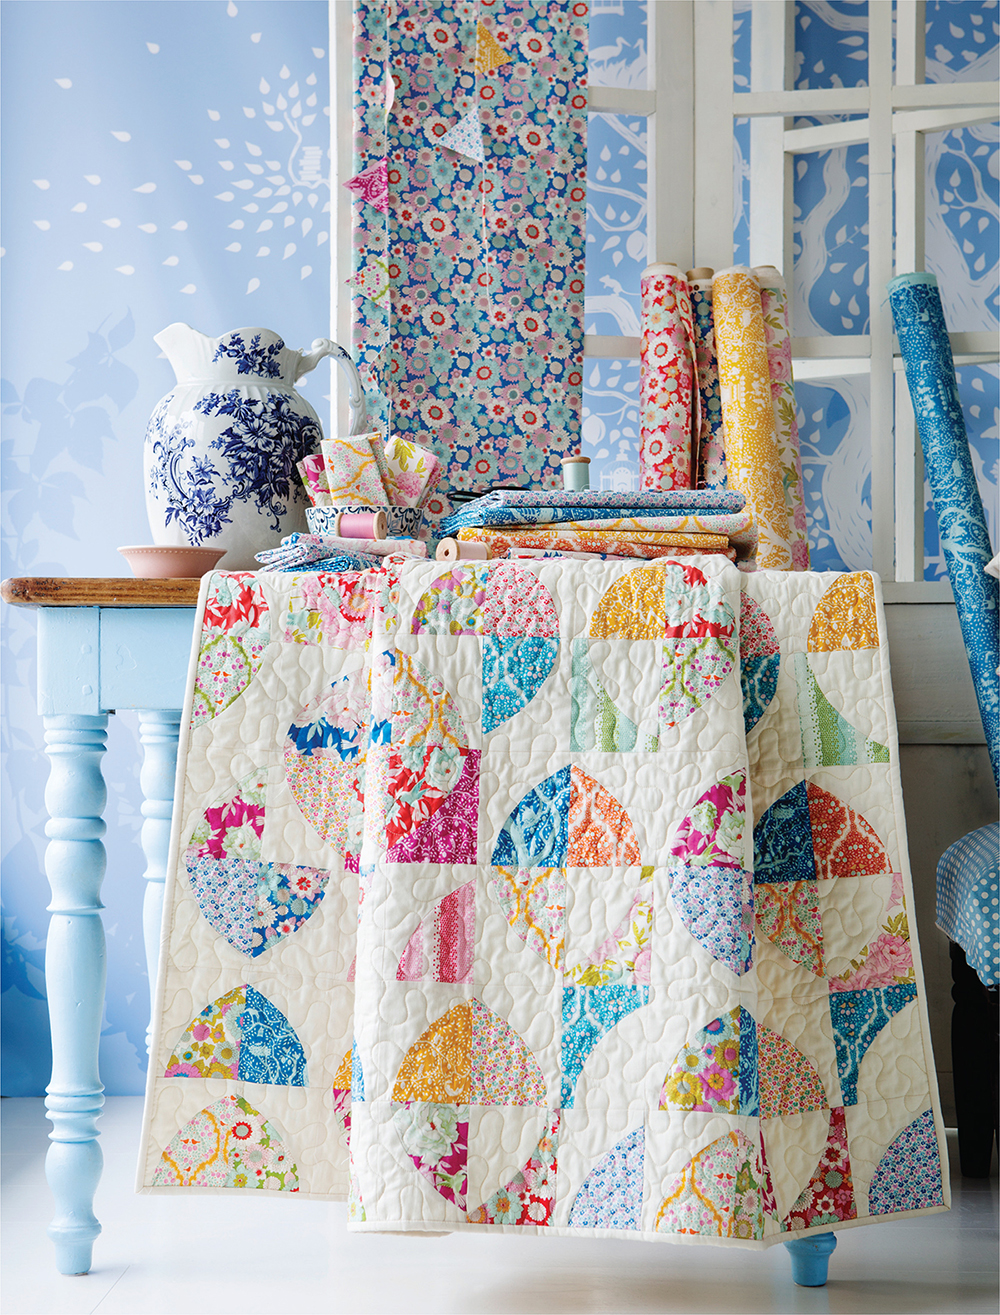
We are cutting lemons to make Lemonade with this fun, modern quilt in bright Lemontree fabrics. The quilt uses all the fabrics from the collection, plus solid dove white for contrast.
MATERIALS
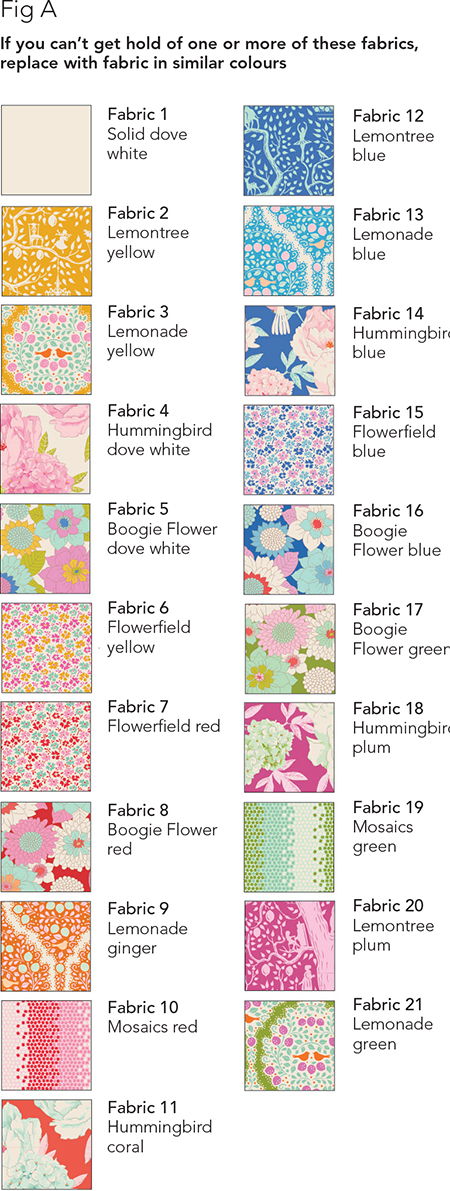
- Fabric 1: 212yd (2.3m) Solid dove white
- Fabric 2: 38yd (40cm) Lemontree yellow
- Fabric 3: 38yd (40cm) Lemonade yellow
- Fabric 4: 14yd (25cm) Hummingbird dove white
- Fabric 5: 38yd (40cm) Boogie Flower dove white
- Fabric 6: 38yd (40cm) Flowerfield yellow
- Fabric 7: 14yd (25cm) Flowerfield red
- Fabric 8: 38yd (40cm) Boogie Flower red
- Fabric 9: 14yd (25cm) Lemonade ginger
- Fabric 10: 14yd (25cm) Mosaics red
- Fabric 11: 38yd (40cm) Hummingbird coral
- Fabric 12: 38yd (40cm) Lemontree blue
- Fabric 13: 38yd (40cm) Lemonade blue
- Fabric 14: 14yd (25cm) Hummingbird blue
- Fabric 15: 38yd (40cm) Flowerfield blue
- Fabric 16: 14yd (25cm) Boogie Flower blue
- Fabric 17: 14yd (25cm) Boogie Flower green
- Fabric 18: 38yd (40cm) Hummingbird plum
- Fabric 19: 14yd (25cm) Mosaics green
- Fabric 20: 14yd (25cm) Lemontree plum
- Fabric 21: 14yd (25cm) Lemonade green
- Backing fabric 312yd (3.25m)
- Wadding (batting) 61in x 80in (155cm x 203cm)
- Binding fabric 12yd (50cm) Solid dove white
- Template plastic or thin card to make templates
FINISHED SIZE
5212in x 72in (133.3cm x 183cm)
PREPARATION AND CUTTING OUT
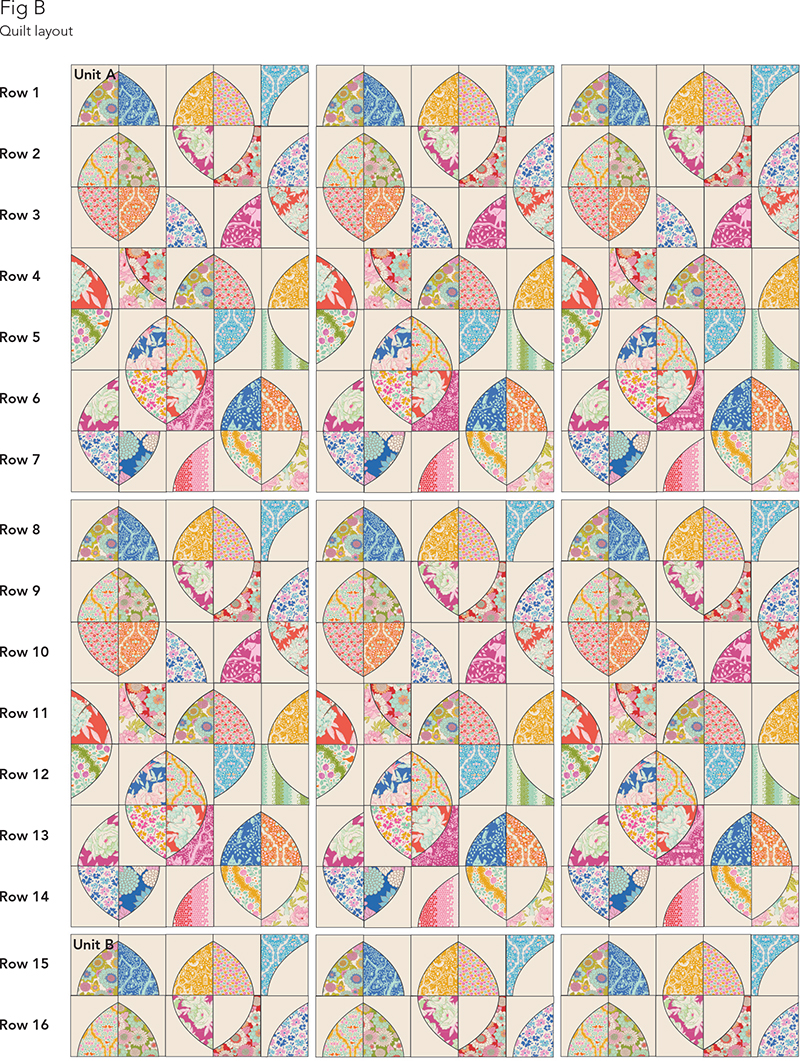
Before you start, refer to General Techniques: . There are 240 blocks in the quilt, all made the same way. These blocks are assembled into two different units Unit A and Unit B. Unit A is five blocks wide x seven blocks high, and this unit is repeated six times in the quilt. Unit B is five blocks wide x two blocks high, and is repeated three times at the bottom of the quilt. The fabrics used for the quilt are shown in Fig A and the quilt layout in Fig B.
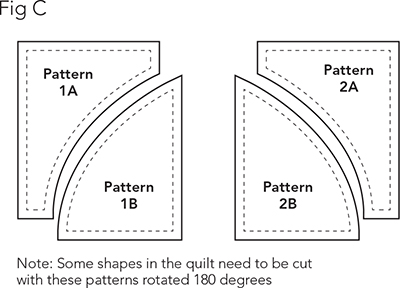
Each block is made up of two curved pieces, created from a pair of patterns. Two pairs of patterns are supplied (with seam allowances) Patterns 1A and 1B face one way and Patterns 2A and 2B face the opposite way (see Fig C). Copy the patterns onto card or template plastic. Note: Some shapes in the quilt need to be cut with these patterns rotated 180 degrees.
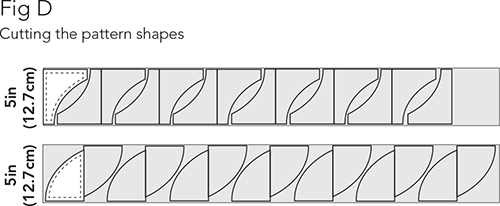
3 Fig D shows how to cut the shapes. When cutting the shapes from the solid Fabric 1, the fabric is reversible, so cut the numbers of shapes stated and then rotate and/or reverse (flip) the shapes as necessary before use. Some of the print fabrics will need to be cut with all four patterns, to ensure that the shapes appear the correct way round.
For the concave shapes (Patterns 1A and 2A), cut the shapes from strips of fabric 5in (12.7cm) x width of fabric.
For the convex shapes (Patterns 1B and 2B), cut the shapes from strips of fabric 5in (12.7cm) x width of fabric. (The Pattern 1B and 2B heights are actually 458in (11.8cm) but it will be easier to cut all fabric strips the same 5in (12.7cm) depth.)
You could cut the shapes as you go along, or cut the total numbers of 5in (12.7cm) x width of fabric strips needed. To cut all the strips needed, cut the following numbers of strips.
- From Fabric 1 cut seventeen 5in (12.7cm) x width of fabric strips.
- From Fabrics 4, 7, 9, 10, 14, 16, 17, 19, 20 and 21 cut one 5in (12.7cm) x width of fabric strip.
- From Fabrics 2, 3, 5, 6, 8, 11, 12, 13, 15, 18 cut two 5in (12.7cm) x width of fabric strips.
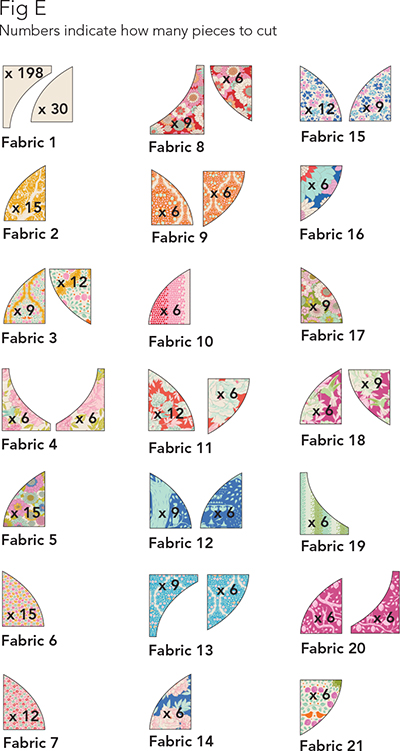
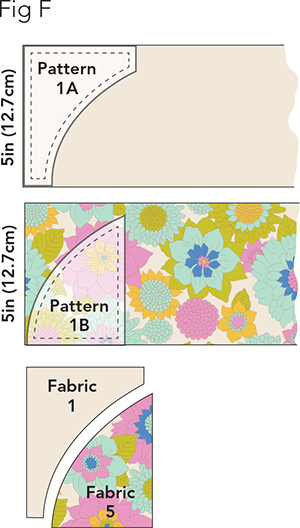
Beginning with Fabric 1, and referring carefully to Fig E, cut the shapes from the various fabrics in the numbers of pieces stated. Pay close attention to the way the shape is facing and use the patterns to cut the shapes. (Some of these shapes will be rotated later when you begin to piece the quilt.) Fig F shows the example of the pieces cut for the first block in the quilt (top left of quilt).
Cut the backing fabric in half across the width. Sew together along the long side and trim to a piece about 61in x 80in (155cm x 203cm).
From the binding fabric cut seven strips 212in (6.4cm) x width of fabric. Sew together end to end and press seams open. Press in half along the length, wrong sides together.
SEWING THE BLOCKS INTO UNIT A
When all the block shapes are cut, begin to sew them together in blocks, as follows. Take the first two curved pieces (Fabric 1 and Fabric 5) and mark the halfway points along the curves by folding each piece in half and creasing or marking with a pencil (

