Carolyn S Vagts - Year of Pot Holders 2
Here you can read online Carolyn S Vagts - Year of Pot Holders 2 full text of the book (entire story) in english for free. Download pdf and epub, get meaning, cover and reviews about this ebook. year: 2019, publisher: Annies Wholesale, genre: Home and family. Description of the work, (preface) as well as reviews are available. Best literature library LitArk.com created for fans of good reading and offers a wide selection of genres:
Romance novel
Science fiction
Adventure
Detective
Science
History
Home and family
Prose
Art
Politics
Computer
Non-fiction
Religion
Business
Children
Humor
Choose a favorite category and find really read worthwhile books. Enjoy immersion in the world of imagination, feel the emotions of the characters or learn something new for yourself, make an fascinating discovery.

- Book:Year of Pot Holders 2
- Author:
- Publisher:Annies Wholesale
- Genre:
- Year:2019
- Rating:5 / 5
- Favourites:Add to favourites
- Your mark:
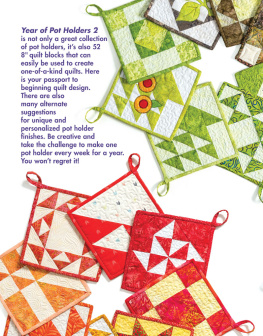
Year of Pot Holders 2: summary, description and annotation
We offer to read an annotation, description, summary or preface (depends on what the author of the book "Year of Pot Holders 2" wrote himself). If you haven't found the necessary information about the book — write in the comments, we will try to find it.
Carolyn S Vagts: author's other books
Who wrote Year of Pot Holders 2? Find out the surname, the name of the author of the book and a list of all author's works by series.


Year of Pot Holders 2 — read online for free the complete book (whole text) full work
Below is the text of the book, divided by pages. System saving the place of the last page read, allows you to conveniently read the book "Year of Pot Holders 2" online for free, without having to search again every time where you left off. Put a bookmark, and you can go to the page where you finished reading at any time.
Font size:
Interval:
Bookmark:

You can purchase prepackaged sizes or battings by the yard and trim to size. Quilting Press quilt top on both sides and trim all loose threads. Make a quilt sandwich by layering the backing right side down, batting and quilt top centered right side up on flat surface and smooth out. Pin or baste layers together to hold. Mark quilting design on quilt top and quilt as desired by hand or machine. Note: If you are sending your quilt to a professional quilter, contact them for specifics about preparing your quilt for quilting. When quilting is complete, remove pins or basting.
Trim batting and backing edges even with raw edges of quilt top. Binding the Quilt Join binding strips on short ends with diagonal seams to make one long strip; trim seams to " and press seams open (Figure A). 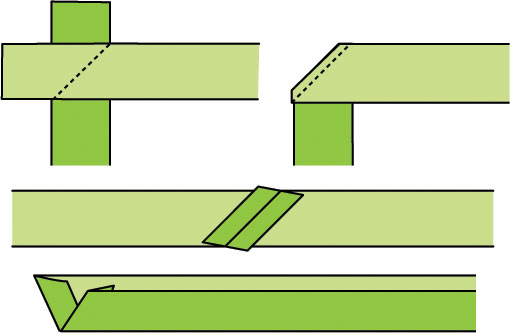 Figure A Fold 1" of one short end to wrong side and press. Fold the binding strip in half with wrong sides together along length, again referring to Figure A; press. Starting about 3" from the folded short end, sew binding to quilt top edges, matching raw edges and using a " seam.
 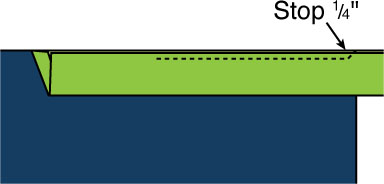 Figure B Fold binding up at a 45-degree angle to seam and then down even with quilt edges, forming a pleat at corner, referring to Figure C.
 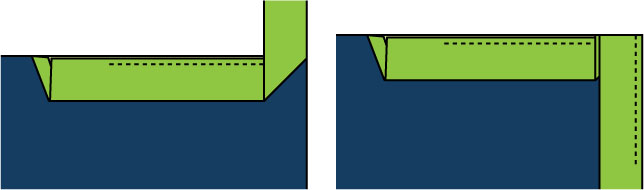 Figure C Resume stitching from corner edge as shown in Figure C, down quilt side, backstitching " from next corner. Figure C Resume stitching from corner edge as shown in Figure C, down quilt side, backstitching " from next corner.
Repeat, mitering all corners, stitching to within 3" of starting point. Trim binding end long enough to tuck inside starting end and complete stitching (Figure D). 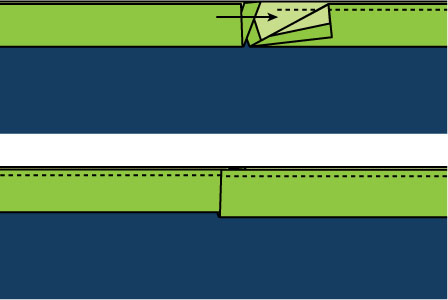 Figure D Fold binding to quilt back and stitch in place by hand or machine to complete your quilt. To download templates for easy printing, go to: AnniesCatalog.com/customers/check_code.html and enter 141446D71
 We would like to thank the following manufacturers who provided materials to our designer to make sample projects for this book. Fabrics for this book were generously donated by the following textile companies:Hoffman California-International FabricsModa FabricsNorthcott FabricsAll battings, fusible webs and stabilizers were generously donated by Bosal:Katahdin Premium 100 percent cotton battingPoly-Therm #364B heat-reflective fleeceFashion-Fuse #300 woven fusible stabilizerSplendid Web #345 fusible web with paper release
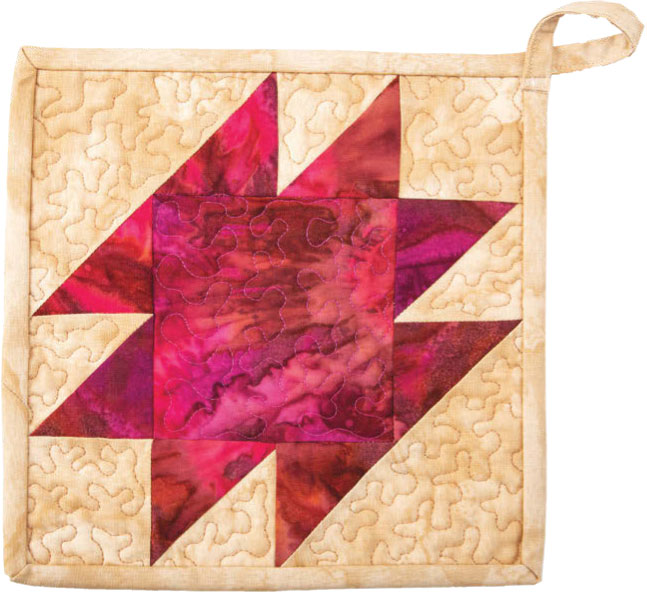 Finished Size Pot Holder Size: 8" 8"
Materials and cutting lists assume 40" of usable fabric width for yardage. WOF width of fabric HST half square triangle  QST quarter square triangle
  CuttingFrom light fabric cut: 1 (4") A square then cut once diagonally 2 (2") B squares then cut once diagonally 2 (2") C squares From dark fabric cut: 1 (4") D square 4 (2") E squares then cut once diagonally Completing the Block Stitch one B HST and one E HST together as shown in Figure 1. Press open. Make 4.
  Figure 1 Stitch one unit from step 1 and one E HST as shown in Figure 2. Make 2.
 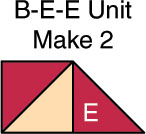 Figure 2 Stitch one C square and one E HST to each side of a unit from step 1 as shown in Figure 3. Press. Make 2.
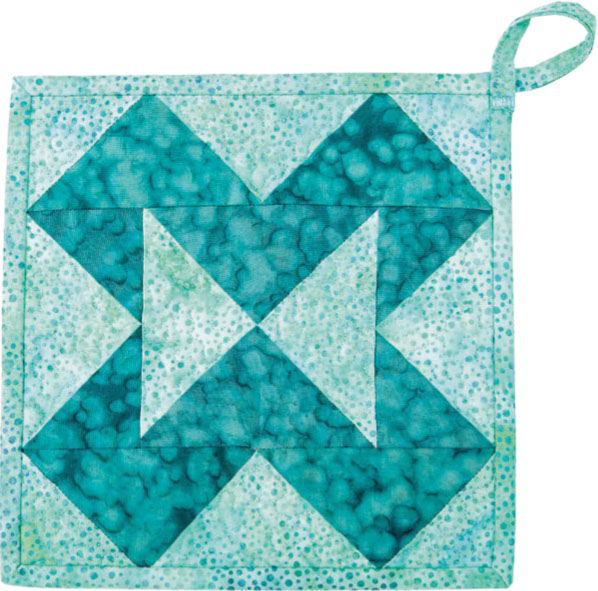
 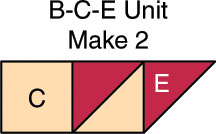 Figure 3 Referring to the Assembly Diagram and photo, lay out all pieces and units as shown and stitch together to complete one block. Press.
 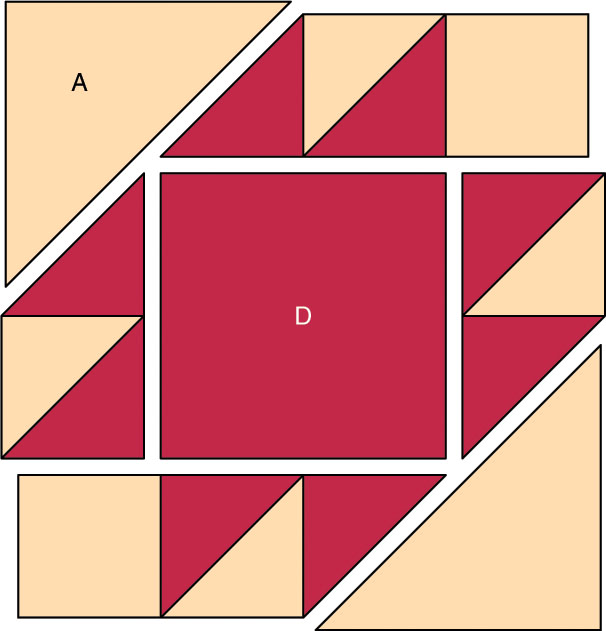 Week No. 1: Anvil Assembly Diagram 8" 8" Layer backing right side down, battings and pot holder block right side up. 1: Anvil Assembly Diagram 8" 8" Layer backing right side down, battings and pot holder block right side up.
Quilt as desired. Bind pot holder and make hanging loop referring to General Instructions. 
 Finished Size Pot Holder Size: 8" 8"
Font size:
Interval:
Bookmark:
Similar books «Year of Pot Holders 2»
Look at similar books to Year of Pot Holders 2. We have selected literature similar in name and meaning in the hope of providing readers with more options to find new, interesting, not yet read works.
Discussion, reviews of the book Year of Pot Holders 2 and just readers' own opinions. Leave your comments, write what you think about the work, its meaning or the main characters. Specify what exactly you liked and what you didn't like, and why you think so.