Table of Contents
Guide
Pages
If you are an Annies customer and have a question about the instructions on a pattern you have purchased, please visit: AnniesCatalog.com/pages/customer_care/pattern_services.html Templates To download templates for easy printing, view the download instructions at the end of this book or click the Templates chapter in the Table of Contents. Introduction As colder weather sets in and the garden is harvested, countless quilters are inspired to create. Images of fresh pumpkins and falling leaves beg to be turned into warm and cozy quilts for every room of the home. Beautiful runners adorn the tables at our family gatherings as we give thanks for what we have. This is an ideal time to decorate with rich colors and plan projects for our loved ones. In
Quilts for Autumn you will find 11 creative projects that embody this special season.
Whether you are a new or experienced quilter, you will be sure to love stitching the traditional and contemporary designs within these pages. For a stunning table runner to show off at Thanksgiving, check out Come Little Leaves. Dig out your favorite fall palette scraps to make a lap or throw quilt, or even a welcoming wall hanging. If modern is more your style, Farmhouse Comfort is a stylish yet whimsical quilt that would make a great addition to almost any decor. From kitchen projects to wall hangings to full-size quilts, this collection will spark your creativity for many seasons to come. Enjoy! Table of Contents General InformationDESIGNED & QUILTED BY CHRIS MALONE You can hang this quilt in the foyer to welcome your guests during the colorful autumn months.
The dimensional leaves add a touch of fun to the appliqu and simple patchwork. 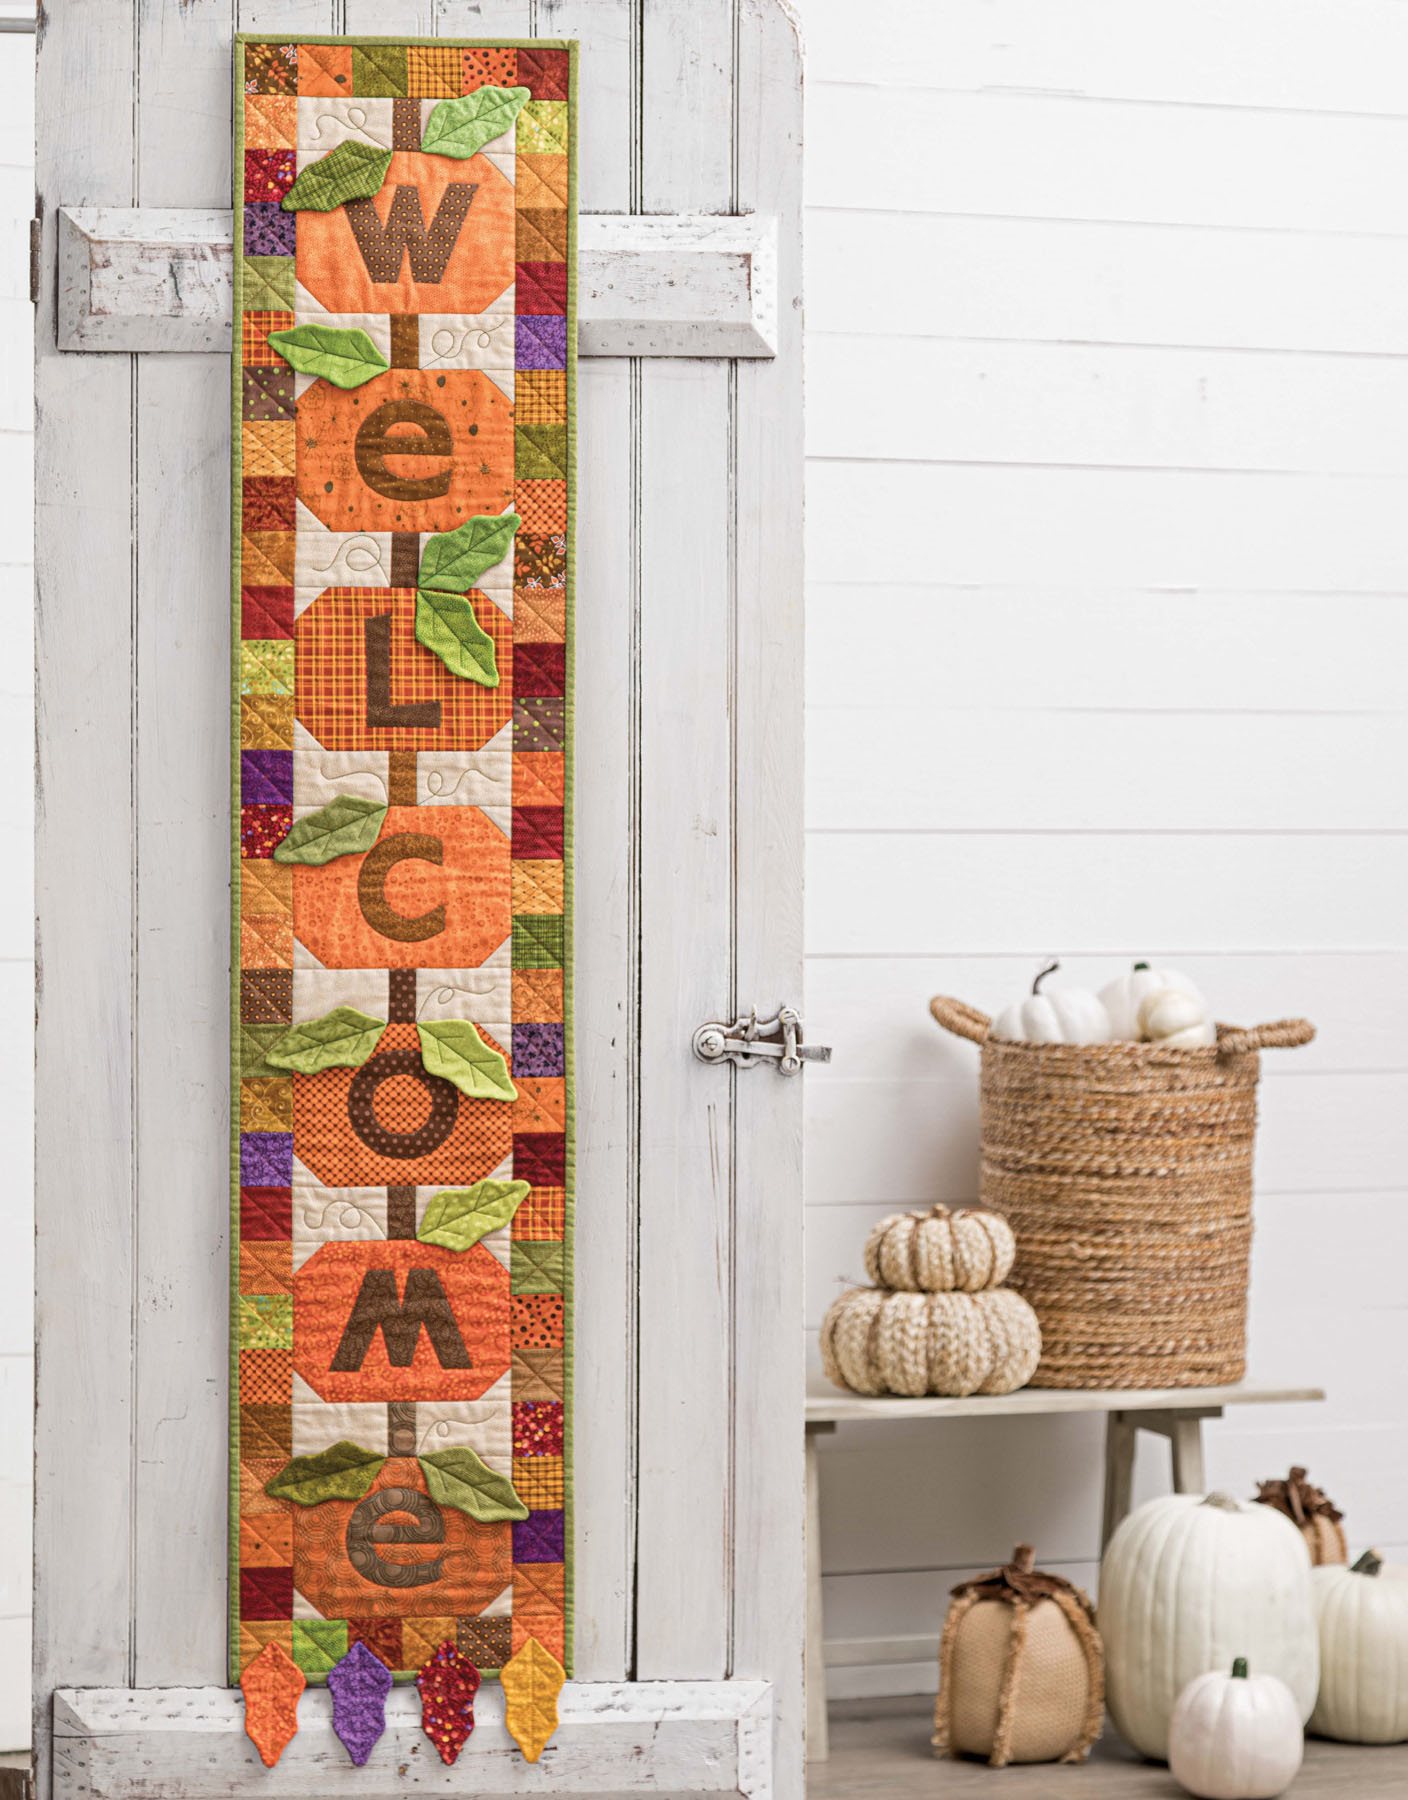 SKILL LEVEL Confident Beginner FINISHED SIZES Wall Hanging Size: 12" 60" Block Size: 8" 8" Number of Blocks: 7 MATERIALS yard light tan tonal 10" square each of 7 assorted orange tonals/prints 10" square each of 7 assorted brown tonals/prints 4 (10") squares of assorted fall-colored prints (gold, red, orange and purple) yard green tonal 11 (5" 7") F rectangles of assorted green tonals/prints 15 (4" 5") G low-loft batting scraps Backing to size Batting to size Fusible web with paper release Template material Pinking shears (optional) Seam sealant (optional) Thread Basic sewing tools and supplies
 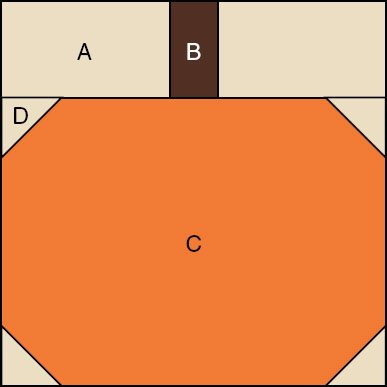 Pumpkin 8" 8" Finished Block Make 7 PROJECT NOTES Read all instructions before beginning this project. Refer to photos for placement of appliqus and embellishments. Stitch right sides together using a " seam allowance unless otherwise specified. Materials and cutting lists assume 40" of usable fabric width for yardage. WOF width of fabric HST half-square triangle
  QST quarter-square triangle
  CUTTING From light tan tonal cut: 1 (4" WOF) strip, then subcut into: 14 (2" 4") A rectangles 2 (1" WOF) strips, then subcut into: 28 (1") D squares From each of 7 assorted orange tonals/prints cut: 1 (6" 8") C rectangle 4 (2") E squares From each of 7 assorted brown tonals/prints cut: 1 (1" 2") B rectangle 2 (2") E squares From each assorted fall-colored print cut: 1 (5" 7") F rectangle 5 (2") E squares From green tonal cut: 6 (2") E squares 4 (2" WOF) binding strips COMPLETING THE PUMPKIN BLOCKS Sew a B rectangle between two A rectangles as shown in .
Repeat to make a total of seven stem units. 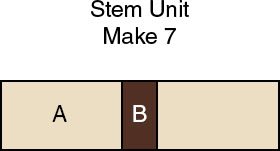 Figure 1 Draw a diagonal line from corner to corner on the wrong side of the D squares. Place a D square on each corner of a C rectangle as shown in . Sew on the drawn line. Trim the seam to "; flip open and press.
 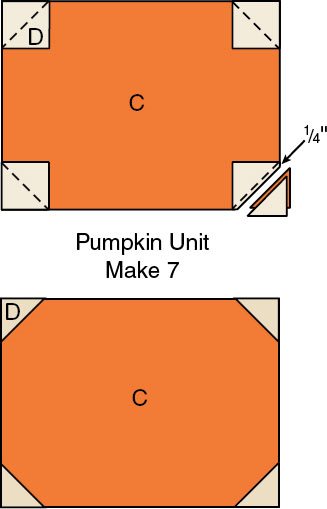 Figure 2 Sew a stem unit to the top of each pumpkin unit to make seven Pumpkin blocks as shown in the block diagram.
  Figure 2 Sew a stem unit to the top of each pumpkin unit to make seven Pumpkin blocks as shown in the block diagram.
Prepare templates for each of the letters using patterns provided, referring to Raw-Edge Fusible Appliqu on . Trace each letter template onto the paper side of the fusible web to make one each of the O, L and C and two each of the W/M and E letters. Cut the shapes apart. Fuse each letter to a different brown. Cut out letters on pattern lines and remove paper backing. Center a letter on each pumpkin, matching the brown letter fabric to the B stem piece.
Fuse in place and machine blanket-stitch around the appliqu using matching thread. COMPLETING THE PADDED APPLIQU LEAVES Prepare a leaf template using the pattern provided and referring to Padded Appliqu. Fold an F rectangle, right sides together, as shown in . Trace around the template on the wrong side of F and pin to a G rectangle as shown. Stitch all around the leaf on the pattern lines, trim batting close to seam and clip the curved areas. Cut a slash where indicated on pattern, cutting through one layer of fabric only, and turn the leaf right side out through the opening.
Press edges flat and hand whipstitch the cut edges together on the back. 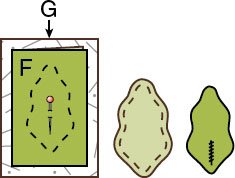 Figure 3
 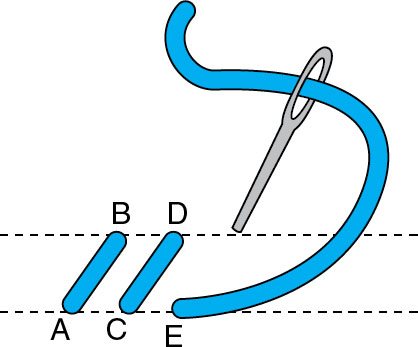 Whipstitch Here a Tip Trim around leaves using pinking shearsthe pinked edges will control fraying and clip the curves all in one step!After slashing the stitched leaves, treat the edges with seam sealant and allow to dry before turning right side out. Repeat step 2 to make a total of 11 green leaves and one each red, gold, purple and orange. Transfer the vein lines from the pattern to each leaf and stitch on the lines two times using a matching color of thread. COMPLETING THE WALL HANGING Sew the pumpkin blocks together in a vertical row, spelling out the word Welcome. Arrange the E squares into two long border rows of 28 squares each and two short border rows of six squares each as shown in .
  Figure 4 Sew a long border row to each side of the block row.
  Figure 4 Sew a long border row to each side of the block row.
Sew a short border row to the top and bottom to complete the wall hanging top. Layer, quilt as desired (including curly tendrils at pumpkin tops if desired) and bind the edges, referring to Quilting Basics. Referring to photo, place one or two green leaves at the top of each pumpkin. Attach by stitching directly on the quilted center vein line using the same green thread. Again referring to photo, arrange the red, gold, purple and orange leaves at the bottom edge of the wall hanging and stitch through the upper section of the center vein line to attach. 



 SKILL LEVEL Confident Beginner FINISHED SIZES Wall Hanging Size: 12" 60" Block Size: 8" 8" Number of Blocks: 7 MATERIALS yard light tan tonal 10" square each of 7 assorted orange tonals/prints 10" square each of 7 assorted brown tonals/prints 4 (10") squares of assorted fall-colored prints (gold, red, orange and purple) yard green tonal 11 (5" 7") F rectangles of assorted green tonals/prints 15 (4" 5") G low-loft batting scraps Backing to size Batting to size Fusible web with paper release Template material Pinking shears (optional) Seam sealant (optional) Thread Basic sewing tools and supplies
  Pumpkin 8" 8" Finished Block Make 7 PROJECT NOTES Read all instructions before beginning this project. Refer to photos for placement of appliqus and embellishments. Stitch right sides together using a " seam allowance unless otherwise specified. Materials and cutting lists assume 40" of usable fabric width for yardage. WOF width of fabric HST half-square triangle
  QST quarter-square triangle
  CUTTING From light tan tonal cut: 1 (4" WOF) strip, then subcut into: 14 (2" 4") A rectangles 2 (1" WOF) strips, then subcut into: 28 (1") D squares From each of 7 assorted orange tonals/prints cut: 1 (6" 8") C rectangle 4 (2") E squares From each of 7 assorted brown tonals/prints cut: 1 (1" 2") B rectangle 2 (2") E squares From each assorted fall-colored print cut: 1 (5" 7") F rectangle 5 (2") E squares From green tonal cut: 6 (2") E squares 4 (2" WOF) binding strips COMPLETING THE PUMPKIN BLOCKS Sew a B rectangle between two A rectangles as shown in .
 Figure 1 Draw a diagonal line from corner to corner on the wrong side of the D squares. Place a D square on each corner of a C rectangle as shown in . Sew on the drawn line. Trim the seam to "; flip open and press.
  Figure 2 Sew a stem unit to the top of each pumpkin unit to make seven Pumpkin blocks as shown in the block diagram.
  Figure 3
  Whipstitch Here a Tip Trim around leaves using pinking shearsthe pinked edges will control fraying and clip the curves all in one step!After slashing the stitched leaves, treat the edges with seam sealant and allow to dry before turning right side out. Repeat step 2 to make a total of 11 green leaves and one each red, gold, purple and orange. Transfer the vein lines from the pattern to each leaf and stitch on the lines two times using a matching color of thread. COMPLETING THE WALL HANGING Sew the pumpkin blocks together in a vertical row, spelling out the word Welcome. Arrange the E squares into two long border rows of 28 squares each and two short border rows of six squares each as shown in .
  Figure 4 Sew a long border row to each side of the block row.