Contents
Guide

2022 by Libby Ashcraft and Fox Chapel Publishing Company, Inc., 903 Square Street, Mount Joy, PA 17552.
Crafting with Digital Cutting Machines is an original work, first published in 2022 by Fox Chapel Publishing Company, Inc. The patterns contained herein are copyrighted by the author. Readers may make copies of these patterns for personal use. The patterns themselves, however, are not to be duplicated for resale or distribution under any circumstances. Any such copying is a violation of copyright law.
All rights reserved. No part of this publication may be reproduced, stored in a retrieval system or transmitted, in any form or by any means, electronic, mechanical, photocopying, recording or otherwise, without the prior written permission of the copyright holders.
Design/project contributors: Tabitha Carty and Amelia Johanson
Print ISBN 9781497101548
eISBN: 9781607658634
Library of Congress Control Number: 2021944627
To learn more about the other great books from Fox Chapel Publishing, or to find a retailer near you, call toll-free 800-457-9112 or visit us at www.FoxChapelPublishing.com.
We are always looking for talented authors. To submit an idea, please send a brief inquiry to acquisitions@foxchapelpublishing.com.
For a printable PDF of the patterns used in this book, please contact Fox Chapel Publishing at , with 9781497101548 Crafting with Digital Cutting Machines in the subject line.
Contents

Introduction
Welcome to the world of digital cutting machines. You are going to have so much fun learning about digital cutting machines and crafting that a digital cutter is sure to become an essential part of your sewing and crafting roomif it isnt already! Whether you know exactly what you want to make or are looking for ideas and inspiration to get the most out of your digital cutting machine, immersed in the pages of this book is exactly where you want to be.
With a few exceptions, all the projects that follow can be created using any digital cutter, and learning how to use your machine and what it can do is just as important as what you can make with it. There is a myriad of information available on paper crafting with digital cutters, but Im always surprised by how little you can find on cutting fabrics and other materials. Few digital-cutting crafters know and use their machines full capacity. In this book, I will introduce you to three popular machine models. Along with descriptions of the machines components and features, Ive included a synopsis of the blades, tools, mats, and other accessories used with each one.
Ive found that, once you know the basics, the best way to broaden your knowledge is to be a hands-on learner and just create. It is my hope that, in doing so, you expand your personal library of techniques and skills to get the most from your digital cutting machine.
All the designs in this book are available as scalable vector graphic (SVG) files for you to download and use however you choose. If you love a particular project but envision it with a different design, there are endless designs online that you can purchase and download. Likewise, if a particular material (often referred to as a medium) isnt to your liking, give it a try anywayyou may be surprised to find something you really love! Youll see that digital cutting machines truly do offer endless creative possibilities.
Lets get started!
Pay attention to my tips and tricks throughout the book. Trust meI learned the hard way!

Digital Cutting Inspiration
You can download the SVG design files for the projects shown on .

Felt-Lettered Pillows: Lend a little pizzazz to a bedroom, dorm room, or family room by adding words to decorative pillows. Use the downloadable block letters (Alphabet_Pillow.svg) to create whatever words suit your fancy. Smaller letters, approximately 3 " (9.2cm) tall, are ideal for the 12" x 20" (30.5 x 50.8cm) pillow form shown. Cut the letters from felt, then cut the same letters from adhesive bond and apply to the back of each letter. Use a strong-tack mat to cut the felt and a light-tack mat with mirror-image function for cutting the adhesive bond. Turn to for full instructions for making these felt-lettered pillows.

Create Sign: Decorate your creative space with this inspirational message. Start with a " (1.3cm) plank, approximately 48" tall x 6" wide (1.2m x 15.2cm). Sand it, then stain it the color of your choice. Cut 4 " (11.4cm) letters from the file Alphabet_Create.svg in a mix of adhesive vinyl colors using the light-tack mat, then weed and position the letters on your prepared board with the aid of transfer tape. Pull the transfer tape at an angle, not with the grain of the wood, to prevent the stain and grain from being pulled up by the transfer tape. Letters start 6" (15.2cm) from the top of the board, with 1" (2.5cm) between each letter. Tip: Use painters tape to space the letters evenly.
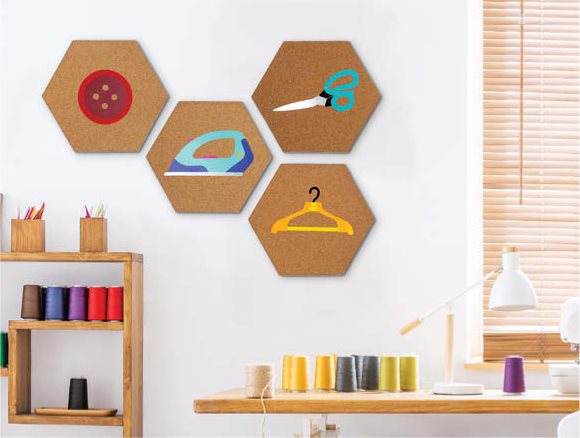
Hexagonal Cork Wall Hangings: Add silhouettes to purchased cork hexagons (or cut your own hexagons on your machine) to spice up your sewing room. Using the Wall Hanging downloadable designs, cut the silhouettes on a standard mat from 12" (30.5cm) square permanent vinyl sheets and a small piece of glitter vinyl. When cutting pieces to layer, make sure to use alignment boxes at the top of each cut for precise placement. Weed, then use transfer tape to pull up and place each layer. Tip: Command strips work very well for hanging these pieces.

Faux-Suede Hexagon Pillow: Sensuede is a win-win fabric for digital cutting. It not only cuts like a breeze, but this quality, fabric-weight faux suede wont fray, so you are left with a clean raw edge without the need for any stabilizers, seam sealants, or webbing. Use the standard-tack mat and cut approximately 25 hexagons. Turn to for step-by-step pillow instructions.
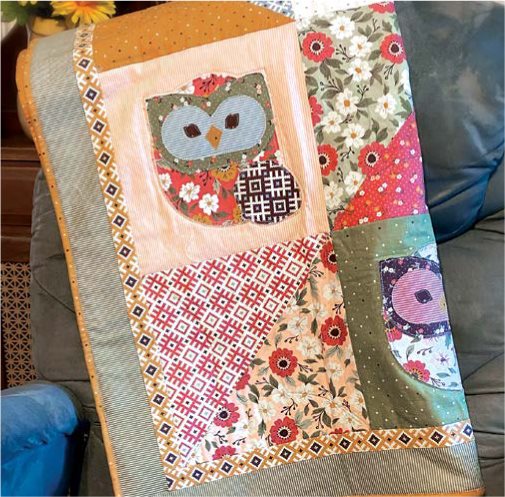
Raw-Edge Appliqu Owl Quilt: Raw-edge appliqu and digital cutting go hand in hand, as you can see in this adorable owl design. Be sure to cut on a strong-tack or standard-grip mat and test-cut to check your settings. Back your layer-cake squares with Heat n Bond double-sided fusible web if you dont want your raw edges to fray slightly. If you like the frayed look, prepare your squares with Terial Magic first for clean cuts, then apply slightly smaller pieces of fusible web individually. Turn to for step-by-step instructions on making this quilt.

