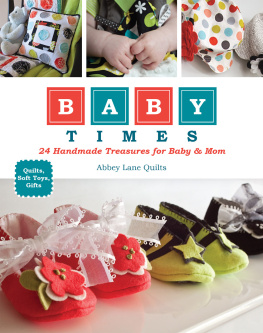
Publisher: Amy Marson Creative Director: Gailen Runge Project Editor: Alice Mace Nakanishi Compiler: Lindsay Conner Cover/Book Designer: April Mostek Page Layout Artist: Casey Dukes Production Coordinator: Joe Edge Photography by Nissa Brehmer, Christina Carty-Francis, and Diane Pedersen of C&T Publishing, Inc., unless otherwise noted For further information and similar projects, see the book listed after each artists bio. Published by C&T Publishing, Inc., P.O. Box 1456, Lafayette, CA 94549 Baby Bib Abbey Lane Quilts FINISHED SIZE: Approx. 8 11 You can never have too many bibs for a baby. Grab some cute scraps for this quick and easy project and make a bib to match every outfit. 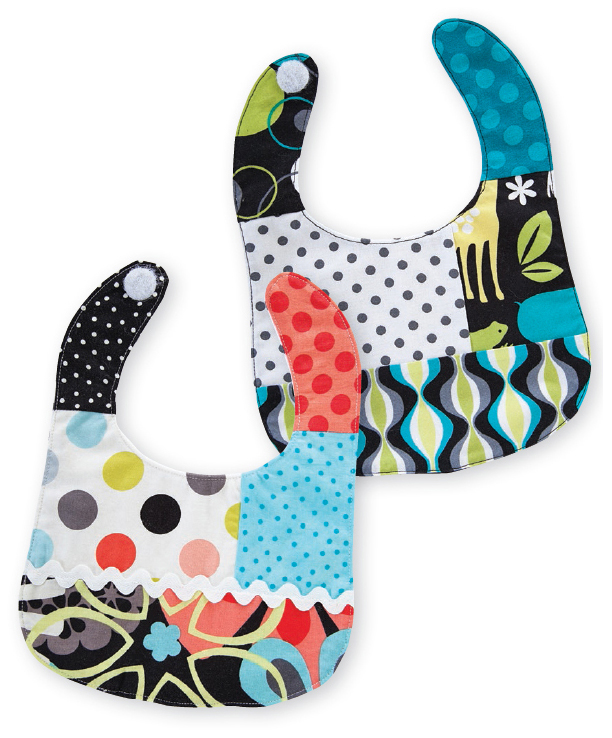 ABBEY LANE QUILTS is a pattern design company founded in 2008 by the team of Marcea Owen and Janice Liljenquist.
Marcea is an entrepreneur and writer with a background in art and interior design. Janice is an accomplished quilting teacher and longarm quilter. Abbey Lane Quilts is based in Oviedo, Florida.  WEBSITE: abbeylanequilts.com This project originally appeared in Baby Times, by Abbey Lane Quilts, available from Stash Books.
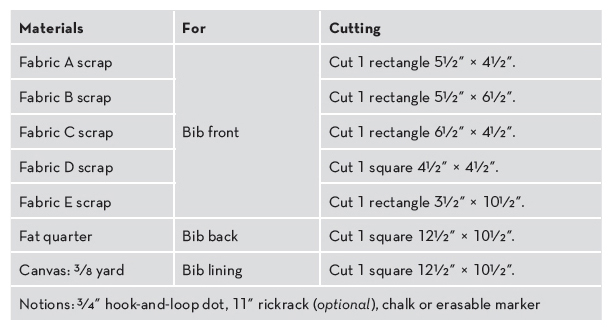
  Materials and CuttingPrewash all fabrics and canvas before cutting.
  Instructions Sew Fabric A to Fabric B along the 5 side.
Press seam. This will be Row 1. Sew Fabric C to Fabric D along the 4 side. Press seam. This will be Row 2. Sew Rows 1 and 2 together.
Press seam. Sew Fabric E to the bottom of the unit. Press seam. 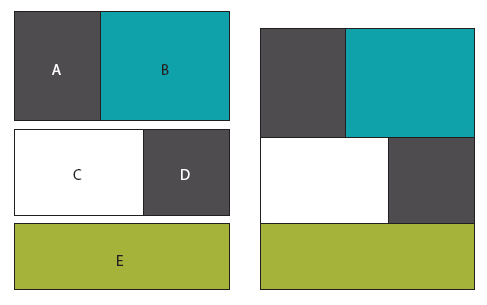 Make 2 copies of the Baby Bib pattern. Cut out the 2 pieces, flip one over, and tape them together along the dotted lines.
 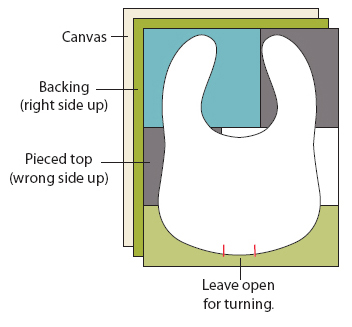 Pin all 3 layers together.
  Pin all 3 layers together.
Cut out the bib. Sew around the entire bib, leaving a 2 opening at the bottom. Clip the curves. Turn right side out and press. Turn the opening in and pin closed. Topstitch around the entire bib.
The top stitching will close the opening. Sew one side of the hook-and-loop dot to each tab. One side will be on the front of the tab and the other will be on the back of the other tab.  It is helpful to sew the hook side of the dot on the back of the top tab and the soft loop side on the front of the bottom tab. This way the babys hair is not so easily caught in the hook side of the dot. Craft Apron Virginia Lindsay FINISHED SIZE: 17 11 When I have a booth at a craft show, I look forward to the time when I can walk around and shop the other tables.
I started making these craft aprons to sell to other vendors and the many DIYers who are shopping. This design has seven pockets to keep you extra organized.  Fabric: Painters drop cloth canvas, Kona Cotton in Tangerine from Robert Kaufman Fabrics, and Dolce by Tanya Whelan for FreeSpirit Fabric VIRGINIA LINDSAY is a self-taught sewist and lover of all things fabric. She is the author of a popular sewing blog and the designer behind Gingercake Patterns. Several of her patterns are published by Simplicity.
  WEBSITE: gingercake.org This project originally appeared in Sewing to SellThe Beginners Guide to Starting a Craft Business, by Virginia Lindsay, available from Stash Books.
  MaterialsQuilting-weight fabric is recommended for the pockets and works with a layer of fusible interfacing for the apron body.
  Materials Quilting-weight fabric is recommended for the pockets and works with a layer of fusible interfacing for the apron body.
A heavier-weight fabric would also work for the apron body and eliminate the need for interfacing. Cotton fabric APRON BODY: 2 pieces 12 18 LARGE POCKET: 1 piece 14 18 SMALL POCKET: 1 piece 10 18 TIES: 2 pieces 3 36 Other FUSIBLE INTERFACING: 1 piece 12 18 for apron body (needed if using quilting-weight cotton) AIR- OR WATER-SOLUBLE FABRIC-MARKING PEN LIGHTWEIGHT DOUBLE-SIDED FUSIBLE WEB (optional): Small scrap 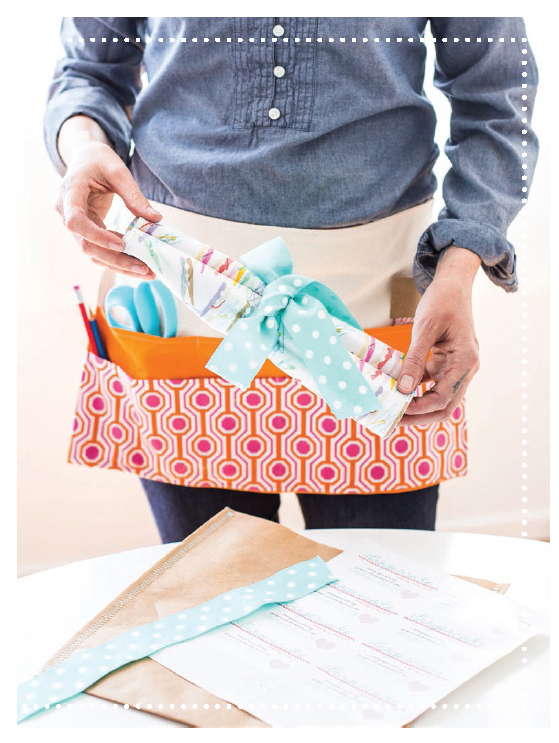 Instructions Seam allowances are unless otherwise noted. PREPARE THE PIECES If you are using quilting-weight cotton for the main piece of the apron, follow the manufacturers instructions to fuse interfacing to the wrong side of the 12 18 front apron body. Fold the large pocket in half lengthwise, wrong sides together, to make a folded piece 7 18. Press the folded edge, pin if needed, and edgestitch along the fold. Repeat Step 2 to fold, press, and stitch the smaller pocket to make a folded piece 5 18.
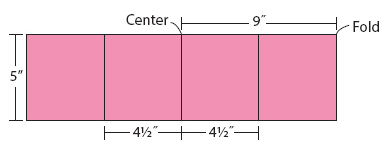
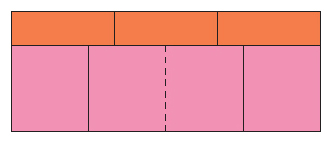
Test your fabric-marking pen on a scrap of your fabric and make sure the marks will come off easily. Use a ruler to mark the large pocket with a vertical line 6 in from each end to make 3 even sections. 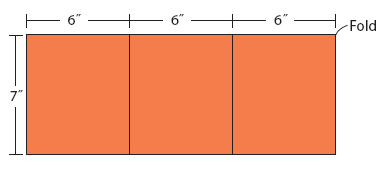 On the small pocket, mark a vertical line at the center (9) and a line 4 on either side of the center to divide the pocket into 4 equal parts.
  SEW THE DIVIDED POCKETS Layer the small pocket on top of the large pocket, aligning the raw edges at the bottom. Sew through both pockets on the marked center line of the small pocket.
  Layer the pocket unit on top of the front apron body piece, aligning the raw edges at the bottom.
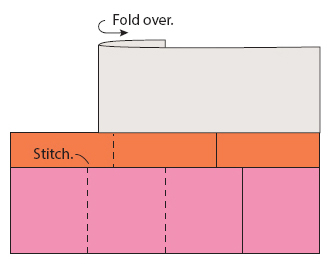
Fold (and pin if needed) the small pocket over to the center to expose the 6 line on the large pocket underneath. Sew on the 6 line through only the large pocket and the apron body. 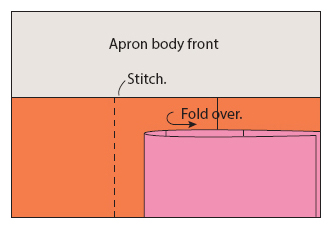 Unfold the small pocket to cover up the line you just sewed. Fold the apron body under toward the center. Sew through just the small and large pockets on the 4 line on the small pocket.
Next page


 ABBEY LANE QUILTS is a pattern design company founded in 2008 by the team of Marcea Owen and Janice Liljenquist.
 WEBSITE: abbeylanequilts.com This project originally appeared in Baby Times, by Abbey Lane Quilts, available from Stash Books.
  Materials and CuttingPrewash all fabrics and canvas before cutting.
  Instructions Sew Fabric A to Fabric B along the 5 side.
 Make 2 copies of the Baby Bib pattern. Cut out the 2 pieces, flip one over, and tape them together along the dotted lines.
  Pin all 3 layers together.
  It is helpful to sew the hook side of the dot on the back of the top tab and the soft loop side on the front of the bottom tab. This way the babys hair is not so easily caught in the hook side of the dot. Craft Apron Virginia Lindsay FINISHED SIZE: 17 11 When I have a booth at a craft show, I look forward to the time when I can walk around and shop the other tables.
 Fabric: Painters drop cloth canvas, Kona Cotton in Tangerine from Robert Kaufman Fabrics, and Dolce by Tanya Whelan for FreeSpirit Fabric VIRGINIA LINDSAY is a self-taught sewist and lover of all things fabric. She is the author of a popular sewing blog and the designer behind Gingercake Patterns. Several of her patterns are published by Simplicity.
  WEBSITE: gingercake.org This project originally appeared in Sewing to SellThe Beginners Guide to Starting a Craft Business, by Virginia Lindsay, available from Stash Books.
  MaterialsQuilting-weight fabric is recommended for the pockets and works with a layer of fusible interfacing for the apron body.
  Instructions Seam allowances are unless otherwise noted. PREPARE THE PIECES If you are using quilting-weight cotton for the main piece of the apron, follow the manufacturers instructions to fuse interfacing to the wrong side of the 12 18 front apron body. Fold the large pocket in half lengthwise, wrong sides together, to make a folded piece 7 18. Press the folded edge, pin if needed, and edgestitch along the fold. Repeat Step 2 to fold, press, and stitch the smaller pocket to make a folded piece 5 18.
 On the small pocket, mark a vertical line at the center (9) and a line 4 on either side of the center to divide the pocket into 4 equal parts.
  SEW THE DIVIDED POCKETS Layer the small pocket on top of the large pocket, aligning the raw edges at the bottom. Sew through both pockets on the marked center line of the small pocket.
  Layer the pocket unit on top of the front apron body piece, aligning the raw edges at the bottom.
 Unfold the small pocket to cover up the line you just sewed. Fold the apron body under toward the center. Sew through just the small and large pockets on the 4 line on the small pocket.