Table of Contents

Many years ago, when I worked for Ugebladet Sndag, Copenhagens Sunday newspaper, I found an old knitting article in the archives. It featured a lovely jacket made in Japanese Fine Knitting. The pattern was simple, but unusual, and came from a little booklet written by Mieko Yano, a Japanese handicraft teacher. The booklet had been translated from Swedish by Karen Lindberg who had studied and become enthusiastic about the technique.
Some years later, while visiting the Sewing Festival exhibition in Malm, Sweden, I saw examples of Maria Gustafssons Optical Knitting. It was identical to Japanese Fine Knitting. I contacted Maria, who very generously shared with me her vast experience in optical knitting, and loaned me her materials and pictures of her fine work. Maria also sent me the story of how she saw optical knitting for the first time and how her curiosity was awakened. Both her path and mine led to Japan.
A year and a half ago, a beautifully edited version of my book Domino Knitting was published in Japan. Following a rather complex path of contacts, my editor, Akiyo Murono, eventually pointed me to the booklet by Mieko Yano. My search had come full circle.

A Japanese book on Hidden Patterns, was the inspiration for Shadow Knitting.
While working on my knitwear collection, I realized that I must take up this exciting and somewhat mysterious knitting technique. When a friend suggested calling it Shadow Knitting, I was delighted. Shadow Knitting is the perfect name since it very accurately describes the special look of the technique. The right-side ridges cast a shadow pattern that changes when the wearer moves. My first design was a jacket called Japan. With my curiosity piqued, I developed the technique further with Bumblebee, Zebra, and Shadows. (You can find these designs and more on my website: www.viv.dk.)
My shadow-knitted pieces generated a great deal of interest, and eventually Marilyn Murphy from Interweave Press encouraged me to write this book. I began writing and discovered that the way was lighted. Thank you, Marilyn, for your encouragement. In 2002, while visiting in Loveland, Colorado, I met some of the employees of Interweave Press. They were very inspiring and helpful, and I am very thankful to all of them.
For long periods in the winter, I am unable to knit, so it has been a fantastic experience to have my knitting friends literally take up the needles for me. Of course, this has also led to all sorts of good knitting chats, and lots of cups of coffee. Many, many thanks to Else Nielsen, Kirsten Jensen, Helle Srensen, and Else Troelsen. Without all of you, there would not be a book. Finally, thank you to Akiyo Murono, Taeko Hatta, and Maria Gustafsson for your help and inspiration.
I have designed all the patterns and instructions contained in this book. Now they are yours to enjoy, so please knit them. My very best wishes for much knitting pleasure!
Vivian Hxbro
Shadow knitting is very simple in principle. It uses just two stitch patterns, garter stitch and stockinette stitch, and the patterning is minimalistic. If you look at a shadow-knit garment directly from the front, it is difficult to see the pattern, but when the person wearing the garment moves, the pattern becomes visible. It almost seems like magic.

Three views of a shadow-knitted circle pattern. The pattern is more visible at some angles, and nearly disappears at others.
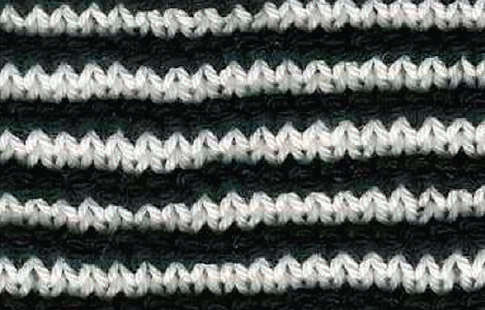
In shadow knitting, the right side of the work always begins with a knit row. The patterning is worked on the wrong side, alternating two rows worked in a dark color and two rows worked in a light color (or vice versa, two rows worked in a light color followed by two rows worked in a dark color). The pattern itself is formed on the right side by the purl ridges. Working knit stitches on the wrong-side rows creates the right-side purl ridges. An American knitter once told me that she saw it as uphill (ridges) and down-dale (smooth). This is an excellent way to describe the shadow-producing texture. Although the principles of shadow knitting are simple, the results are unusual and exciting. The patterning is subtler than that of multicolored knitting (Fair Isle, jacquard, Norwegian pattern knitting, intarsia, etc.), and a large piece must be knitted for the shadow patterns to show. At the beginning, your knitting will look like plain old stripes, but dont worry; give it a few inches and the magic will happen!
How Shadow-Knitted Patterns Are Formed
The principles of shadow knitting may be summed up in a few simple statements:
- Shadow knitting always uses at least two colorsone dark and one light.
- Shadow knitting is always worked with only one color at a timethe rows of knitting alternate between two rows of a dark color and two row of a light color.
- Shadow knitting is always worked with knit and purl stitches.
- On right-side rows, all of the stitches are knitted.
- On wrong-side rows, the same color is used as for the previous right-side row, and the stitches are either knitted or purled based on a chart or text instructions.
It is not easy to see the shadow pattern while youre knitting it because it is worked on the wrong side. To build the pattern successfully while working on the wrong side, youll need to use a system of markers. Following a charted pattern, place the markers at the points where the pattern shifts from knit stitches to purl stitches, and vice versa. Sometimes you may have many, many markers on your needle, but with those markers in place, youll be nearly able to work the pattern on wrong-side rows with your eyes closed. For more about markers, see Using Markers on .
The Basic Shadow Patterns
Shadow knitting begins with two basic patterns. Basic Pattern 1 has light ridges on a dark stockinette background; Basic Pattern 2 has dark ridges on a light stockinette background. The row-by-row instructions for these two basic patterns are below.
Basic Pattern 1
Row 1: (RS) With dark yarn (D), knit.
Row 2: (WS) With D, purl.
Row 3: (RS) With light yarn (L), knit.
Row 4: (WS) With L, knit. This row will form light-colored ridges on the right side of the work.
Repeat Rows 14 for pattern.

Basic Pattern 2
Row 1: (RS) With L, knit.
Row 2: (WS) With L, purl.
Row 3: (RS) With D, knit.
Row 4: (WS) With D, knit. This row will form dark-colored ridges on the right side of the work.
Repeat Rows 14 for pattern.
, as well as other designs in this book.
Next page

