CONTENTS The most common refrain heard when I told people I was writing a book on pompoms was Oh, I used to make those as a child. And so did I. I spent hours winding yarn onto basic cardboard pompom makers cut from cereal packets, then turning the results into fluffy chicks or monsters with big googly eyes. When I was asked to write this book, I was a little apprehensive about the time it can take to make a pompom and what exactly you might do with those simple spheres. I soon learnt that the humble cardboard maker has been replaced by more efficient plastic contraptions for speedy pompom making and that there are hundreds of things that you can do with your pompoms. While some projects in this book are simple and require basic pompom-making techniques, others are more complex and involve a bit of brain power but the results are amazing.
Once you have got your head around the way a pattern is created within a pompom, there is no end to what you can create. The most exciting moment in pompom making comes when you cut through all the wraps of yarn and the pattern you hope you have created begins to reveal itself. There were many experiments when planning these projects, but even though some did not turn out just the way I expected, they all had a certain charm. Even the ones I initially considered a failure turned out pretty much okay after a hard trim with some sharp scissors. As in life, a good haircut can work wonders. In this book I have used an acrylic DK-weight yarn from a company called Stylecraft (who were kind enough to give me many balls of yarn for experimentation).
I recommend you also use a similar DK-weight yarn so that the number of wraps of each colour yarn are consistent with the instructions given. The colours mentioned in the instructions are specific to Stylecraft but it is easy to swap in colours based on whatever yarn you have to hand. When choosing yarns for your pompom making, inexpensive acrylic DK-weight yarns work best as they fluff up nicely when trimmed. Using an aran-weight or bulky yarn does mean less winding to fill the pompom maker, which makes for a speedier pom, but may give a less defined pattern. Some of the weirder and more wonderful yarns with sequins and fluffy bits make incredible pompoms, so do have fun and try lots of different types. As I sit at my desk writing this introduction, I am surrounded by all the projects made for this book.
I am struck by how versatile the humble pompom can be. When asked to write this book, never in my wildest dreams did I imagine I would be able to show you how to make pompoms in the shape of sushi! Happy Pompoming! You can buy tiny pompom makers, but they are fiddly to use and easy to lose. Forks are the perfect size to make smaller pompoms. Plus, if you are ever at a restaurant with a ball of yarn, well, theres your after-dinner entertainment right there. 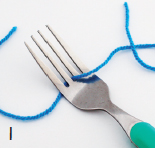 Cut a length of yarn to approximately 15cm (6 in).
 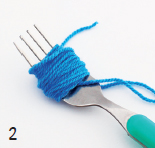 Wind yarn round fork 50 times, making sure cut end does not get caught up in wraps.
 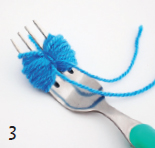 Once finished winding, use two cut ends to gather wraps tightly together.
  Once finished winding, use two cut ends to gather wraps tightly together.
Tie into a knot. 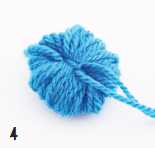 If you find it tricky to pull yarn bundle tight, slip it off tines, gather and tie another knot.
 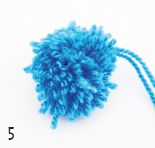 Snip through each side of yarn bundle to release yarn strands.
 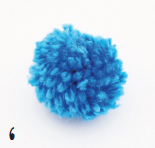 Trim pompom with scissors into a neat, round shape. Keep brushing the strands to reveal any stray bits. I find it easier to start wrapping yarn in the centre of a maker; it is less fiddly than trying to start at one end.
With the fingers of one hand, hold the cut end of the yarn in place on the maker. Wind the yarn around the maker, catching the cut end under the wraps to hold it in place. If the instructions require you to wrap from one end, start in the centre then slide the yarn to the side once it is secure. Alternatively, tie the yarn on with a knot. Wind the yarn evenly across the maker with a constant tension. It is easy to wind too much yarn in the centre of the maker halves and then the makers do not close properly.
There is nothing worse than having your makers fly open after you have cut through all the wool and hundreds of strands of wool go falling to the floor. Believe me, I know! Do not wrap the yarn round the maker too tightly as it is then harder to cut later. When you have complete a pompom use a good pair of sharp scissors, insert the tip of the blades between the two halves of the maker and snip. After you have cut open your pompom, you need to tie another piece of yarn round the centre to stop all the bits falling out. Rather than tying a double knot straight away, tie one knot, wrap the yarn back on itself, pull tightly, then tie a double knot for a much tighter pompom. Keep trimming.
I learnt a lot making the pompoms for this book. My main realisation was that trimming is key! I went back to my basket of reject pompoms and realised that if I had spent more time with the scissors, carefully trimming round and round the pom I thought was a no-no, it would actually have been a yes-yes. Rolling the pompom between your hands moves the strands and shows up any bits that need a snip. Do this periodically as you trim for the perfect finish. Cheat a little. There are some projects in this book that require lots of colour changes and small wraps of yarn.
Once you have completed a project and trimmed the pompom, do not be afraid to pull out strands that make your pattern look uneven or even add ones in where there is a hole. Thread a large darning needle with the required colour and sew it through the pompom in the necessary place, then trim. This method works well when adding eyes and highlights to faces, such as the . Use the tip of a darning needle or the point of some scissors to move individual strands of yarn around. As pompoms are tied so tightly, when you move a strand it tends to stay in place.
Another fork method for making pompoms, but this time a sweet looped variety.
Another fork method for making pompoms, but this time a sweet looped variety.
Combining traditional fluffy pompoms with these loopy ones looks great on sweaters, socks, necklaces or cushions. There is not much that cant be improved by the addition of a pompom. 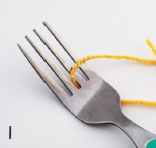








 Cut a length of yarn to approximately 15cm (6 in).
  Wind yarn round fork 50 times, making sure cut end does not get caught up in wraps.
  Once finished winding, use two cut ends to gather wraps tightly together.
  If you find it tricky to pull yarn bundle tight, slip it off tines, gather and tie another knot.
  Snip through each side of yarn bundle to release yarn strands.
  Trim pompom with scissors into a neat, round shape. Keep brushing the strands to reveal any stray bits. I find it easier to start wrapping yarn in the centre of a maker; it is less fiddly than trying to start at one end.
