If you are an Annies customer and have a question about the instructions on a pattern you have purchased, please visit: AnniesCatalog.com/pages/customer_care/pattern_services.html
Templates
To download templates for easy printing, view the download instructions at the end of this book or click the Templates chapter in the Table of Contents.
Introduction
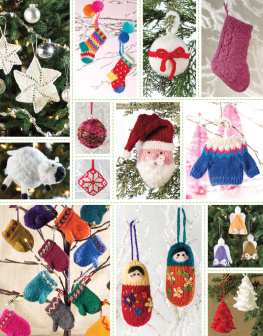
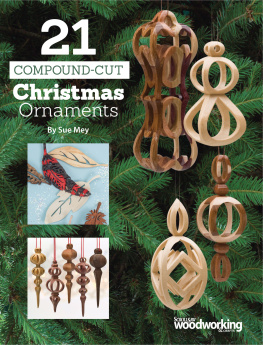
When you look at your Christmas tree, which ornaments stand out the most? Chances are they are handmade, either by you or a loved one. The best thing about handmade ornaments is the memories that come with themthere is nothing better than reminiscing about past holidays spent with loved ones. This year, why not create more memories by hand-making the ornaments in this book? You can make them as gifts, or get the whole family involved and spend the afternoon crafting. Weve included a wide variety of designs from traditional to whimsical for the very young to the young-at-heart, and even for a favorite pet. Many of the ornaments are easy to make and can be made in an hour or two using general supplies found in local sewing and craft stores.
If you have a stash of sewing and craft supplies, this will be a wonderful way to make good use of what you have on hand. Dont stop with making Christmas ornaments! You can also be creative by using these designs to make gift tags, hot pads, cards, coasters or mug rugs. If you enjoy making ornaments, but your list is small, make ornaments by the batch to sell at a craft bazaar, or better yet, bring a smile to someone in need by giving handmade Christmas ornaments to your favorite charity. May you have lots of fun making Christmas ornaments that your family and friends will cherish for many years to come. 
Table of Contents
Oh Christmas Tree
Tis the Season
Traditional Trimmings
Christmas Critters
Winter Wonderland
Designs by Chris Malone

Finished Sizes
Tree: 4 x 5 inches Bell: 4 x 6 inches
Christmas Tree
Materials
-inch-wide fabric strips: Total of 12 inches red Total of 65 inches green 48 inches of

-inch-diameter cotton clothesline rope Buttons: 1 (1-inch-diameter) yellow 3 (-inch-diameter) red 8-inch piece of yellow pearl cotton or other thin cord Tacky fabric adhesive Basic sewing tools and equipment
Assembly
Apply a drop of adhesive to the end of the wrong side of a red fabric strip. Place the rope end on the glue.
Fold the excess fabric over the top and the side of the rope. Spiral wrap the fabric strip around the rope at an angle so each wrap overlaps the previous wrap by at least inch (Figure 1). Keep the fabric snug against the rope.  Figure 1 Wrap 7 inches of the rope, clip off any excess fabric and glue fabric end to the rope. Apply a drop of glue to the end of the wrong side of a green strip. Overlap the red strip end with the green and press in place.
Use a pin to hold the junction until the glue sets (Figure 2). 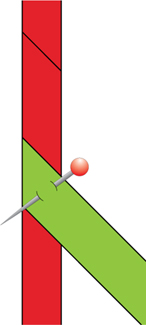 Figure 2 Wrap 18 inches of rope with green fabric strips; secure the end with a dot of glue and a pin. Coil the red-wrapped rope end into a tight circle to the junction of the red and green fabric. Straight-stitch an X across the circle to hold the coils in place (Figure 3).
 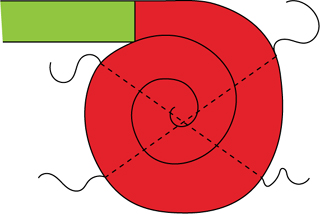 Figure 3 Set your sewing machine to a -inch-wide zigzag stitch. Position the center of the coiled shape under the presser foot.
Zigzag stitch between the coils catching two coils in each stitch (Figure 4). Note:To stitch the coils, stop stitching often with the needle down and turn the coil slightly before resuming stitching.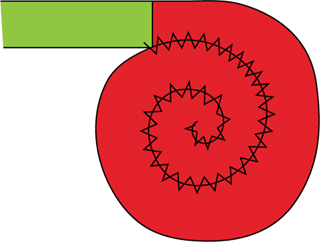 Figure 4 Backstitch to secure the coil stitching at the green wrapped section; remove the coil from the machine. Change the thread on the machine to green. To shape the tree, extend the rope tail at a right angle to the coiled base. Turn the rope back on itself making a 2-inch tight loop. Zigzag-stitch the two green rows together beginning at the color junction.
Stop stitching with the needle down in the upper rope referring to Figure 5. Raise the presser foot and turn the ornament 180 degrees.  Figure 5 Pull the rope tail straight down and turn it back on itself 2 inches from the junction of the two colors to complete the first row. Pull the rope back almost to the first loop and fold it back on itself (Figure 6). Zigzag together.
 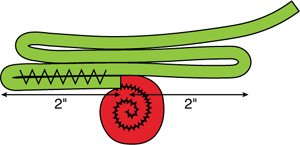 Figure 6 Continue to fold the rope back and forth, creating steadily shorter rows to form the triangular tree shape.
Add more fabric strips as necessary; overlap and glue fabric ends together to add another fabric strip. At the top of the tree, clip any excess rope and fabric, tucking the fabric tip inside. Backstitch to secure the zigzag stitches (Figure 7).  Figure 7 Stitch the yellow star button to the top front of the tree and three red buttons to the center of the tree referring to the sample photo. To make a hanger, thread a needle with yellow cord.
Bell
Materials
-inch-wide fabric strips: Total of 12 inches of yellow Total of 90 inches of green 65 inches of

-inch-diameter cotton clothesline rope 1 (-inch-diameter) red button 8-inch piece of red pearl cotton or other thin cord Tacky fabric adhesive Basic sewing tools and equipment
Assembly
Follow Christmas Tree assembly steps 15 using the yellow and green strips.
Bell
Materials
-inch-wide fabric strips: Total of 12 inches of yellow Total of 90 inches of green 65 inches of

-inch-diameter cotton clothesline rope 1 (-inch-diameter) red button 8-inch piece of red pearl cotton or other thin cord Tacky fabric adhesive Basic sewing tools and equipment
Assembly
Follow Christmas Tree assembly steps 15 using the yellow and green strips.
Coil the yellow-wrapped end into a tight, slightly oval shape. Straight stitch an X across the circle to hold the coils in place, referring to Figures 3 and 4. Follow Christmas Tree assembly steps 8 and 9 to finish the yellow section of rope. Shape the bell referring to Christmas Tree assembly steps 1015. At the top of the bell, trim away any excess leaving a 2-inch tail of green-wrapped rope. Coil the 2-inch tail into a tight circle and finish the stitching referring to Figure 7.








 When you look at your Christmas tree, which ornaments stand out the most? Chances are they are handmade, either by you or a loved one. The best thing about handmade ornaments is the memories that come with themthere is nothing better than reminiscing about past holidays spent with loved ones. This year, why not create more memories by hand-making the ornaments in this book? You can make them as gifts, or get the whole family involved and spend the afternoon crafting. Weve included a wide variety of designs from traditional to whimsical for the very young to the young-at-heart, and even for a favorite pet. Many of the ornaments are easy to make and can be made in an hour or two using general supplies found in local sewing and craft stores.

 -inch-diameter cotton clothesline rope Buttons: 1 (1-inch-diameter) yellow 3 (-inch-diameter) red 8-inch piece of yellow pearl cotton or other thin cord Tacky fabric adhesive Basic sewing tools and equipment
  Figure 1 Wrap 7 inches of the rope, clip off any excess fabric and glue fabric end to the rope. Apply a drop of glue to the end of the wrong side of a green strip. Overlap the red strip end with the green and press in place.
 Figure 2 Wrap 18 inches of rope with green fabric strips; secure the end with a dot of glue and a pin. Coil the red-wrapped rope end into a tight circle to the junction of the red and green fabric. Straight-stitch an X across the circle to hold the coils in place (Figure 3).
  Figure 3 Set your sewing machine to a -inch-wide zigzag stitch. Position the center of the coiled shape under the presser foot.
 Figure 4 Backstitch to secure the coil stitching at the green wrapped section; remove the coil from the machine. Change the thread on the machine to green. To shape the tree, extend the rope tail at a right angle to the coiled base. Turn the rope back on itself making a 2-inch tight loop. Zigzag-stitch the two green rows together beginning at the color junction.
 Figure 5 Pull the rope tail straight down and turn it back on itself 2 inches from the junction of the two colors to complete the first row. Pull the rope back almost to the first loop and fold it back on itself (Figure 6). Zigzag together.
  Figure 6 Continue to fold the rope back and forth, creating steadily shorter rows to form the triangular tree shape.
 Figure 7 Stitch the yellow star button to the top front of the tree and three red buttons to the center of the tree referring to the sample photo. To make a hanger, thread a needle with yellow cord.