Publisher: Amy Marson Creative Director: Gailen Runge Editor: Lynn Koolish Technical Editors: Susan Nelsen and Debbie Rodgers Cover/Book Designer: April Mostek Production Coordinator: Tim Manibusan Production Editor: Alice Mace Nakanishi Illustrator: Kirstie L. Pettersen Photo Assistant: Mai Yong Vang Instructional photography by Diane Pedersen of C&T Publishing, Inc., unless otherwise noted Published by C&T Publishing, Inc., P.O. Box 1456, Lafayette, CA 94549 AcknowledgmentsTo my husband, children, sisters, quilting friends, and students, who continue to inspire and challenge me in my quilting arena.To my sisters, sister-in-law, daughters, and daughter-in-law, who each made the project quilt variations.To all the quilters in my classes, for sharing their love and joy of quilting with me.And to everyone at C&T PublishingLynn Koolish, Susan Nelsen, Debbie Rodgers, Alice Mace Nakanishi, and Tim Manibusan.And thanks to RJR Fabrics and Northcott for their beautiful fabrics.The Family Sewing Retreat Each year my mother, six sisters, a sister-in-law, and some of the nieces get together for a weeklong sewing retreat. Living many miles apart does not keep us from getting together each year for this event. Our familys sewing retreats have played a primary role in getting the next generation interested in sewing. We find a commonality in sewing and a community grows out of the interaction that occurs over the hum of sewing machines.
These sewing retreats over the past eighteen years build family relationships as well. There can be anywhere from eleven to twenty-five people at a sewing retreat, it just depends on who can come and how many days they can attend. I love the interaction between the four generations. My daughters and daughter-in-law know my sisters in a unique way that would have never happened if this gathering did not exist. We bounce ideas back and forth as we sew. We have a large variety of talent to pull from: I may not know how to write but there is someone who can give me ideas for writing.
The photographer in our group helps in photographing ideas for trimming and posting our pictures. The oil and watercolor painters help us fine-tune our color selections and help us understand why value is as important as color in quilt making. We all learn from each other and value each other. This not only happens in the quilting and sewing arena but it also happens in sharing our personal stories. I love to take a quilt that I am ready to quilt to these gatherings and get four or five of the ladies around the quilt to each come up with an idea of how they would quilt it. From the input of each quilter there are so many different ideas.
Then after hearing all these ideas I pick and choose the quilting designs I like best. I decided in this book that I would love to have each of my sisters, sister-in-law, daughters, and daughter-in-law make a project from this book and add their own flair to it. They could change rotation, placement of the block, and could resize the block. They also could add sashing or spacer blocks between the blocks. So in the following pages you will find the creativity of what each of the women has made. GETTING STARTED SUPPLIES Rotary cutter with a sharp new blade Rotary cutting mat, 24 36 Rotary cutting rulers, 6 24 and 4 14 (The smaller ruler is easier to handle when slicing the blocks.) Template plastic (optional) Pins Sewing thread to match fabric -wide presser foot (Accurate seam allowances are a must.) Scissors Seam ripper Double-sided tape Iron and ironing board Cutting 60 Diamonds With this cutting method, equilateral diamonds are cut individually from a fabric strip and then the diamonds will be pieced into a block.
An equilateral diamond is created when the strip width is the same as the diamond width in the cutting instructions. This cutting method is used in Pollygon Patchwork. The instructions for each project will indicate the specific strip width and the diamond width. Heres how to cut the diamonds: For all the diamonds in this book, your cuts will be a 60 angle. Cut the strip width according to your project instructions. This example shows a diamond cut at a 60 angle from a 6 strip.
Place the strip parallel to the bottom edge of the cutting mat, lining up the edge on a horizontal grid line. Place the ruler on top of the fabric, aligning the rulers 60 line with the bottom edge of the cut strip. Cut along the right side of the ruler. This initial cut will create the first edge of the diamond. 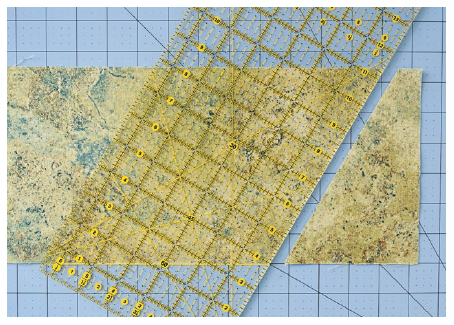 Cut 60 angle on strip. Refer to the project instructions for the desired diamond width.
Use a ruler to measure the width from the first cut edge, keeping the ruler at the same 60 angle. Make the next cut. Repeat along the length of the strip to make the number of cuts required for the project. This example uses a 6-wide ruler to cut the 6-wide diamond. 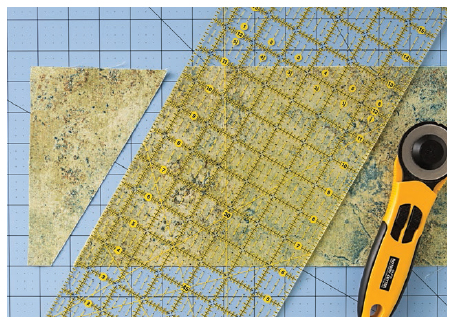 Cut diamond. Slicing Each block is sliced, stitched, pressed, trimmed, and stitched again.
Only one project has the block cut after the 1 strip is added into the strip set: Twilight Table Runner. Two methods are used in this book to slice blocks: Slicing with a ruler Slicing with a template SLICING WITH A RULER Use this method when the project instructions provide specific measurements. Slice Slice the shape using the provided measurement(s), in this case, in half. 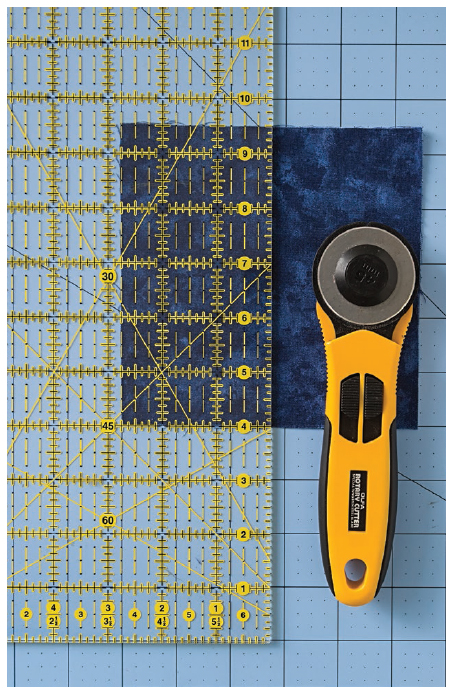 Slice square in half. Stitch and Press Center a 1 strip on one of the long sides of the sliced shape. The 1 strip will always be longer then the shape.
Sew the strip in position. Press toward the darker fabric or as instructed in the project. Trim Use a ruler and trim the edges of the strip even with the sliced shape. Make sure the ruler is squared up with the shape. 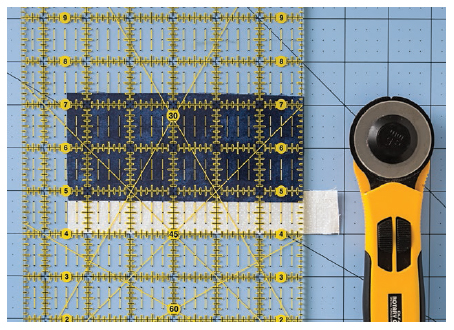 Trim off ends of 1 strip. Press. Press.
The block is finished and is back to the original size. 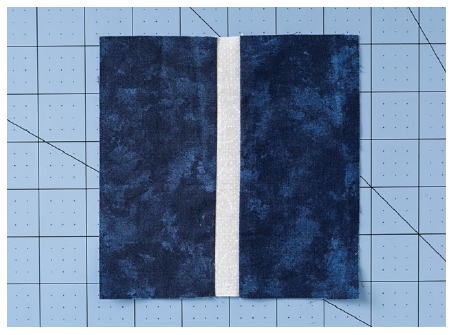 Finished block SLICING WITH A TEMPLATE Use this method when the project instructions provide a pattern to make a template. Template PreparationThe following example uses Just a Square pattern. The size of the block is 5 5 square. Make a copy of the pattern to trace on plain paper or template plastic. Cut out the template roughly beyond the outside of the shape. Use a rotary cutter and ruler to cut on the lines of the template, aligning the ruler line with the seamline on the paper template.
Use double-sided tape to secure the template to the underside of a ruler with the slicing edge along the edge of the ruler. If the template has 2 slicing edges, you may want to make 2 templates and tape each to its own ruler. Otherwise, you will have to reposition the single template on the ruler to slice the second side. Slice Place the ruler on top of a square (or a triangle or diamond shape in a particular project) with the template aligned with one of the corners of the shape. Slice the shape as shown. TIP I use paper to make the templates to be taped to the underside of the ruler.
If a template will be cut around, then I use plastic for the template, like in
Next page

 Cut 60 angle on strip. Refer to the project instructions for the desired diamond width.
 Cut diamond. Slicing Each block is sliced, stitched, pressed, trimmed, and stitched again.
 Slice square in half. Stitch and Press Center a 1 strip on one of the long sides of the sliced shape. The 1 strip will always be longer then the shape.
 Trim off ends of 1 strip. Press. Press.
 Finished block SLICING WITH A TEMPLATE Use this method when the project instructions provide a pattern to make a template. Template PreparationThe following example uses Just a Square pattern. The size of the block is 5 5 square. Make a copy of the pattern to trace on plain paper or template plastic. Cut out the template roughly beyond the outside of the shape. Use a rotary cutter and ruler to cut on the lines of the template, aligning the ruler line with the seamline on the paper template.