Section I
Administration at the Site Level
LESSON 1: Using the Site Administration Menu
LESSON 2: Using the Site Actions Menu
LESSON 3: Changing a Site's Look and Feel
LESSON 4: Using Custom Themes
LESSON 5: Managing Reporting Services
Chapter 1
Using the Site Administration Menu
A SharePoint application is largely organized around the concept of the individual site. Every SharePoint site must have at least one owner who will have available to him or her the full range of administrative options at the site level.
In many cases the people responsible for building and maintaining a SharePoint site are not IT professionals. More often they are business users charged with organizing documents, posting meeting information, and uploading photos of the company picnic. The purpose of this chapter is to explain the basic administration functions that are available to a user who has administrative access to a site. Typically, this person is known as the site owner .
The SharePoint administration interface is displayed by a browser and is security-trimmed . This means that many of the menu options, links, and other parts of the interface can be viewed only by people who have a certain level of rights. If you are following the steps in this chapter and the accompanying video walkthrough, and you are not seeing the links and menu items described, it's likely that you do not have a sufficient level of rights to the site. Someone with a higher level of access will have to increase your security level.
Accessing the Site Administration Menu
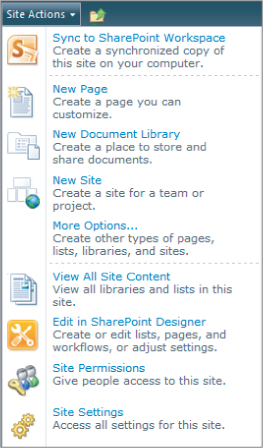
Every SharePoint site includes a Site Settings page. This page consists of various link groupings that contain all of the various administration and configuration options available to a site owner. You can access the site settings page from any page on a SharePoint site using the site actions menu. The site actions menu is usually found in the upper left corner of a SharePoint site. If the page has been modified from its original layout, it could be located somewhere else.
. The choices you see in this menu vary based on a wide array of settings, options, and other variables, but near the bottom of the list should be an option called Site Settings. Clicking this link takes you to the Site Settings page.
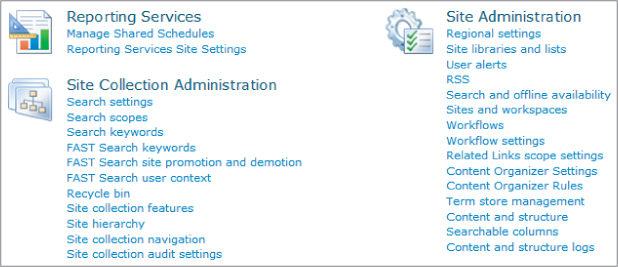
On the Site Settings page for any SharePoint site, you will find a large collection of links organized under several categories. See .
For this chapter we focus on the links under the heading Site Administration. (Later chapters discuss the other headings.) These links deal with a range of functions and settings common to every SharePoint site.
You may notice that the links under your Site Administration heading are different from the ones in this book. SharePoint offers a dizzying array of options, features, and configuration settings. The links that appear on the Site Actions page depend on the version of SharePoint being used and the type of site that was created; in addition, optional features may have been activated.
Links that are the result of optional configurations will be discussed in later chapters. In this chapter we will deal strictly with the site administration options found on all (or at least most) SharePoint sites.
A SharePoint installation typically contains a number of individual sites. Each option in the site administration menu must be set separately for each SharePoint site. Other items we will look at later have a larger scope and will affect the behavior of several sites at once.
In the following sections in this lesson, we will discuss the purpose of each link in the site administration menu. The links found in the Site Administration menu common to all SharePoint sites include:
- Regional Settings
- Site Libraries and Lists
- User Alerts
- RSS
- Content and Structure
- Content and Structure Logs
Exploring these administrative functions will be the focus of this lesson.
Setting the Regional Settings Options
The Regional Settings link in the Site Administration menu opens the Regional Settings page. The Regional Settings page is used by administrators to determine how SharePoint displays certain elements that change according to a user's time zone or location. Let's walk through the various options and discuss the effect each one has on the site. shows the Regional Settings page.
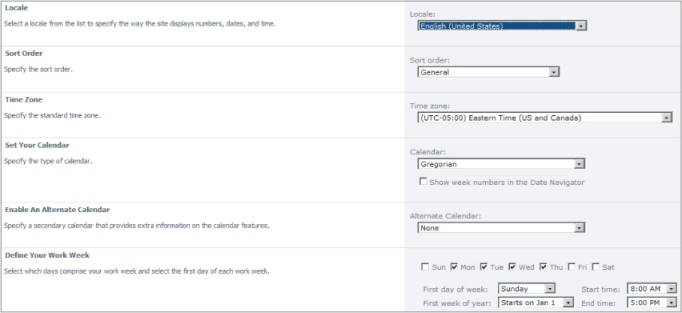
- Locale: Selecting a locale causes SharePoint to display numbers, dates, and time-related elements in the formats used in the locale selected. It will also cause some less obvious behaviors such as showing the names of months on a calendar view in the chosen locale.
- Sort Order: If you have the proper language pack installed for the selection you make in this drop-down box, items in lists and libraries are sorted in alphabetical order according to the chosen language. Language packs should be installed by a SharePoint farm administrator.
- Time Zone: This setting is important to set properly because often the users of a SharePoint portal are in a different time zone from the physical server that SharePoint is hosted on. Users expect time and date stamps on documents and items to reflect local time. If a server sits in California, but users are in New York, leaving the default setting here causes the time stamps of the users' documents to be three hours too early. If you are the owner of a site, make sure this setting is correct for the predominant location of your users.
- Set Your Calendar: This setting affects the presentation of calendar views (usually used for events lists). The default is the standard Gregorian calendar. To see how different settings change the presentation, complete the Try It walkthrough at the end of this chapter.
- Enable an Alternate Calendar: The alternate calendar presents an alternate month and year next to the month and year in the chosen format for calendar views. In addition, next to each day of the month shown in the calendar view, the alternate day is shown in parentheses to highlight differences between the chosen and alternate calendar formats.
- Define Your Work Week: This option is reflected in calendar views, as the weekday shown on the far left side of a calendar view will be the day chosen here as the first day of the week. Options for the work week and for the start and end times for the workday affect which days and times in the calendar views are shaded darker. Non-working days and hours are shaded, while working hours have a white background.
- Time Format: The 12-hour format shows time in the more common format, with a.m. and p.m. indicators. The 24-hour setting is military time, such as 15:00 for 3 p.m. (12 p.m. plus three hours).
Site Libraries and List Links
The Site Libraries and Lists link provides a shortcut by which a site administrator can access the list and library settings page for all the lists and libraries on a site. This page presents a link for each list and library in the site. Clicking the link takes you to the settings page for that list or library.
Viewing and Managing User Alerts
Alerts are a method for users to receive notification when content in the site are added, changed or deleted. Users can voluntarily set alerts that will send e-mails to them when the contents of lists or libraries change. Note that you cannot set up alerts for other users using the browser interface provided in SharePoint. Users must elect to receive them and set the alerts themselves. However, this page enables you to view alerts that users have set up and to delete them at your discretion. Sometimes users decide they no longer wish to receive alert notifications and ask an administrator to remove them.

