TABLE OF CONTENTS
TABLE OF CONTENTS

Savor the Taste of Summer Year Round
Summer is the best time to indulge in juicy fruits and crisp veggies. Whether you purchase them from earthy stands at farmers markets, pull them from colorful displays at grocery stores or pick them fresh from your garden, its easy to end up with more produce than you need. Thats not a problem with Taste of Home Jams, Jellies, Pickles & More! After all, this delightful collection helps you preserve summer flavor for year-round enjoyment. If youve never canned or preserved before, the step-by-step directions found here make it a breeze. If youre an experienced canner, youll delight in these finger-licking recipes, handy tips and gorgeous photos. So what are you waiting for? Lets get canning and preserving today!

Tips for Successful Canning:
This book focuses on hot water bath canning, which is used to process high-acid foods such as tomatoes, fruits, pickles, jams and other preserves.
Remember these tips when canning: SELECT FRUITS and vegetables when they are at the peak of their quality and flavor, and wash them thoroughly before using. FOLLOW DIRECTIONS for each recipe exactlydont substitute ingredients or change processing times. Prepare only one recipe at a time; do not double recipes. SUBSTITUTE A CAKE COOLING RACK if you dont have a rack specifically made for canning. Place rack in the canner before you add the canning jars. USE A CANNING FUNNEL that has a wide opening and sits on the inside of the mouth of the jar, allowing you to fill jars cleanly and easily.
Wipe the threads and rim of each jar to remove any food that spills. REUSE SCREW BANDS if they are not warped or rusty. Jar lids are not reusable, however, so use a new one for each of your canned creations. ACCURATELY MEASURE the headspacethe distance between the top of the jar and the food/liquid. This is critical because it affects how well the jar seals and preserves its contents. A clear plastic rulerkept solely for kitchen useis a big help in determining the correct headspace.
REFRIGERATE ANY LEFTOVERS that wont completely fill another jar. Use the leftovers within the next few days. USE NONMETALLIC UTENSILS when removing air bubbles from the jar and measuring headspace. STORE HOME-CANNED FOODS in your cupboard for up to one year.
Tools of the Trade
Heres what you need to get started using the hot water bath processing method. LARGE STOCKPOT: Choose a stockpot that holds at least 12 quarts and is tall enough to allow the jars to be fully submerged.
LADLE: Be careful when pouring hot mixtures into jars or jar funnels. JAR FUNNEL: Place in the mouth of the jar to fill without spilling. MAGNETIC LID LIFTER: Lift lids out of hot water using this tools magnetic end. BUBBLE REMOVER & HEADSPACE TOOL: Slide this tool down the side of filled jars to release air bubbles and measure headspace. JAR WRENCH: Jar lids can be difficult to turn without this wrench. TONGS (WITH COATED HANDLES): Youll need tongs to lift foods during cooking and canning.
JAR LIFTER: Safely remove hot jars from boiling water with one hand. GLASS CANNING JARS, LIDS & BANDS: Fill the glass jars, then seal with one-time-use lids and reusable bands.
SEAL the Deal
Enjoy this years harvest well into next year. You have your toolsyouve read the tips and youre all set to put up summers bounty. Or, are you? Before you dive in, take a quick moment to review the basic steps for canning and processing. Next, select the recipe thats right for you, your produce and your taste.
Thenlets get canning! BEFORE YOU START Before you begin canning, read the recipe instructions and gather all equipment and ingredients. Inspect the glass canning jars carefully for any chips, cracks, uneven rims or sharp edges that may prevent sealing or cause breakage. Discard any imperfect jars. Wash the jars, bands and lids in hot soapy water; rinse thoroughly. (You also can use a dishwasher.) HOT & STERILIZED JARS For hot jars, place the jars in a large kettle. Fill the jars and kettle with hot (not boiling) water that covers the jars by 1 inch; bring to a simmer over medium-low heat.
For sterilized jars, start by following the directions above, but bring the water to a boil. After boiling the jars for 10 minutes, turn the heat down so the water is at a simmer. For lids (hot jars and sterilized jars), heat water on low in a small saucepan. Add lids. Keep jars and lids in the hot water until ready to use. Bands just need to be dry and ready to use.
When youre ready to fill the jars, remove them with a jar lifter, emptying water into the kettle. Set the jars and lids on a clean kitchen towel. STERILIZED VS. HOT JARS Theres a reason some canning recipes call for hot sterilized jars while others call simply for hot jars. If the mixture will be processed for 10-plus minutes up to 1,000 feet above sea level, jars just need to be hot. (Add 1 minute for each 1,000 feet of additional altitude.) 
Fill Jars & Process
Prepare the recipe as directed. (Add 1 minute for each 1,000 feet of additional altitude.)


Fill Jars & Process
Prepare the recipe as directed.
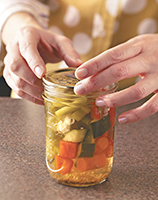
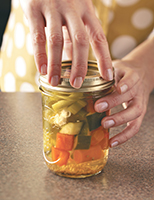
Ladle or pour the hot mixture into the prepared jars. Use a ruler to make sure youre leaving the recommended amount of headspace for expansion during processing. Remove air bubbles by sliding a nonmetallic utensil between the food and inside of the jar two or three times. Wipe the threads and rim of the jar with a clean, damp cloth. Place a warm lid on top of each jar with the sealing compound next to the glass. Screw a band onto the jar just until you feel resistance.
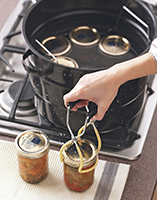
Immediately after filling each jar, use a jar lifter to place the jar onto the canning rack, making sure the jars are not touching. Using the handles on the rack, lower the filled rack into the canner. Add enough boiling water to the canner to cover jars by 1 to 2 inches. Cover the canner; adjust the heat to hold a steady rolling boil. Start counting the processing time when the water returns to a boil. If water level decreases while processing, add more boiling water.


