In memory of Marilyn Morse, my Morningstar,
who helped me find my authentic voice,
and for
Sheryl Reeder and Barbara Christenson,
my sisters of choice,
who always listen with their hearts.
Contents
Introduction
Lets Make a Quilt
Making a quilt has become the quintessential American pastime. Although in vogue during many different eras in our history, quiltmaking began its meteoric rise in more recent popularity during the 1976 American Bicentennial. Now its a beloved activity worldwide. Quilts appeal to our visual and tactile senses and to our need to create. If you love to sew and you love color and fabric, quiltmaking is tailor-made for you! And with new fabrics, new tools, and new techniques, its easier than ever.
If you have basic sewing skills and youve yearned to make a quilt, or you need a refresher course on basic quiltmaking, youll find what you need in this little handbook. If you havent sewn in a while, you may want to take a brush-up course in basic sewing techniques at your favorite fabric store or sewing machine dealership, or ask a more experienced sewer to help you. Why not enlist a sewing buddy to learn how to make a quilt with you it can be more fun when you share learning experiences and celebrate successes!
With a sewing machine, a few basic tools, and an assortment of colorful cotton fabrics, youre ready to get started. Before you know it, you will be making accurately stitched patchwork blocks to turn into pot holders, tote bags, small wall hangings, table toppers, and even larger lap- and bed-size quilts. You can practice the techniques shown in this book by making the blocks illustrated and then combine them into a quilt or use them to make several smaller projects. Make the nine sampler blocks illustrated in ).
Note that this book features lessons in making patchwork blocks with geometric pieces, which require straight seaming. Blocks with curved pieces or triangles with sharp points are not included, as these require learning to make and use templates, slightly more advanced techniques. Appliqu, a method of adding figurative pieces to the surface of the blocks and borders, is also reserved for another book.
When you know how to cut and sew together a few basic patchwork shapes and turn them into a quilt, you will have the confidence you need to expand your skills and make hundreds of other block styles for your quilting projects. In addition to basic block cutting and assembly, youll learn how to layer your finished quilt top with batting and backing, machine-quilt them together, and finally finish your project with binding and a label.
What Makes a Quilt a Quilt?
A traditional pieced quilt has three essential layers:
- Blocks, which may be joined with plain squares or other shapes to make the quilt-top center
- Filler, usually batting, or sometimes flannel or other fabric
- Backing, to cover the batting on the back of the quilt
In addition, you usually find the following on quilts:
- Quilting stitches to hold the layers together
- Binding to finish the edges
- Outer border (most quilts have at least one) and sometimes sashing strips and cornerstones that connect the block rows.
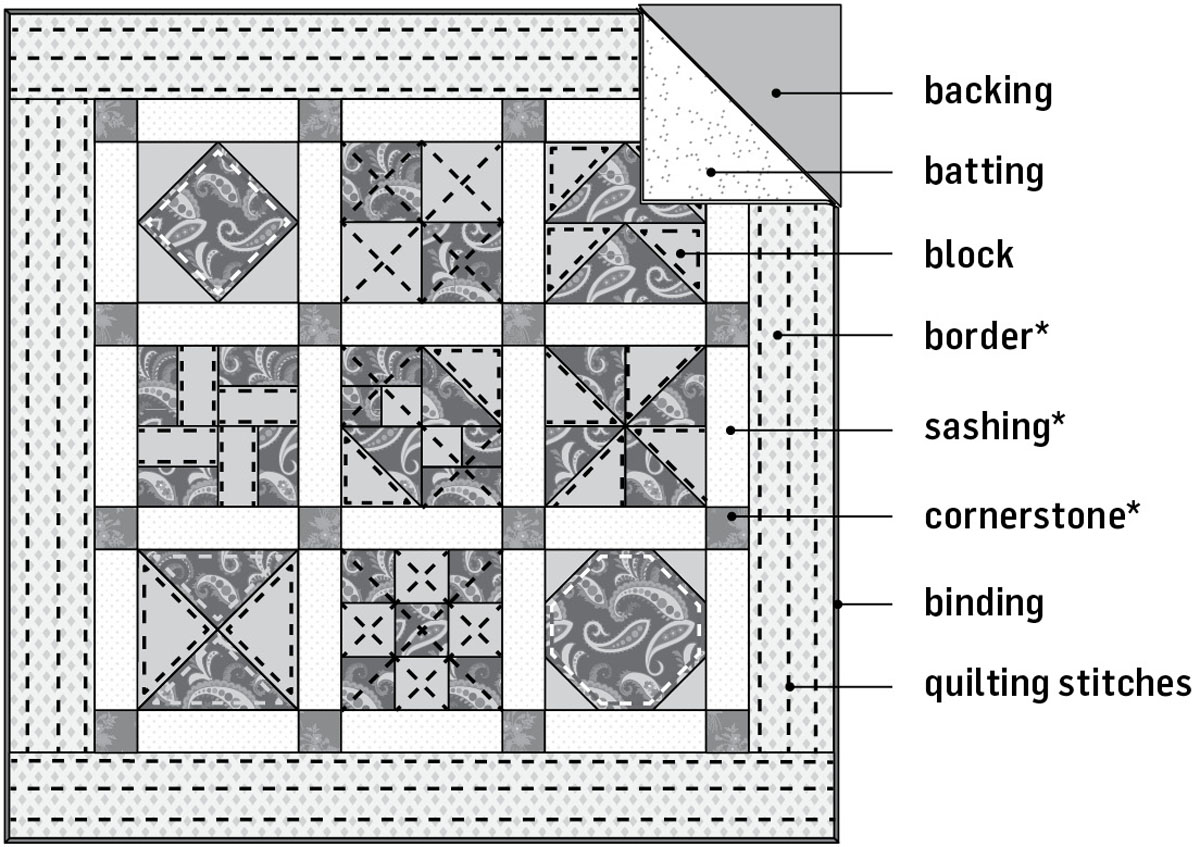
*Most quilts have borders; some have multiple borders. Not all quilts have sashing and cornerstones.
Chapter 1
Get Ready
You dont need a fancy machine to make a quilt, just one that is in good working order with well-adjusted tension. And you dont need a lot of new sewing skills. In fact, if you have made home-dec items or clothing, you probably already have most of the sewing skills you need! However, you may need to purchase some additional cutting and sewing tools that are specially designed to enhance and assist the quiltmaking experience.
If you can cut straight and stitch a straight, accurate "-wide seam allowance, you can make quilt blocks and sew them together to make a quilt top. Even your first machine-quilting stitches can be lines of straight stitching. You can graduate to more complex quilting designs after you are comfortable with basic machine quilting.
Gathering Tools and Supplies: The Quilters Toolbox
Like any hobby, quiltmaking requires special materials and tools designed for specific tasks. In times past, quilt pieces were cut with scissors from fabric leftovers, feed sacks, and worn clothing. Todays quiltmakers can choose from a dizzying array of quality quilters cottons. While patches were once sewn together and the quilting done by hand, todays modern tools and techniques make it easy to cut multiple pieces quickly and sew them together by machine. Piecing and quilting the layers together by machine is now more popular than piecing and quilting by hand because it takes less time and you can see the results sooner! Thats whats covered in this book.
As a sewer, you may already have most, if not all, of the tools you need. There are lots of new, innovative quiltmaking tools available, but you can make many quilt blocks using a few basic tools and techniques. Heres what you need to get started. Some will be shown in illustrations in the following chapters.
Sewing Machine and Accessories
- A well-maintained sewing machine makes piecing quicker and easier than sewing by hand.
- A " quilters presser foot assists in stitching accurate piecing seams.
- A walking foot or even-feed feature on your machine prevents layers from shifting when machine quilting and sewing on the binding.
- Size 75/11 or 80/12 sharp needles. Topstitch and Microtex needles are sharps; universal needles will work for your first projects, but sharps stitch through quilters cottons more easily for a finer seam and accurate, straight stitches. Special quilters machine needles with specially tapered points for accurate piecing are also available.
Cutting Tools
- An 18" 24" rotary cutting mat with self-healing surface is essential. It should have a printed grid of 1" squares to help with fabric and ruler alignment. (You may want to invest in a larger one later.)
- Standard or large heavy-duty rotary cutter. Todays cutters have many options: handle shape and design, color, quick-release blade changing, and self-retracting blades. Test several to determine what is most comfortable for your hand. (Note: Rotary cutting tools appear .)
- Acrylic rotary rulers provide an edge to cut along for accurate pieces. They are 1/8 " thick and come in an array of lengths and widths. They are marked in 1/8 " increments with many horizontal and vertical lines. Some have angled lines for help when cutting diamonds and sharp-pointed triangles. For your first one, invest in a 6" 24" acrylic ruler. This is a standard size that is essential for cutting strips; every quilter should have one. Its also good to have a 4" 12" ruler for cutting smaller pieces from the strips and a 6"-square rotary ruler to use when cutting small pieces.


