Steve Lage is owner and webmaster of Indoorclimbing.com and manages the web-site full time. His interest in climbing began back in 1976 as he was just starting an Air Force career. While stationed at the Air Force Academy in Colorado Springs, Colorado, he and his Air Force buddies would slip off to the Garden of the Gods for rock climbing every chance they got. He continued in the Air Force and was assigned to civil engineering as an engineering assistant. While on active duty he completed his degree in computer science at Chapman University. At about that same time, the new sport of indoor climbing was emerging. In 1998 he used his engineering experience and computer knowledge to provide the first online source for how to build a home climbing wall. He has personally built several home climbing walls, including those featured in this book, and he spearheaded the approval and construction of a racquetball-conversion climbing gym while stationed in Germany. Steve retired from the Air Force following a thirty-year career. He remains active in many outdoor pursuits. He especially enjoys day hiking, camping, and outdoor and indoor climbing.
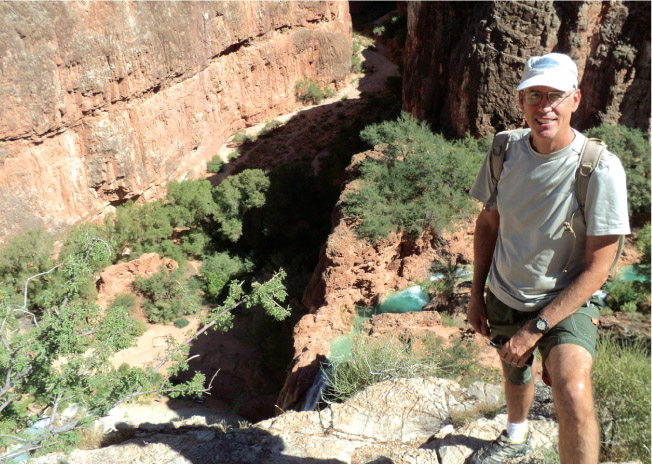
Author Steve Lage hiking near the Grand Canyon.
Appendix A
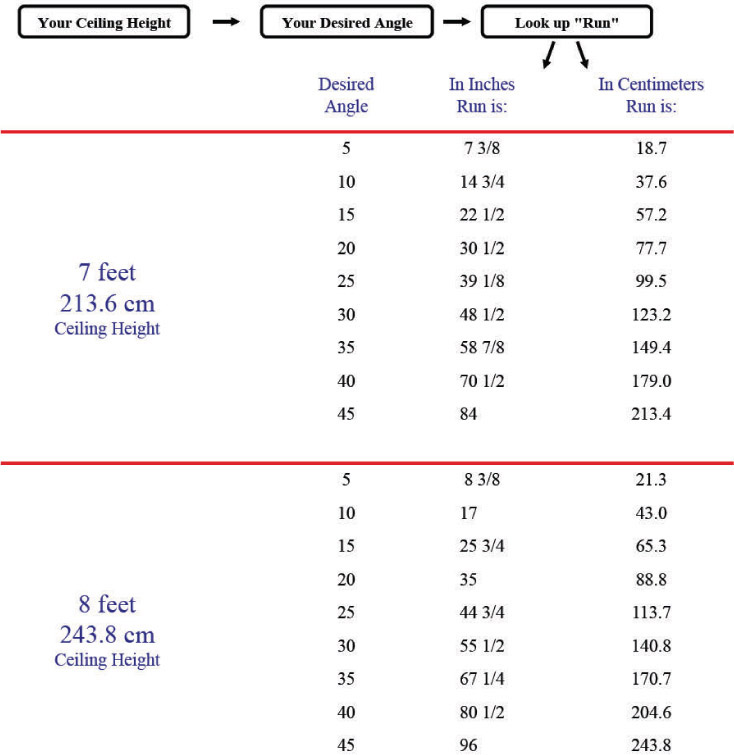
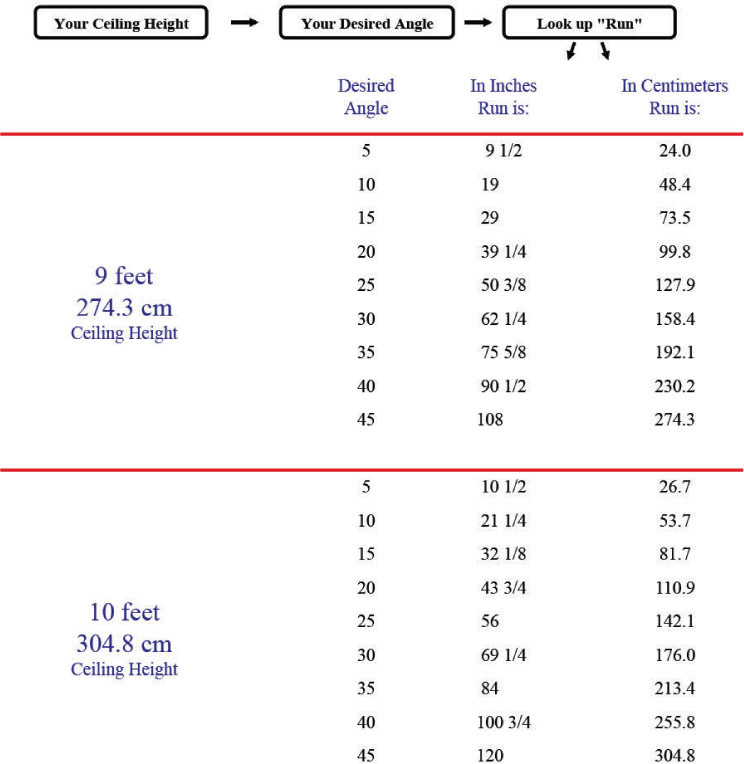
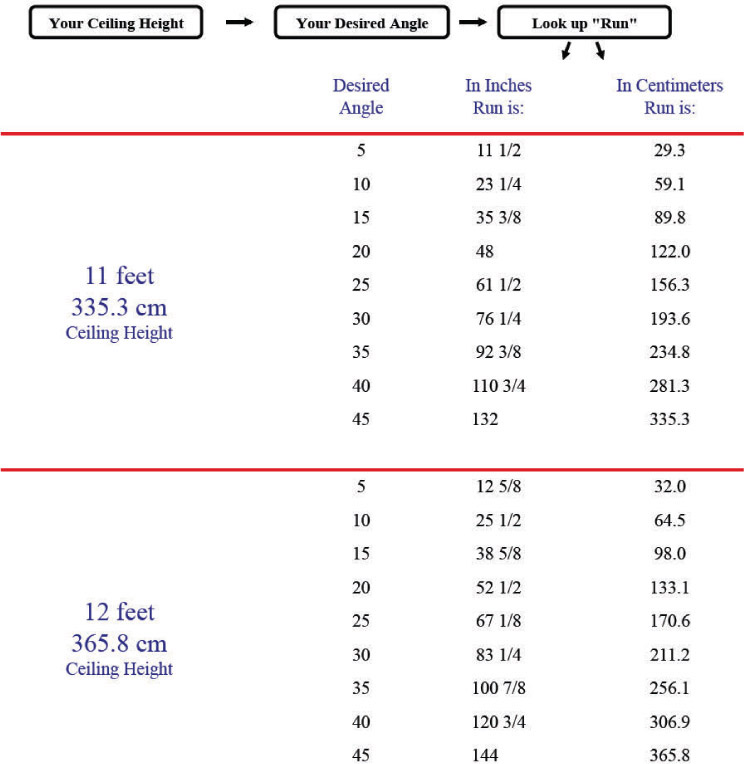
Rise-Run Chart
M easure the height of your interior walls. Decide what angle you want your climbing wall to be. Find the applicable ceiling height, then the desired angle. To the right of the desired angle is the run, the distance from the wall on the ceiling where the climbing wall will be anchored. When anchored to the floor at the base of the wall, it will create the desired inclined angle.
You can improve accuracy of your angles and measurements by using the online calculator at www.indoorclimbing.com/riserun.
T he first and most important step in the process is planning. In fact, you need to plan to plan. Set the time aside for this important first step. Ben Franklin said, If you fail to plan, you plan to fail. If theres one thing you should get out of this section, it is to take the extra time required for careful planning.
Planning comes down to this: Whats the purpose? Then design a wall that fulfills it. Easy, right? Dont be in a hurry to get started. Actually answer the question. Whats the purpose, why do I actually want a climbing wall? Heres how you do that.
Is your wall for training or just casual enjoyment? For kids or just you? You may know where you want to improve, or you may know the type of climbing you will be doing. Various features on a climbing wall will require you to master a particular skill. So if you want to improve in a certain area, make yourself a climbing wall with the features that require that skill set.
Here are common climbing wall features, with the corresponding skills needed for those features.
VERTICAL OR NEAR-VERTICAL WALLS
Vertical walls are good for beginning climbers, but advanced climbers can gain a lot from this type of wall too. Anyone wanting to improve endurance, balance, lock-offs, cross-throughs, gastons, sidepulls, flagging, matching hands or matching feet, high steps, backsteps, and toe pulls will benefit from working out on vertical walls. With interesting features, ledges, and protrusions added, vertical walls can be made challenging for experienced climbers as well as beginners. For children the lower sections can be built with a nearly vertical or even positive incline. The higher sections can be overhung with smaller holds for advanced climbers to use. A vertical wall will provide excellent climbing for young kids, as well as novice and more advanced adult climbers alike.
MODERATELY OVERHANGING WALLS
Dynamic movement, like dynos and lunges, can be practiced best on walls with a moderate overhang. Training to improve dynamic movement does not require features or texture. This type of overhang uses a great deal of upper body strength and will help improve those muscles. Climbing moves like the knee-drop and heel hook can be improved on a moderately overhanging wall.
STEEP OVERHANGING WALLS
A steep overhanging wall will help you focus on improving your upper body strength and torso, back, and leg strength. The most effective training on this type of wall is short bursts of maximum exertion in two or three sets. You dont need height or distance. All you need is enough space to do a circuit on a steep overhang. You can learn or improve swinging the lower body from left to right as you move your feet from hold to hold. This movement will completely change your orientation on the wall. Heel hooks also can be practiced on steep overhanging walls. Roof, cave, and overhead climbing can be improved with steep overhanging walls, and these walls can also help you improve your ability to use and stick underclings. Undercling holds are usually placed lower, relative to the foot position. This type of hold uses an entirely different set of muscles. If you need practice with under-clings, a steep overhanging wall will help. Be aware that a steep overhang does require more floor area for the fall zone than other types of climbing walls.
HEIGHT OF THE WALL
Usually home climbing wall heights are limited by the ceiling. From about the end of World War II to the mid-1990s, the standard home ceiling height was 8 feet. In the mid-to late 1990s, builders began constructing 9-foot ceilings. PreWorld War II homes and some of the newer high-end homes have 10- and 12-foot ceilings. Basement ceiling height, or basement joist height, is usually around 7 feet. Basement heights vary from place to place and builder to builder.
.
WHAT IF YOUR PURPOSE IS PURELY RECREATIONAL?
If your purpose for building a climbing wall is purely recreational, you may want to incorporate several vertical sections, a moderately overhanging section, and a steeply overhanging ledge transitioning between them. Be creative and include features such as caves, stalactites, columns, and artes to add interest and wow your guests. A training wall may not need many features to meet its intended purpose, but as long as the features do not inhibit training, there is no reason to leave them out.
After you decide what type of climbing wall you need, start sketching the ideas and concepts that have the features you want. Sketching will help you define the 3-D shape, and when finalized will aid in developing a materials and equipment list. The sketch is your construction blueprint, with dimensions, measurements, and assembly notes. It should contain all the details of the cuts, angles, and individual piece sizes.
Rather than sketching your plan on paper, you may find it easier to use computer-aided design (CAD) software. If you plan on drawing your model using CAD, I recommend one capable of 3-D modeling. In my opinion, SketchUp is the most intuitive and easiest to learn, free, and runs in a modern desktop browser. The online SketchUp version is located at app.sketchup.com. You can save your model online, upload it to the 3-D Warehouse, or download it to your hard drive. As you plan your project, make sure you have enough space to actually assemble it and that you have a large-enough fall zone.


