paper home 
paper home
Beautifully unique origami projects ESTHER THORPE

Contents
Introduction
Itd be impossible to put a date on it, exactly when my obsession with making things from paper began. Even when I was at preschool I remember endlessly making paper homes for my cuddly toys. My parents were brilliant at encouraging me to be creative, even though creativity wasnt something that came naturally to them. My mum would frequently take me to exhibitions both locally and further afield, and I distinctly remember being struck by the beautiful work of Bridget Riley on a visit to the Tate Gallery in London. This sparked my fascination with geometric pattern, and with Bridget Riley books, of which I have a library! At school, art, design and maths were my favourite subjects, and when I went to university to study graphic design, I discovered that origami marries these three passions together beautifully. Throughout my degree and since, I have enjoyed stretching myself with more and more complex models and still find there is nothing more satisfying than transforming 2D square sheets into 3D models.
I live in a small seaside town in the south east of England, with my husband, daughter and two house rabbits, Hugo and Florence (my paper offcuts nibblers!). I enjoy being a mummy by day and a ninja folder by night. I find origami truly addictive and I hope my book will inspire you too. There are projects of varying levels of difficulty: some are straightforward and quick to complete, while others are a little more time consuming, but well worth the effort. If you are a novice, the Triangular Basket or the Star Garland is a good place to start. Mastering projects that use a similar origami technique is also a good way to develop your folding skills; for example, the Photo Holder, the Cube (Geometric Mobile) and the Vase are all based on the same origami module (the sonobe).
Feel free to dip in and out the photo step-by-steps should make it easy to pick up where you left off. I also find a good cup of coffee and a little background noise helpful when getting my fold on! Whatever works for you, relax and enjoy your creative process. 


The Importance of Paper
If youre not already obsessed with beautiful papers, once you start folding, therell be no stopping you! When looking for papers to fold, there are a few practicalities to consider. If you want to make the projects using the exact same papers as I have, .
What will happen to the papers pattern once it is folded? Generally speaking, its best to opt for a small pattern so the design gets celebrated in the finished project rather than lost in the folds.
How many intricate folds are involved in making my chosen project? Each project will require different paper densities, defined by the gsm (grams per square metre).
For lots of delicate folding the birds on the Crane Mobile, for example a lighter weight paper (90gsm) is best, but a project requiring the paper to hold its structure the Lampshade, for instance will need a heavier paper (120gsm). Is the paper available in the size I need? Packs of origami paper are readily available in craft stores in the most frequently used sizes, from standard 15 x 15cm (6 x 6in) squares to smaller 7.5 x 7.5cm (3 x 3in) or larger 25 x 25cm (10 x 10in) sheets. Can I use paper not specially made for origami? There are so many beautiful papers available it would be a crime to limit yourself to origami papers only. Other brilliant papers include flat wrap, maps, out-of-date calendars, scrapbook and graph paper. How do I know what gsm a paper is? When a gsm is not specified for the paper you want to use if using recycled papers, for example you may not be sure of its weight. Compare it to a paper in your collection that you do know the gsm of.
And, if you still arent sure, simply give it a go youll soon discover if the paper you have chosen is the right thickness (or not!) for your chosen project. How can I cut non-standard papers to size? While scissors can be used to trim paper squares and strips to size, you will find that a guillotine is invaluable for cutting paper accurately; if you have one of these, even if only an A4 sized one, most papers will be adaptable for use. What other tools do I need? The answer is, not a lot, but there are a few things that will come in handy: scissors, for cutting ribbon, hook-and-loop tape and double-sided tape; ribbon, for hanging finished projects (3mm wide satin ribbon is most useful as it is narrow enough to be threaded); a large-eyed sewing needle, for threading hanging ribbons; and quick-drying glue, for when origami models need to be secured in place.
How to Fold
Origami, like so many things in life, takes practice to perfect, so take a little time to hone your folding techniques. Always work in a well-lit room. If youre not blessed with daylight, grab a lamp and pop it beside you folding is so much more enjoyable when you can see what youre doing.
Relax and have fun!
ACCURATE FOLDS
It might sound obvious, but making your folds as accurate as possible is fairly crucial. Attention to folding detail will pay off by the end of your model.
Folding in half horizontally and vertically: It is important to ensure the edges of your paper are perfectly aligned before making a fold. Pinch down in the centre and continue the fold out to the edges.
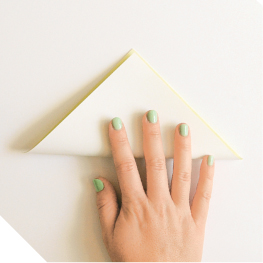
 Folding in half diagonally:
 When folding diagonal folds, the paper can occasionally misbehave and slide out of place, so it is crucial to begin by lining up the two opposing corners.
TIP / Dont be afraid to refold if the precreases arent in the right place, you may not achieve the results you want, so get it right before its too late.
On this completed sonobe module, the two outer folds are mountain folds and in the centre there is a valley fold.
MOUNTAIN AND VALLEY FOLDS
Throughout the book I refer to mountain and valley folds.
MOUNTAIN AND VALLEY FOLDS
Throughout the book I refer to mountain and valley folds.
The best way to understand this terminology is to think quite simply if the paper is acting as a mountain or a valley. When creating a mountain fold, the models uppermost side is exposed when folded; when creating a valley fold, the models uppermost side is enclosed in the fold. 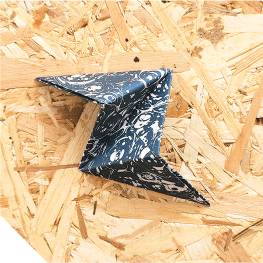
INVERSE FOLDS
One of the trickier folds to master is inverse folding. This is where precreases in the paper are inverted on themselves, as you can see being worked here. This is one half of the Party Diamonds model.
Next page


![Marcia Joy Miller - Origami for Busy People: 27 Original On-The-Go Projects [Origami Book, 48 Papers, 27 Projects]](/uploads/posts/book/151502/thumbs/marcia-joy-miller-origami-for-busy-people-27.jpg)


 Folding in half diagonally: When folding diagonal folds, the paper can occasionally misbehave and slide out of place, so it is crucial to begin by lining up the two opposing corners. TIP / Dont be afraid to refold if the precreases arent in the right place, you may not achieve the results you want, so get it right before its too late.
  On this completed sonobe module, the two outer folds are mountain folds and in the centre there is a valley fold.