Everyone should know that anything technical, including electricity, involves a lot of complicated physics and if I wanted to I can talk about how things really happen down to the atomic level. But for the sake of understanding, Im keeping it as simple as I can so I can teach only what you need to know and get to working on electrical problems as soon as possible, just accept that the way Im explaining it is just for your ease. Otherwise this book would be way too long and you would NOT want to read it all. But my methods and examples do teach and WILL work in the real world for real life electrical issues.
This book is the first book of the Everything Electrical series that will aim to teach you how you too can use your electrical meters like a pro.
Ch. 1: Introduction To Multi-meters: Manual, Auto Ranging and Analog

A multi-meter is an electrical testing tool that combines many different kinds of electrical meters into one. The different symbols on the multi-meter represents a meter setting that measures something completely different from other settings. The placement of the dial indicates what meter setting you are on. There are three very different multi-meters I will introduce. The Analog multi-meter, the Manual multi-meter and the Auto-Ranging multi-meter. The way you actually test something with either of these multi-meters is basically the same, the difference is in the setup before testing.
Lets go ahead and look at the faces of each multi-meters to see what they look like and note all the important factors about each of them.
Analog:
The Analog multi-meter was the first multi-meter to come out many decades ago. In this multi-meter, the unit of measure AND the unit range must be manually selected via the dial on the meter.

(To use this meter you have to move the dial to the unit you want to measure as well as the exact range you expect to measure in. In this multi-meter, the measurement display is shown as a moving needle through a number wheel placed in the back of the needle.)

(As you can see around the dial, there are many unit settings to choose from. One thing to note on this meter is the color of the setting. For example, the capital DCV is a unit called direct volts or DC volts and has many different ranges under it. It include the 10 volt, 50 volt, 250 volt and 1000 volt ranges. All these ranges belong under one unit of measure, the DC volt. Another example is the blue unit mA or milliamps. This unit has dial ranges that include the 5mA, 50mA, 500mA, etc. All these ranges belong under one unit of measure the milliamp. )
Ranges are best defines as the maximum number value that you can measure while being in that unit range setting you are on. For example, in the 10 volt range setting the meter will only be able to measure up to 10 volts. If what you are measuring anything that is over 10 volts, the meter will either display an over limit reading or simply nothing at all. The meter requires you to know more or less how much of the unit you will expect to measure before you will measure.
Tip for Selecting Ranges: If you own one of these meters or a similar meter that requires you to manually select ranges, the best way to use these and not have to worry so much about what ranges to choose is to start at the highest setting first. If when measuring, the number value measured on the needle display is too small to read you should move down one range, for a better resolution.
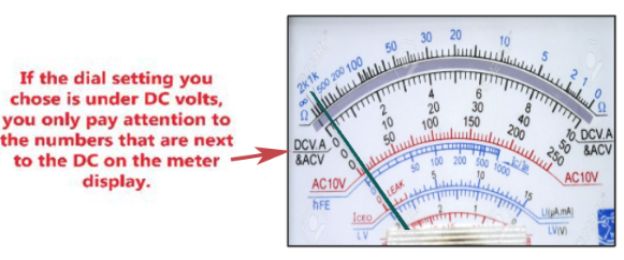
(This is the measurement display. After you have chosen your unit and range, next is to pay attention to only the number values that match your unit selected.)
Using the Analog Meter:
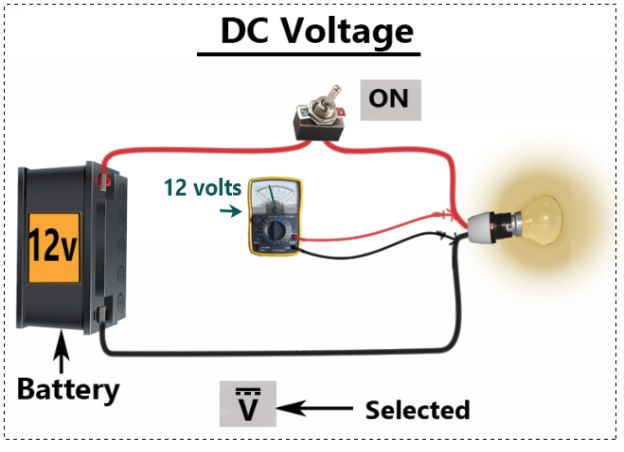
(In this illustration you see an example of the analog meter connected to a light circuit. To get a voltage reading make sure the test probes are touching the inside of the wire as touching only the insulation is not enough. You can also use the metal terminals of electrical devices as test points for the meters test probes. I will elaborate more on this later..)
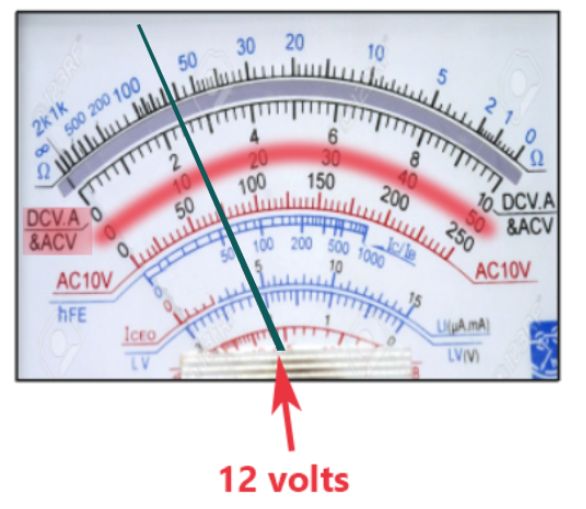
(Here you see the example of our analog meter and what it displayed during use. The unit of measure selected was the Dc Volts. The range has also been set to the 50 volt range setting since the electrical system runs on 12 volts according to this circuits battery. The 10 volt range setting would be inappropriate to use since its too low of a range for this voltage measurement and the needle would display the maximum value.)
The following illustration is what the display would have looked like if the too low a range would have been selected
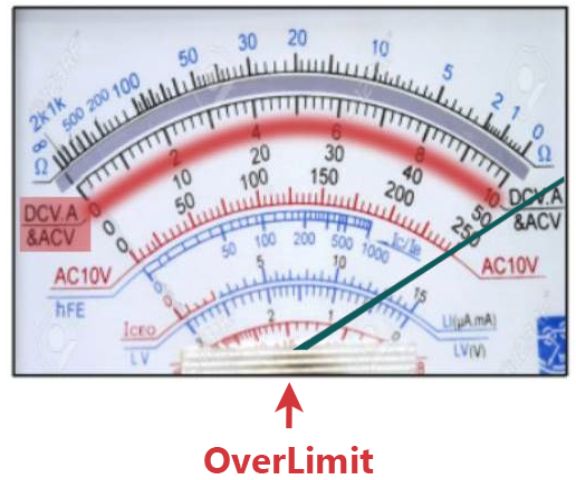
(Too low a range setting. Move up one range for better resolution.)
Manual Ranging:
The Manual Ranging multi-meter is a lot like the analog meter. In this multi-meter, everything is also manually selected via the dial and depending on your range setting the maximum measureable value is also indicated. For Example: If you are on the 200v setting, you are only allowed to measure up to 200v. Any measurement above 200v cannot be read and will be displayed as OL over the limit. To correct this, you must select a range setting higher than the reading you expect or just continue to move the dial to a higher setting until a solid measurement is seen.


