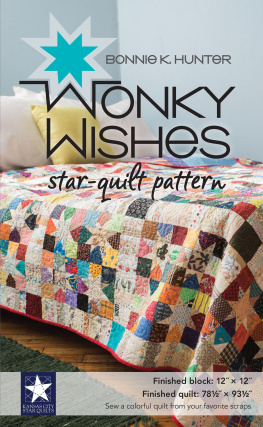
Publisher: Amy Marson Creative Director: Gailen Runge Editor: Liz Aneloski Technical Editors: Nanette S. Zeller and Alison M. Schmidt Design Direction: Kristy Zacharias Cover Designer: April Mostek Page Layout Artist: Casey Dukes Production Coordinators: Zinnia Heinzmann and Tim Manibusan Production Editor: Alice Mace Nakanishi Illustrator: Aliza Shalit Photo Assistant: Sarah Frost Style photography: Page + Pixel Studio photography: Diane Pedersen Published by Kansas City Star Quilts, an imprint of C&T Publishing, Inc., P.O. Box 1456, Lafayette, CA 94549 Wonky Wishes Finished block: 12 12 Finished quilt: 78 93 Every scrap-lovers dreama place for all of your precious pieces! Wonky stars dance on a field of colorful scrap squares, separated by bands of neutral low-volume string piecing. Let your imagination run wild with fabric and color placement, and rememberif its still ugly, you just didnt cut it small enough! 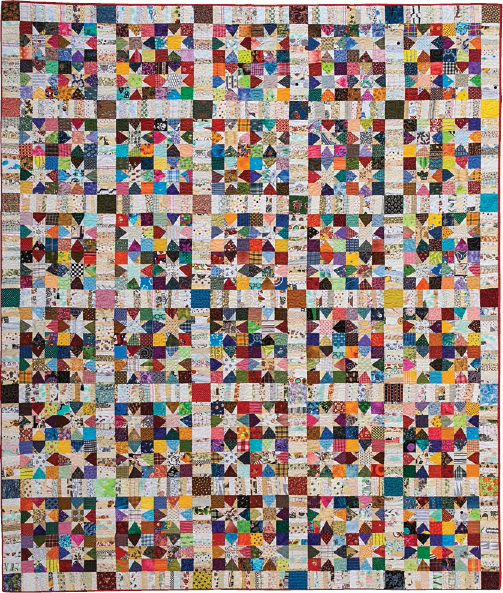 Wonky Wishes Quilt Basics SUPPLIES Sewing machine in working condition with presser foot Rotary cutter with new blade, a mat, and a ruler (Note: A 6 6 square and 6 12 rulers are helpful.) Pins Thread (Note: I find a light gray works well when sewing through multiple colors.) Scissors Seam ripper Iron and ironing board PRESSING HINTS As you work with your scraps to make star-point units, some of the edges may be trimmed on the bias and will be prone to stretching. Handle the cut pieces as carefully as possible.
You can use spray starch before trimming the units to help keep any bias from stretching or warping. Any bias edges will be stabilized by seams when the units are joined together. Follow the arrows for pressing to encourage nested seams. The sashings will have many seams, so do the best you can to press them the way they want to go. Sometimes, I will choose to the press seams open in extensively bulky areas, but I prefer to press to one side, if possible. MATERIALS Yardage is based on 40-wide fabric.Assorted dark scraps in a variety of colors: 5 yards total Assorted light neutral fabrics from white to cream to beige: 6 yards total Binding: yard red print, for double-fold binding Batting: 85 100 Backing: 7 yards Foundation paper: 36 sheets 8 14 (I use Carol Doaks Legal-Size Foundation Paper by C&T Publishing.) CUTTING Assorted dark fabrics Cut 960 squares 2 2 for star backgrounds.
Cut 42 squares 3 3 for cornerstones. Assorted light neutral fabrics Cut 480 squares 2 2, slicing squares in half on the diagonal from corner to corner to yield 960 star-point triangles. NOTEIf you have small leftover neutral scraps and cut off triangles from other projects, these may be used in place of the star-point triangles. They do not have to be precisely cut to cover the corner of a base square. Cut 120 squares 2 2 for star centers. (I like to include a few colored squares for fun.) Cut strips into random widths from to 2 for string-pieced sashing. Strips should measure at least 10 long.
Shorter strips can be joined end to end to create the desired length. Cut enough to get going; cut more variety as needed. Binding Cut 10 strips 2 width of fabric. Construction Seam allowances are , unless otherwise noted. Follow the arrows for the pressing direction. Star-Point Unit Place a triangle across one corner of a background square with right sides together as shown. Sew with a seam.
Figure A 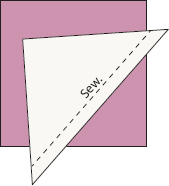 A. Cover one corner and sew. Press the triangle back over the corner of the background square, making sure the triangle completely covers the corner of the background square. Figure B
 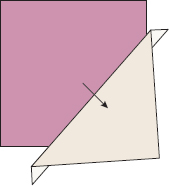 B. Press. Trim the excess even with the edges of the background square. Trim to remove excess background fabric from behind the star point, leaving a seam allowance. Figure C
 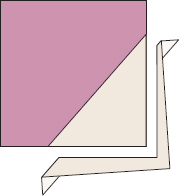 C. Trim excess fabric.
Repeat Steps 13 to add a second triangle to the adjacent corner. The star-point units should measure 2 2 square. Make 480 star-point units; 4 per star. Figures D & E 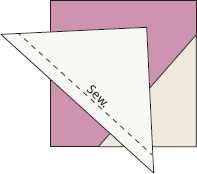 D. Add second triangle.
 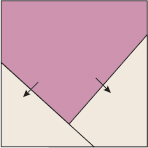 E. Star-point unit; make 480. Star Assembly Lay out the Star Points, Star Centers, and background squares in a nine-patch format.
Join the units into rows, then join the rows to form each star. The star units should measure 6 6 square. Press as shown. Make 120 star units. 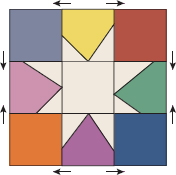 Star unit; make 120. Wonky Wishes Block Join 4 stars to create one Wonky Wishes block, measuring 12 12 square.
Press as shown. Make 30. 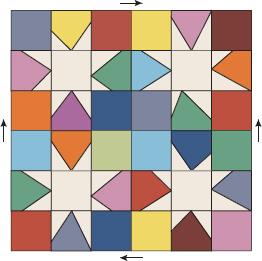 Wonky Wishes block; make 30. String-Pieced Sashings The sashings are created by covering sheets of foundation paper with the narrow strips of fabric. The paper adds stability and keeps the fabric from bunching, shifting, or warping during piecing. Adjust your sewing machine stitch length to a smaller stitch (1.5 or approximately 18 stitches per inch).
Lay the first light neutral fabric strip, right side up, centered on an 8 14 sheet of foundation paper. Place the second strip, right side down, on top of the first. The strips should lay across the paper slightly overhanging both side edges. If desired, angle the placement of the strips. Stitch along the second strip, using a seam. Trim the first fabric, if necessary, to leave a seam allowance.
Press to one side. Figure A 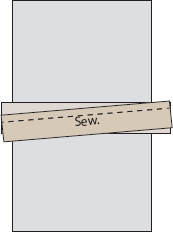 A. Sew 2 strips, right sides together. Continue to add strips to each side of the center strip until the paper is completely filled. Figure B
 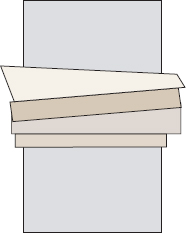 B. Continue adding strips to cover paper. NOTES Tilting and leaning the strips with wonky angles adds more charm.Shorter strips may be joined end to end for a length long enough to reach across the paper. Let seams fall where they may! Trim the excess fabric beyond the paper.
Cut 2 sashing strips 3 wide along the length of the paper. Figure C 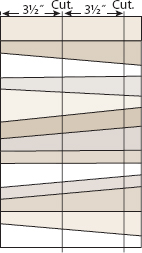 C. Cut sashing strips from string-pieced panel. Trim the sashing strips to 12 in length. Repeat Steps 36 to make 71 sashings 3 12. Remove the paper. Assembling the Quilt Lay out the blocks, sashings, and cornerstones, as shown in the quilt assembly diagram.
Join the units into rows, pressing seams toward the blocks and cornerstones. Join the rows to complete the quilt top. Press. 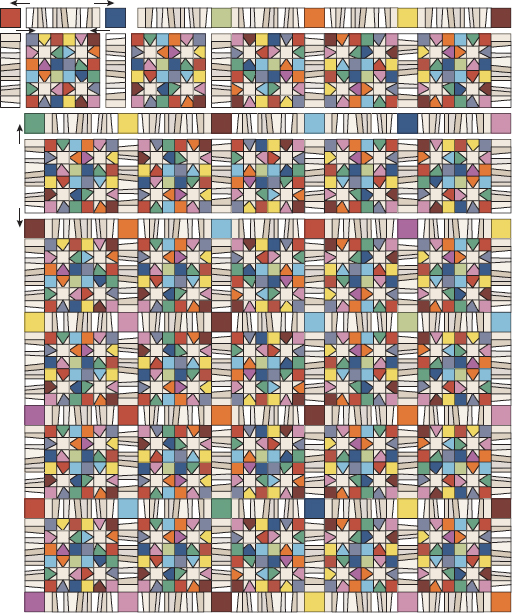
Next page

 Wonky Wishes Quilt Basics SUPPLIES Sewing machine in working condition with presser foot Rotary cutter with new blade, a mat, and a ruler (Note: A 6 6 square and 6 12 rulers are helpful.) Pins Thread (Note: I find a light gray works well when sewing through multiple colors.) Scissors Seam ripper Iron and ironing board PRESSING HINTS As you work with your scraps to make star-point units, some of the edges may be trimmed on the bias and will be prone to stretching. Handle the cut pieces as carefully as possible.
 A. Cover one corner and sew. Press the triangle back over the corner of the background square, making sure the triangle completely covers the corner of the background square. Figure B
  B. Press. Trim the excess even with the edges of the background square. Trim to remove excess background fabric from behind the star point, leaving a seam allowance. Figure C
  C. Trim excess fabric.
 D. Add second triangle.
  E. Star-point unit; make 480. Star Assembly Lay out the Star Points, Star Centers, and background squares in a nine-patch format.
 Star unit; make 120. Wonky Wishes Block Join 4 stars to create one Wonky Wishes block, measuring 12 12 square.
 Wonky Wishes block; make 30. String-Pieced Sashings The sashings are created by covering sheets of foundation paper with the narrow strips of fabric. The paper adds stability and keeps the fabric from bunching, shifting, or warping during piecing. Adjust your sewing machine stitch length to a smaller stitch (1.5 or approximately 18 stitches per inch).
 A. Sew 2 strips, right sides together. Continue to add strips to each side of the center strip until the paper is completely filled. Figure B
  B. Continue adding strips to cover paper. NOTES Tilting and leaning the strips with wonky angles adds more charm.Shorter strips may be joined end to end for a length long enough to reach across the paper. Let seams fall where they may! Trim the excess fabric beyond the paper.
 C. Cut sashing strips from string-pieced panel. Trim the sashing strips to 12 in length. Repeat Steps 36 to make 71 sashings 3 12. Remove the paper. Assembling the Quilt Lay out the blocks, sashings, and cornerstones, as shown in the quilt assembly diagram.